Template Development GuideLast Updated: 22/3/2024

Introduction

Taguchi’s Javascript templates transform a set of source data (recipient details, request information, and activity content defined in the Taguchi UI) into an output document for delivery via email or SMS, or for display over the web.

A Javascript template is a packaged set of scripts, views and other content that conforms to the CommonJS 1.1 module specification. To facilitate code re-use and streamline management of families of related templates, Taguchi provides baseline template code that implements object-oriented approaches such as inheritance and mix-ins.

The interface between Taguchi and a template module consists of a series of handlers for specific events in a request’s lifecycle. The base templates (from which custom templates are expected to inherit) define a full set of handlers, and custom templates can add or override handlers as required.

Taguchi Javascript templates are created in Mimeformat, a library-based, authenticated system allowing you to generate MIME documents based on data submitted in JSON files.

Taguchi

Getting Started

When provisioning your Taguchi account, an example template will have been created for you. To access this template, create a new activity (or click on an existing activity), then click the “Choose…” button next to the template name at the top of the edit interface. Click the ”Edit…” button under the template preview tile; the template editor (Mimeformat.it) will open in a new tab.

You can also launch Mimeformat.it in the Settings > API Tokens section of v4, or the Settings > Templates section in v5.

The template editor displays the template’s README.md file when first loaded; the rendered documentation for the template is shown in the preview pane on the right-hand side of the interface. When developing a template, you should document your code in this file to ensure others are able to maintain the template and make revisions as necessary.

Other files can be edited using the drop-down menu at the top of the editor view. When editing a file other than README.md, the preview area on the right will display the template output (as HTML) and update in real time as you change the code.

For more information on Mimeformat.it, see the Mimeformat.it section within this documentation.

Developing Email Templates

Coding email templates is no different to coding websites in the late 90's. Think tables and inline CSS. Fortunately, there are many kinds of template 'hacks' to use to assist with bringing your email template up to date (such as responsive CSS/tables).

A few things to keep in mind:

  • Taguchi templates are standard 600px wide for desktop (560px with 20px padding) and 320px wide for mobile (280px with 20px padding). We recommend not exceeding 800px width for desktop view when coding your template.
  • Keep it grid based. No complicated floats or positioning. Remember that tables are your best friend.
  • Compress any images used in your template to ensure quick loading and smaller email sizes. Cut up larger images in to smaller images to aid in email load flow.
  • Assume images will be automatically blocked by popular mail clients (Outlook, Apple Mail, Gmail etc...), include alternative text and strict dimensions for all images.
  • One big sliced image may be pretty, but does not work well with responsive email design. Try coding repetitive sections of your email into the template.
  • Use fonts such as Arial, Verdana, Georgia, and Times New Roman in your templates, or if you are using font-face embedded fonts, ensure you have a matching backup font as a fallback for those email client's that don't support font-face (such as Outlook).
  • Avoid HTML5 (video included), embedded Javascript and Flash elements, try using compressed GIF's for animations.
  • Design around the desktop and mobile experience. Find out what sort of email clients and devices your subscribers use, and tailor towards the majority.

Template Best Practices

Keep these in mind when developing a Javascript template:

  • Use tables for your layout, ensure any complicated structures utilise nested tables.
  • Use element attributes such as cellpadding, cellspacing, valign and width/height to manipulate your table/row/cell dimensions.
  • Keep your CSS simple. Avoid shorthand HEX colour codes (such as #FFF, rather than #FFFFFF) and complex selectors (such as descendant, child or sibling selectors, and pseudo-elements).
  • CSS should always be inline, do not call an external css file. This file will not render correctly in most versions of Outlook and is ignored by some web mail clients.
  • Use media queries to increase text size for smaller screens and make the email mobile responsive (if designs permit).
  • Test on as many email clients and devices possible. If you do not have any test environments available, you can utilise a service such as Litmus to generate proofs in various clients/devices.

Taguchi v4 API Tab 
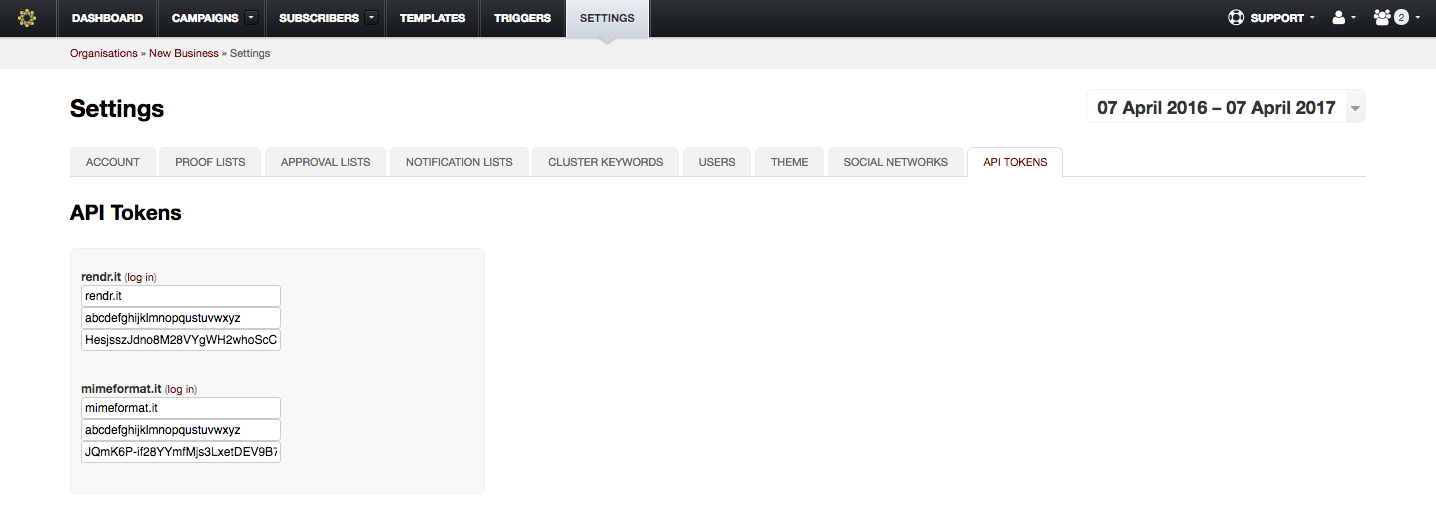
In v4: Navigate to your Settings > API Tokens tab to gain access to Mimeformat.it or Rendr.it

Taguchi v5 Templates Tab 
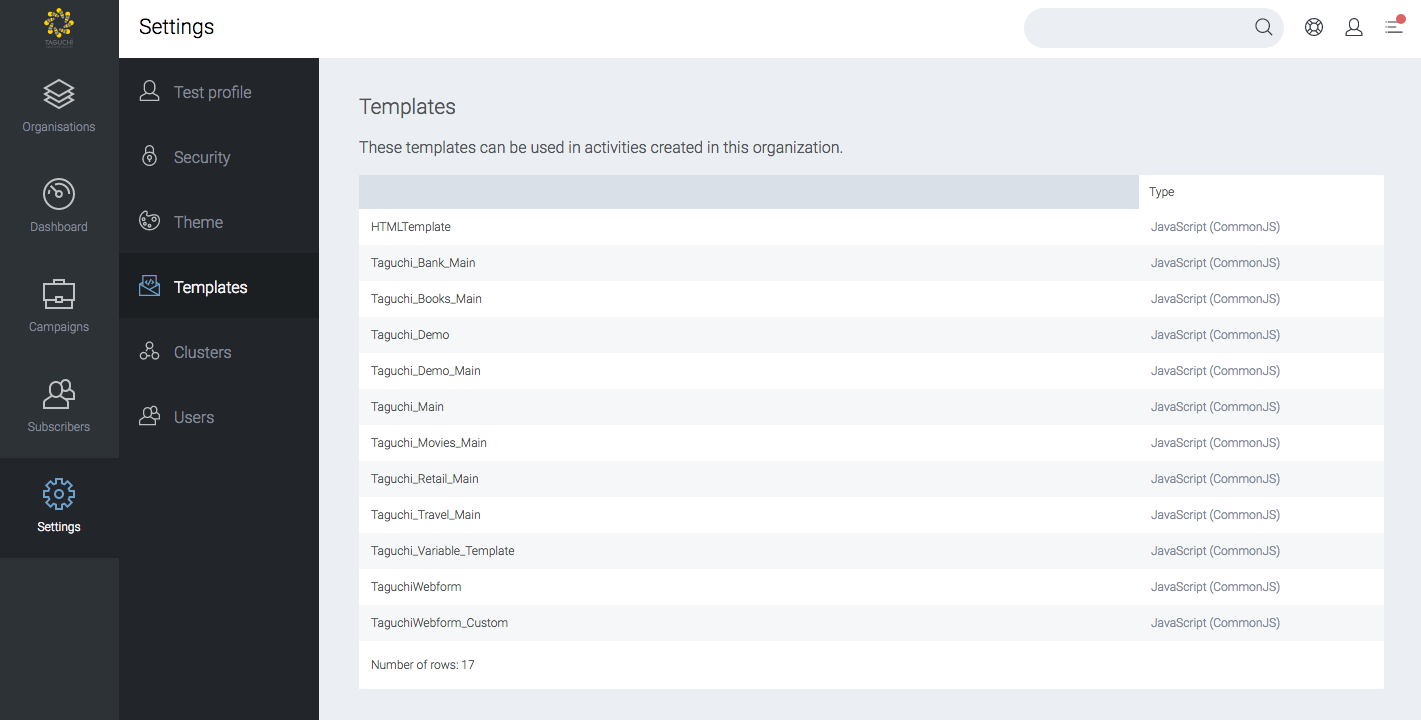
In v5: Simply navigate to Settings > Templates to see a list of Mimeformat.it templates available. Click on a template to launch it in Mimeformat.it.

Common Template Files

The following are required to form the base template.

datadescription.xml

A template's Data Description determines the content structure of activities created using the template. An activity is composed of one or more channels, each containing zero or more items.

Each item comprises of many different attributes and content fields. Each of these fields will be displayed under a channel item as an input field when displayed within the activity edit interface.

Template Element

The data description is defined within the <template> element.

  • template

    The parent element.

    <template label="My Template" type="email"></template>

    Show Attributes
    • label

      The name of the template.

    • type

      The type of template (options are: email, web or sms)

Channel Elements

Channels are displayed in the template as separate sections with a dropdown field (which consists of items). A channel has three default fields (title, pubDate and description).

  • channel

    A channel element.

    <channel type="content" label="Content" hide="title pubDate description"></channel>

    Show Attributes
    • type

      A unique identifier for the channel.

    • label

      A label displayed at the top of the channel in the UI.

    • hide

      Used to hide any of the default fields within the channel.

Item Elements

Items are displayed within channels and are typically used to define a section within the outputted template (for example an item could be a Hero Image, Article Block or similar).

  • item

    An item element.

    <item type="hero" label="Hero Image" closed="yes" summary="alttext"></item>

    Show Attributes
    • type

      A unique identifier for the channel.

    • label

      A label displayed at the top of the channel in the UI.

    • closed

      yes/no. Will the item be collapsed/closed by default?

    • summary

      The field used to display a short summary of the item block (this is displayed next to the block label in the UI).

Content/Attribute Fields

These fields can be placed within the <template> element, within a <channel> element or within an <item> element.

  • text

    A standard single line text input.

    <content type="text" name="title" label="Title" />

    Show Attributes
    • name

      The name attribute is used to reference the input field and should be unique to the parent item.

    • label

      The field label displayed before the field.

    • default

      The default/initial populated value of the item.

    • infotext

      A popup information box for additional visual information about the field, useful for explaining what the field does to the end user.

  • opttext

    A standard single line text input with added functionality for multiple variants for A/B and multivariate testing.

    <content type="opttext" label="Subject" name="subject" />

    Show Attributes
    • name

      Alphanumeric. The name attribute is used to reference the input field and should be unique to the parent item.

    • label

      Alphanumeric. The field label displayed before the field.

    • default

      Alphanumeric. The default/initial populated value of the item.

    • infotext

      Alphanumeric. A popup information box for additional visual information about the field, useful for explaining what the field does to the end user.

  • longtext

    A multi-line textarea.

    <content type="longtext" name="description" label="Content" rte="yes"/>

    Show Attributes
    • name

      Alphanumeric. The name attribute is used to reference the input field and should be unique to the parent item.

    • label

      Alphanumeric. The field label displayed before the field.

    • default

      Alphanumeric. The default/initial populated value of the item.

    • infotext

      Alphanumeric. A popup information box for additional visual information about the field, useful for explaining what the field does to the end user.

    • rte

      yes/no. Whether or not the field should be Rich Text Editor or WYSIWYG Editor enabled.

  • hidden

    A hidden input field.

    <content type="hidden" name="color" default="blue" />

    Show Attributes
    • name

      Alphanumeric. The name attribute is used to reference the input field and should be unique to the parent item.

    • default

      Alphanumeric. The default/initial populated value of the item.

  • boolean

    A checkbox input simulating true/false values depending on the checked state.

    <attribute type="boolean" name="notoppadding" label="Remove top padding?" default="no" />

    Show Attributes
    • name

      Alphanumeric. The name attribute is used to reference the input field and should be unique to the parent item.

    • label

      Alphanumeric. The field label displayed before the field.

    • default

      yes/no. The default/initial populated value of the item (boolean uses yes/no for its checked state).

    • infotext

      Alphanumeric. A popup information box for additional visual information about the field, useful for explaining what the field does to the end user.

  • file

    Image/CSV file upload input.

    <content type="file" name="image" label="Image" />

    Show Attributes
    • name

      Alphanumeric. The name attribute is used to reference the input field and should be unique to the parent item.

    • label

      Alphanumeric. The field label displayed before the field.

    • default

      Alphanumeric. The default/initial populated value of the item.

    • infotext

      Alphanumeric. A popup information box for additional visual information about the field, useful for explaining what the field does to the end user.

  • select

    A dropdown select box with options.

    <content type="select" name="color" label="Select a color">
       <option value="#000000">Black</option>
       <option value="#ffffff">White</option>
    </content>

    Show Attributes
    • name

      Alphanumeric. The name attribute is used to reference the input field and should be unique to the parent item.

    • label

      Alphanumeric. The field label displayed before the field.

    • default

      Alphanumeric. The default/initial populated value of the item (match the value id of the option you wish to select).

    • infotext

      Alphanumeric. A popup information box for additional visual information about the field, useful for explaining what the field does to the end user.

  • color

    A HEX color code popup selector.

    <attribute type="color" name="textcolor" label="Font Color" default="#ff0000" />

    Show Attributes
    • name

      Alphanumeric. The name attribute is used to reference the input field and should be unique to the parent item.

    • label

      Alphanumeric. The field label displayed before the field.

    • default

      HEX color code. The default/initial populated value of the item.

    • infotext

      Alphanumeric. A popup information box for additional visual information about the field, useful for explaining what the field does to the end user.

  • cluster

    A dropdown box for Taguchi's cluster functionality (see user guide for more details).

    <content type="cluster" name="cluster" label="Cluster" />

    Show Attributes
    • name

      Alphanumeric. The name attribute is used to reference the input field and should be unique to the parent item.

    • label

      Alphanumeric. The field label displayed before the field.

  • segments

    A select box for Taguchi's content segmentation functionality (see user guide for more details and see this guide for how to implement segmentation).

    <content type="segments" name="content-segment" label="Restrict to segments" />

    Show Attributes
    • name

      Alphanumeric. The name attribute is used to reference the input field and should be unique to the parent item.

    • label

      Alphanumeric. The field label displayed before the field.

<template label="My First Template" type="email">
    <content type="opttext" name="subject" label="Subject" />
    <channel type="content" label="Content" hide="title pubDate description">
        <item type="hero" label="Hero Image" closed="yes" summary="alttext">
            <content type="file" name="image" label="Image (600x350)" />
            <attribute type="text" name="imgheight" label="Image Height (w/o px)" />
            <content type="text" name="alttext" label="Alt text" />
            <content type="text" name="link" label="Link URL" />
            <attribute type="hidden" name="nopadding" label="Remove row padding?" default="yes" />
            <attribute type="select" name="mobilewidth" label="Mobile width">
                <option value="mobile-full">Full-width</option>
                <option value="mobile-hide">Hide on Mobile</option>
            </attribute>
            <content type="cluster" name="cluster" label="Cluster" />
        </item>
    </channel>
</template>

An example of a valid Data Description with a subject line field (with optimization enabled), a content channel and hero image item.

main.js

Templates always contain a main.js file, which acts as the interface between Taguchi and the template code. The default content of this file depends on the template’s name.

Breaking down the sample main.js file provided, we can give a line-by-line explanation as follows:

/*global require: false, module: false, id: false, uri: false */

Templates are JSLinted in real-time, with warnings displayed as line notes. These declarations are necessary to tell JSLint about the global variables available to the template script.

var template = require('template'),

The CommonJS module specification defines a require function, which is used to load functions and variables exported by a module into a variable.

This line makes the template module (which is built in to Taguchi) available via the template variable.

GenericHTML = template.define('GenericHTML')
                      .basedOn('BaseEmail');

The template.define function is used to create a new template object called GenericHTML, which is based on the BaseEmail template. There is little point in defining multiple template objects within a single template module, so this should be the only time template.define is called in your code. The return value of template.define is a new template instance; the basedOn method of that instance is called with the name of the “parent” template (BaseEmail).

The basedOn method should only be called once, as it makes the new template instance a derived template of BaseEmail. Template derivation is similar to subclassing in that the new template instance inherits its behaviour from its parent template (BaseEmail), and individual handlers, views or configuration properties can be overridden as necessary.

A variable called GenericHTML is used to refer to the new template instance.

Note that the name passed to template.define must be the same as the name of the template (displayed in the navigation bar of the editor). Templates cannot be re-named once created.

It is permissible to change the name of the template variable, but as that makes the template code less clear it is strongly discouraged.

module.exports = GenericHTML;

CommonJS modules expose functionality via the module.exports variable; any code which includes this module via require will have access to the properties of the module.exports object. There is no reason that line should be changed.

GenericHTML.request(function(request, response) {
    this.BaseEmail.fromAddress = "from@example.com";
});

This defines a request handler function, which is run for each request prior to calling the request-specific handler(s). Each template may have its own request handler, and the template system guarantees that the request handler for a template’s parent will be called before its own. In this case, the request handler defined in the BaseEmail parent template, BaseEmail.request, will run prior to GenericHTML.request; if another template (NewTemplate) were to be derived from GenericHTML, the sequence of handlers would be BaseEmail.request -> GenericHTML.request -> NewTemplate.request.

The request handler should be used to set up template configuration variables for the current template and its parents. In the above example, the handler configures this.BaseEmail.fromAddress, which is a property exposed by BaseEmail that sets the From header of the output email.

If the template is named (for example) “GenericHTML” the content is as follows:

/*global require: false, module: false, id: false, uri: false */

var template = require('template'),
    // Create a new template based on an existing template type.
    GenericHTML = template.define('GenericHTML')
                          .basedOn('BaseEmail');

// Make the template available to the running application.
module.exports = GenericHTML;

// Register an on-request handler for this template, which can be used
// to make template-specific configuration changes or perform
// calculations used in views.
GenericHTML.request(function(request, response) {
    this.BaseEmail.fromAddress = "from@example.com";
});

package.json

This file is part of the CommonJS module specification, and is used to identify a package and its dependencies. In most cases this file will not need to be modified.

test/sample.json

The sample.json file contains an example request used to generate the template’s preview. This request has the same structure as requests generated by Taguchi, and can be modified to test personalization and customization options.

Taguchi’s activity edit UI can output JSON-formatted requests with whatever activity content you configure; you can copy a request from the activity edit UI to the template UI by selecting “Debug info” from the preview format drop-down and copying the text under the “Request JSON” heading.

{
    "config": {
        "hostname": "www.taguchimail.com",
        "mta": "clients.taguchimail.com"
    },
    "content": {
        "subject": "Sample Subject Line",
        "text": "This is the plain text part",
        "channels": {
            "content": {
                "items": [
                    {
                        "type": "hero",
                        "image": "http://placehold.it/600x300",
                        "width": "1/1",
                        "mobilewidth": "mobile-full",
                        "alttext": "Lorem ipsum dolor sit amet",
                        "imgwidth": "600",
                        "nopadding": "yes"
                    }
                ]
            }   
        }
    },
    "id": "app1.1.1234abcd",
    "recipient": {
        "email": "email@example.org"
    },
    "ref": "send",
    "protocol": "smtp"
}

Above is an example of a sample.json file structure.

views/html.html

All template views should be stored in the views directory. The html.html view is used by BaseEmail to construct the HTML version of the email; any content placed in here will appear in the output email.

The Taguchi activity edit UI stores the HTML content created by the user in request.content.html; request.content is bound to this in top-level templates (html.html and text.txt), so it's available here via this.html.

This code finds the </body> tag in the HTML content, and inserts a Taguchi open rate tracking pixel immediately prior to it. Without the tracking pixel in place, Taguchi is unable to display open rates; we insert it via the template because users often forget to insert tracking code themselves.

{%! renderString(this.html) %}

The renderString function is used to parse a string (in this case, the activity’s HTML content) and execute any JavaScript template blocks within it. This function is covered in the Views section.

Calling this function and using the return value as the HTML version of the email allows the full set of personalization and conditional content functionality supported by JavaScript templates to be accessed by the activity’s HTML content.

<html>
    <head>
        <style>
        /* Desktop Style
        ********************************************************/

        .body {

        }

        /* Mobile Style
        ********************************************************/

        @media only screen and (max-device-width: 500px) {

            .body {

            }

        }
        </style>
    </head>
    <body leftmargin="0" topmargin="0" marginwidth="0" marginheight="0" yahoo="fix" bgcolor="#ffffff">
        <!-- Open-rate tracking image -->
        <img src="{%= analytics.openTrackingImage(template.BaseEmail.baseURL, request.id) %}" width="10" height="1" alt="{%= this.description %}" />
            <table width="100%" cellpadding="0" cellspacing="0" align="center" bgcolor="#eeeeee">
                <!-- Display the approval header, if present -->
                {% if (this.header) { %}
                    <tr>
                        <td bgcolor="#fffbd9" align="center" class="wrapper">
                            <table width="{%= template.SampleEmail.width %}" align="center" class="wrapper">
                                <tr><td style="font-family: arial, sans-serif; font-size: 12px; height: 32px;" align="center">This is a proof message. If you wish to comment, you may do so <a href="{%! this.header %}">here</a>.</td></tr>
                            </table>
                        </td>
                    </tr>
                {% } %}
                <tr>
                    <td>
                        <table width="{%= template.SampleEmail.width %}" cellspacing="0" cellpadding="0" class="wrapper" align="center" bgcolor="#ffffff">
                            <!-- View online url -->
                            <tr>
                                <td class="viewonline" height="32">
                                    Is this email a mess? <a href="{%= template.SampleEmail.viewOnlineURL %}" target="_blank">View the online version.</a>
                                </td>
                            </tr>
                            <!-- Content -->
                            <tr>
                                <td class="wrapper" id="content">

                                </td>
                            </tr>
                        </table>
                    </td>
                </tr>
            </table>
        </div>
    </body>
</html>

Above is an example of a HTML file with the tracking image, proof header and view online link.

views/text.txt

This view generates the plain-text version of the email. Here we just copy the activity’s plain-text content.

Views

Our Javascript Template uses a template language allowing arbitrary JavaScript to be mixed with HTML or plain text, similar to the approaches used in PHP and ASP. JavaScript code is placed within start and end tags; when the view is run, all code outside the JavaScript tags is treated as string data and output verbatim, while the JavaScript code is executed and may perform functions including preventing specific content from being output, or outputting dynamic content based on the request object.

Basic Syntax

While the JavaScript end tag is always %}, our Javascript Template provides three start tag options:

  • {% indicates the start of a JavaScript statement block; you can include any JavaScript code you wish between this and the end tag, including if statements, for loops, and function definitions.
  • {%= indicates the start of a JavaScript expression; the JavaScript code following will be evaluated, and the result will be HTML-escaped and concatenated onto the template output at the location of the tag.
  • {%! indicates the start of a JavaScript expression with no output escaping; the code following will be evaluated and the result will be concatenated onto the template output with no escaping at all.

Outside of those tags, everything in the view is treated as arbitrary textual data encoded as UTF-8. Typically the content would be either HTML or plain text, but aside from the HTML-escaping applied to {%= blocks there is no special treatment of these content types.

Examples

A block of HTML can be conditionally included in the output by wrapping it in a pair of {% blocks containing an if statement:

{% if (recipient.email.indexOf("@hotmail.com") !== -1) { %}<p>Hi hotmail user!</p>{% } %}

Output content can be repeated by using regular JavaScript loop constructs in conjunction with {% blocks:

Hotel Rating: {% for (var i = 0; i < this.hotelStars; i++) { %}*{% } %}

The content of a variable can be escaped and output using the {%= block:

<p>Hi {%= recipient.firstname %}!</p>

More complex expressions can also be included:

<a href="http://www.example.org/unsubscribe?email={%= escape(recipient.email || "") %}">Unsubscribe</a>

If a content object includes pre-formatted HTML, be sure to use a {%! block to output it without escaping:

<table>{%! this.tableRows %}</table>

Default Views

Templates based on the BaseEmail template have two views by default, corresponding to the text/html and text/plain MIME parts of the output email.

These views are located in the files views/html.html and views/text.txt, and can be overridden in derived templates by changing the views/html.html and views/text.txt files added to the template by default.

Template Functions


render

The render function allows one view to call a different view, and optionally manipulate its output. In conjunction with a <%! block, the render function will simply render the called view and concatenate its output to the calling view's output at the location of the tag; if additional control is desired, something like the following can be used:

{%
    var items = render('list', this).split("\n");
    /* Some additional processing here... */
%}
{%! items.join("<br/>") %}
  • viewName: The name of the view to render, which is the same as the name component of the view file path excluding the file type suffix. For example, views/list.html would be named list.
  • content: The context object for the called view, i.e. the object referred to as this. If not present, the context object for the called view will be the same as the context object of the calling view.
Usage
render(viewName [, content])


renderString

In some cases, the request content includes templates of its own; this can arise if fields in the request content need to reference fields in the recipient object. There are a number of ways to implement this, including simple string replacement (e.g. {%= this.title.replace("FIRSTNAME", recipient.firstname) %}) and the use of a template library like mustache.js, but for consistency mimeformat provides access to its own template logic via the renderString function.

  • templateString: The string to compile and render. The template string syntax is identical to the syntax for view files.
  • content: The context object for the template, i.e. the object referred to as this. If not present, the context object for the template will be the same as the context object of the calling view.
Usage
renderString(templateString [, content])

Analytics & Tracking

Taguchi JS templates automatically support click tracking. There are also some useful functions to add to your template to add such things as Google Analytics.

Taguchi Click Tracking

Click tracking is enabled by default. This means any url's in a tags will automatically have Taguchi tracking appended to it. This tracking will reflect within your reports and activity results.

If you wish to disable click tracking for a particular URL, simply add {notrack} immediately after the URL. An example is below.

<a href="http://example.com{notrack}">Sample Link</a>

Email Open Tracking

In order to record opens against activities, you will need to append the Taguchi email open tracking pixel in your email template. Failure to include this will result in no opens being recorded against your broadcasted activities using this template.

Simply include the following code at the beginning of your email (just after the <body> tag).

<img src="{%= analytics.openTrackingImage(template.BaseEmail.baseURL, request.id) %}" width="10" height="1" />

Custom Click Tracking (Google Analytics or similar)

Taguchi JS templates can be configured to handle custom click tracking (such as appending utm_ params to your URL's).

The following code will append Google Analytics compatible utm parameters to any URL. This code should be placed within your main.js file under the request handler.

this.ResponsiveEmail.appendURLwithAnalytics = function(url, content) {
    var analyticTags = '';
    var tempUrl = url;
    var analyticscampaign;
        if (!(/^(mailto:|tel:)/.test(url))) {
            var content = content ? content : 'newsletter';
            var symbol = (url && url.indexOf('?') === -1) ? '?' : '&amp;';
            var anchorIndex = url.indexOf("#");
            var isAnchorLink = (anchorIndex != -1) ? true : false;
            var anchorLink = (isAnchorLink) ? url.substring(anchorIndex) : '';
            if (isAnchorLink) {
                tempUrl = url.substring(0, anchorIndex);
                analyticTags = symbol + 'utm_source=taguchi&amp;utm_medium=email&amp;utm_campaign=edm' + request.activityId + '&amp;utm_content=' + content + anchorLink;
            } else {
                tempUrl = url;
                analyticTags = symbol + 'utm_source=taguchi&amp;utm_medium=email&amp;utm_campaign=edm' + request.activityId + '&amp;utm_content=' + content;
            }
        }
    return tempUrl + analyticTags;
};

Then within your views/ files when linking a URL, rather than just parsing the url value, parse the url value using the function as shown below.

{%= template.ResponsiveEmail.appendURLwithAnalytics(this.link, 'test') %}

Segmentation

Segmentation allows you to define specific items within your template to segmented subscribers. The target expression engine is used to define these segments.

For example, you may be sending an email to all of Australia but you wish to show a hero image specific to each state. You could create segments for each state, hero image items for each state and define the segments to their correlating hero image item to achieve subscriber specific segmentation (e.g. The ACT hero image would have the ACT subscriber segment selected and so on).

To achieve this, you will need to modify your datadescription.xml file and your html.html file.

In your data description file, add a new channel for segmentation. This will allow the user to create new segments and define a target expression for that segment:

<channel type="segments" hide="title pubDate enclosure description link" label="Segments">
    <item type="segment" label="Segment" closed="yes" summary="name">
        <content type="text" name="name" label="Name" />
        <content type="targetexpression" name="targetexpression" label="Target Expression" />
    </item>
</channel>

In order to define the segment to each item, add the following to any items in your data description:

<content type="segments" name="content-segment" label="Restrict to segments" />

This will add a select box which will auto-populate any segments created within an activity using this template.

In your html.html file, you will need to add the following to your content item sequence code:

var segments = JSON.parse(this['content-segment'] || '[]');

var recipientSegments = recipient.segment || {};
if (segments.length && segments.filter(function(x) { return recipientSegments[x] ? true : false; }).length === 0) {
    return;
}

This will hide the item if it does not match the selected segment, and will show the item if the segment matches.

Segment An example of segments shown in the Segments channel of your data description when displayed in the UI.

Segment An example of an item with the segment field.

A/B Testing and Optimization

JavaScript templates automatically support A/B and multivariate testing as well as Taguchi dynamic optimization.

A/B testing refers to a simple split test in which two (or more) pre-defined sets of content are used. That is, if an email were to be configured with three subject lines and three calls to action, subject line 1 would be associated with call to action 1, subject line 2 would be associated with call to action 2, and subject line 3 would be associated with call to action 3.

Item based optimization

By default, the subject line field supports any number of split-test alternatives. The template may also enable testing of item blocks (added via the “add item…” menu) by adding an alternatives="yes" attribute to the relevant item element(s) in the template’s data description.

Multivariate testing

Multivariate testing refers to a test in which every possible combination of content is tested against every other combination. Using the above example of three options for subject line and three for call to action, a multivariate test would involve nine combinations of content:

  • Subject line 1 with call to action 1;
  • Subject line 2 with call to action 1;
  • Subject line 3 with call to action 1;
  • Subject line 1 with call to action 2;
  • Subject line 2 with call to action 2;
  • Subject line 3 with call to action 2;
  • Subject line 1 with call to action 3;
  • Subject line 2 with call to action 3;
  • Subject line 3 with call to action 3.

Multivariate tests can easily involve huge numbers of combinations: a test with four subject lines, four hero images, four sets of article copy and four calls to action would involve 256 combinations of content. Taguchi doesn’t impose a hard limit on the number of combinations, but there’s generally little point in sending more than one combination for every 10,000 people in your database.

To avoid user confusion, templates use A/B testing unless multivariate testing is specifically enabled. This can be done by adding the following markup to the template’s data description, inside the <template> element:

<attribute type="boolean" label="Enable multivariate testing" name="multivariate" />

This adds a checkbox switching between A/B and multivariate testing to the activity edit interface.

For example, if the data description for a template were as follows:

<template label="Catalogue">
    <attribute type="text" label="WebTrends Global Tag" name="webtrends" />
    <channel type="productgrid" label="Products">
        <attribute type="file" label="Products Header Image" name="productheader" />
        <attribute type="boolean" label="Display Grid Borders" name="borders" />
        <item type="product" label="Product" closed="yes">
            <attribute type="text" label="Product SKU" name="sku" />
            <content type="text" label="WebTrends Tracking ID" name="webtrends" />
            <content type="text" label="Price" name="price" />
            <content type="file" label="Brand Logo Image" name="productbrandimage" />
            <content type="text" label="Brand Logo Alt Text" name="productbrandalttext" />
            <content type="file" label="Call-out Label Image" name="calloutlabel" />
            <content type="text" label="Call-out Label Alt Text" name="calloutalttext" />
        </item>
    </channel>
</template>

Enabling testing on the “Product” item type is as simple as adding alternatives="yes" to <item type="product"...>:

<template label="Catalogue">
    <attribute type="text" label="WebTrends Global Tag" name="webtrends" />
    <channel type="productgrid" label="Products">
        <attribute type="file" label="Products Header Image" name="productheader" />
        <attribute type="boolean" label="Display Grid Borders" name="borders" />
        <item type="product" label="Product" closed="yes" alternatives="yes">
            <attribute type="text" label="Product SKU" name="sku" />
            <content type="text" label="WebTrends Tracking ID" name="webtrends" />
            <content type="text" label="Price" name="price" />
            <content type="file" label="Brand Logo Image" name="productbrandimage" />
            <content type="text" label="Brand Logo Alt Text" name="productbrandalttext" />
            <content type="file" label="Call-out Label Image" name="calloutlabel" />
            <content type="text" label="Call-out Label Alt Text" name="calloutalttext" />
        </item>
    </channel>
</template>

Debugging

Since templates allow the full power and flexibility of JavaScript, debugging a template issue can be challenging. Taguchi’s template editor addresses this by leveraging the debugging tools built into modern browsers; WebKit-derived browsers such as Chrome and Safari are recommended.

Template editor debugging

The first step in debugging is to check your source files for errors. Taguchi runs JSLint as you edit code, and errors or warnings will be displayed at the left next to the relevant line number. You should fix any errors or warnings that appear, as they may have effects in other parts of the code which will complicate identification of errors.

The next step is to open your browser’s debugger (or web inspector). Template errors will log messages in your console which may help you to trace the source of the error; in particular, the editor will indicate whether the fault occurred at load time (e.g. due to a syntax error in your main.js, a view, or in sample.json) or at run time (e.g. due to a logic error or undefined variable access).

You can cause your browser to break at the location of the error by navigating to the mimeformat.context.js script file in your browser’s debugger or resources pane, and setting a breakpoint on line 95 (var result = null; in the function mimeformat.debugInContext). Make a change to one of your script files to force the template to run (adding a single space is sufficient); when the breakpoint is hit, enable your browser’s “break on all exceptions” feature. Click “Continue” (the play/pause button); the browser will run the template up to the location of the error, which should allow you to identify the cause and resolve the problem.

If you need to debug faults that do not trigger exceptions, for example the wrong data being displayed, the simplest approach is often to insert console.log statements within the template. The content passed to a view can be logged by inserting the following code within the view file (change the view name as appropriate):

{% console.log("View XYZ: ", this); %}

Alternatively, you can set a breakpoint within a view (or indeed anywhere else) by adding the following code:

{% debugger; %}

Activity editor debugging

Debugging a template from Taguchi’s activity edit UI is somewhat more complex; generally it’s expected that if a problem is discovered in the Taguchi activity UI, the request JSON causing the problem will be copied into the template’s test/sample.json file so that further debugging can take place within the template editor as described above.

To access the request JSON in the activity editor, select “Debug info” from the “Display:” menu at the top right of the preview pane, and copy the JSON data in the “Request JSON” field.

However, it’s possible to use the browser’s debugger within the activity editor as well: navigate to the mimeformat.context.js script in your browser’s debugger or resources pane, and set a breakpoint on line 58 (var mfcontext = {}; in the mimeformat.runInContext function). Change the preview mode or make a change to the activity content to force the template to run, and once the browser breaks in mimeformat.runInContext enable your browser’s “break on all exceptions” feature and click “Continue” (the play/pause button).

Obviously as it’s not possible to change the template code from the activity editor, only the identification of the problem can occur in this environment.

Remember that a template must be deployed after saving before the changes will take effect in Taguchi; in addition, you must re-load the Taguchi activity edit UI to obtain the latest version of a template after making changes.

Mimeformat.it

Mimeformat is a template engine designed to generates MIME documents based on data submitted in JSON files. Email, SMS and Web templates can be created for ease of use for the Taguchi digital marketing system. This enables you to create complex templates, but with a simple, user-friendly front-end interface for those with limited or no technological or programming skills.

Each Taguchi organisation is assigned a Mimeformat.it library. The templates created within that library are accessible within that organisation's activities.

Accessing Mimeformat.it with V4

You can access your assigned Mimeformat.it library within Taguchi V4 by heading to the Settings page in the top navigation bar, then clicking the API Tokens tab.

Your Library ID is located in the first text field, and your Secret Key is in the last text field. You can choose to load your library in Mimeformat.it using the log in link, or by using your Library ID and Secret Key in the Mimeformat.it UI by clicking the title button in the top left corner, and click Load library....

Accessing Mimeformat.it with V5

You can access your assigned Mimeformat.it library within Taguchi V5 by heading to the Settings page in the left navigation bar, then clicking the Templates tab.

Each template is listed in this view, you can edit the template by simply clicking the template name. The Mimeformat.it UI will launch in a new window/tab.

Creating a new template

To create a new template within your Mimeformat.it library, simply load the Mimeformat.it UI and click New Template in the top right corner.

A popup modal window will appear, simply insert a name/ID for your template and click the Create Template button. This name/ID will form part of the template’s URL, and must be a valid JavaScript identifier. The ID cannot be modified once the template is created.

Deploying a template

Once you are ready to deploy your template live, ensure you save all changes, then when the Deploy button becomes active, simply press it. Your template will deploy live and will be available for use within the assigned Taguchi organisation.

Rendr.it

Rendr.it enables you to create images based on HTML, CSS and JavaScript snippets, as well as externally-hosted scripts or images. The final image can be customised via URL parameters or query strings.

Each Taguchi organisation is assigned a Rendr.it library and CDN enabled URL to retrieve Rendr.it images.

Accessing Rendr.it with V4

You can access your assigned Rendr.it library within Taguchi V4 by heading to the Settings page in the top navigation bar, then clicking the API tab.

Your Library ID is located in the first text field, and your Secret Key is in the last text field. You can choose to load your library in Rendr.it using the log in link, or by using your Library ID and Secret Key in the Rendr.it UI by clicking the title button in the top left corner, and click Load library....

Accessing Rendr.it with V5

Rendr.it is currently inaccessible through V5. Please access it through V4 or contact Taguchi Support for further information.

Creating a new image

To create a new image within your Rendr.it library, simply load the Rendr.it UI and click New in the top right corner.

A popup modal window will appear, simply insert a name/ID for your image and click the Create Rendr button. This name/ID will form part of the image’s URL, and must be a valid JavaScript identifier. The ID cannot be modified once the image is created.