- Support Home
- Knowledge Base
- Web Forms
- How do I add reCAPTCHA to a webform?
Related articles
Need some help?
If you have questions or can't find what you're looking for, we're here for you.
Taguchi Support is available Monday to Friday, 9am - 5:30pm AEDT.
Create New TicketTaguchi Certified Training
Join our free and live online training sessions. You'll benefit from a better understanding of the platform's features and functionality. Plus with Taguchi Certified Rewards, every session you attend, you're not just learning - you're earning your way to some fantastic rewards.
About Taguchi Certified RewardsAPI Version 5
Did you know Taguchi has an API that supports all of the functionality provided by the admin interface and more?
Explore API Documentation
Thanks for your feedback!
How do I add reCAPTCHA to a webform?
Users can add a reCAPTCHA block to webforms built in Taguchi to validate the entry of submissions. ReCAPTCHA is a security service provided by Google, designed to prevent fraud attacks on websites and mobile apps.
There are several steps for a user to add a reCAPTCHA block to a form built in Taguchi.
- Setting up a reCAPTCHA service in Google
- Adding the reCAPTCHA secret key in Taguchi
- Adding a reCAPTCHA block to your webform
- Testing the reCAPTCHA functionality
1. Setting up a reCAPTCHA service in Google
reCAPTCHA is a Google service that first needs to be configured in a Google reCAPTCHA account.
You will need to have access to your own Google Cloud Platform account to generate reCAPTCHA keys.
During your set up, you will receive a public and secret key, both which need to be entered into Taguchi.
- Register your site in Google reCAPTCHA
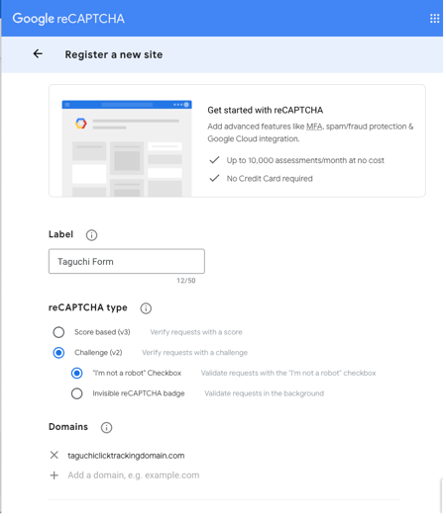
- Taguchi supports reCAPTCHA v2, so please select this during the set up.
- *In the ‘Domains’ section, in addition to adding domains you want the reCAPTCHA to appear, you must add the click-tracking domain configured in your Taguchi organisation to utilise Taguchi’s reCAPTCHA block in your form. The click-tracking domain can be found in the ‘Domains’ section under the Settings tab within Taguchi.
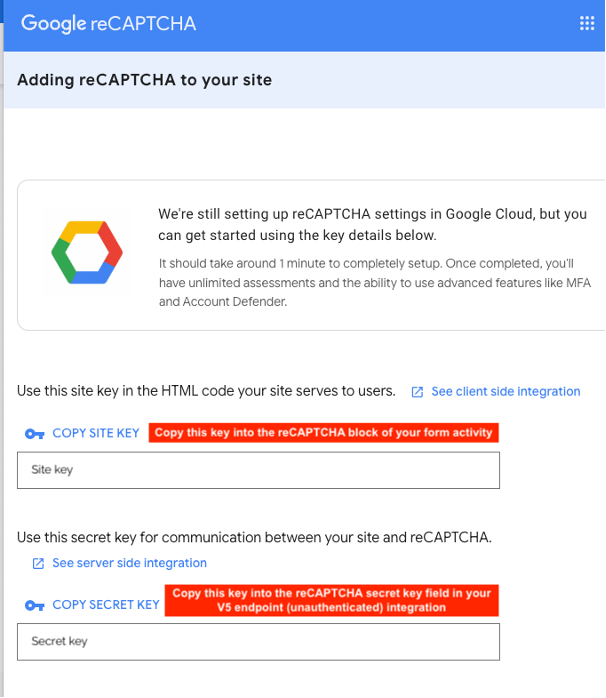
Site and Secret keys
After registration, you’ll be taken to a page where you'll see two keys:
- Site key: Used in the frontend (HTML of your site). This key will need to be added into the reCAPTCHA block of your webform activity
- Secret key: Used in the backend (server-side verification). This key will need to be added into the webform integration.
2. Adding the reCAPTCHA secret key in Taguchi
All webforms in Taguchi are set up with a V5 endpoint integration.html). Integrations can be set up via the Settings menu in the 'Integration' section.
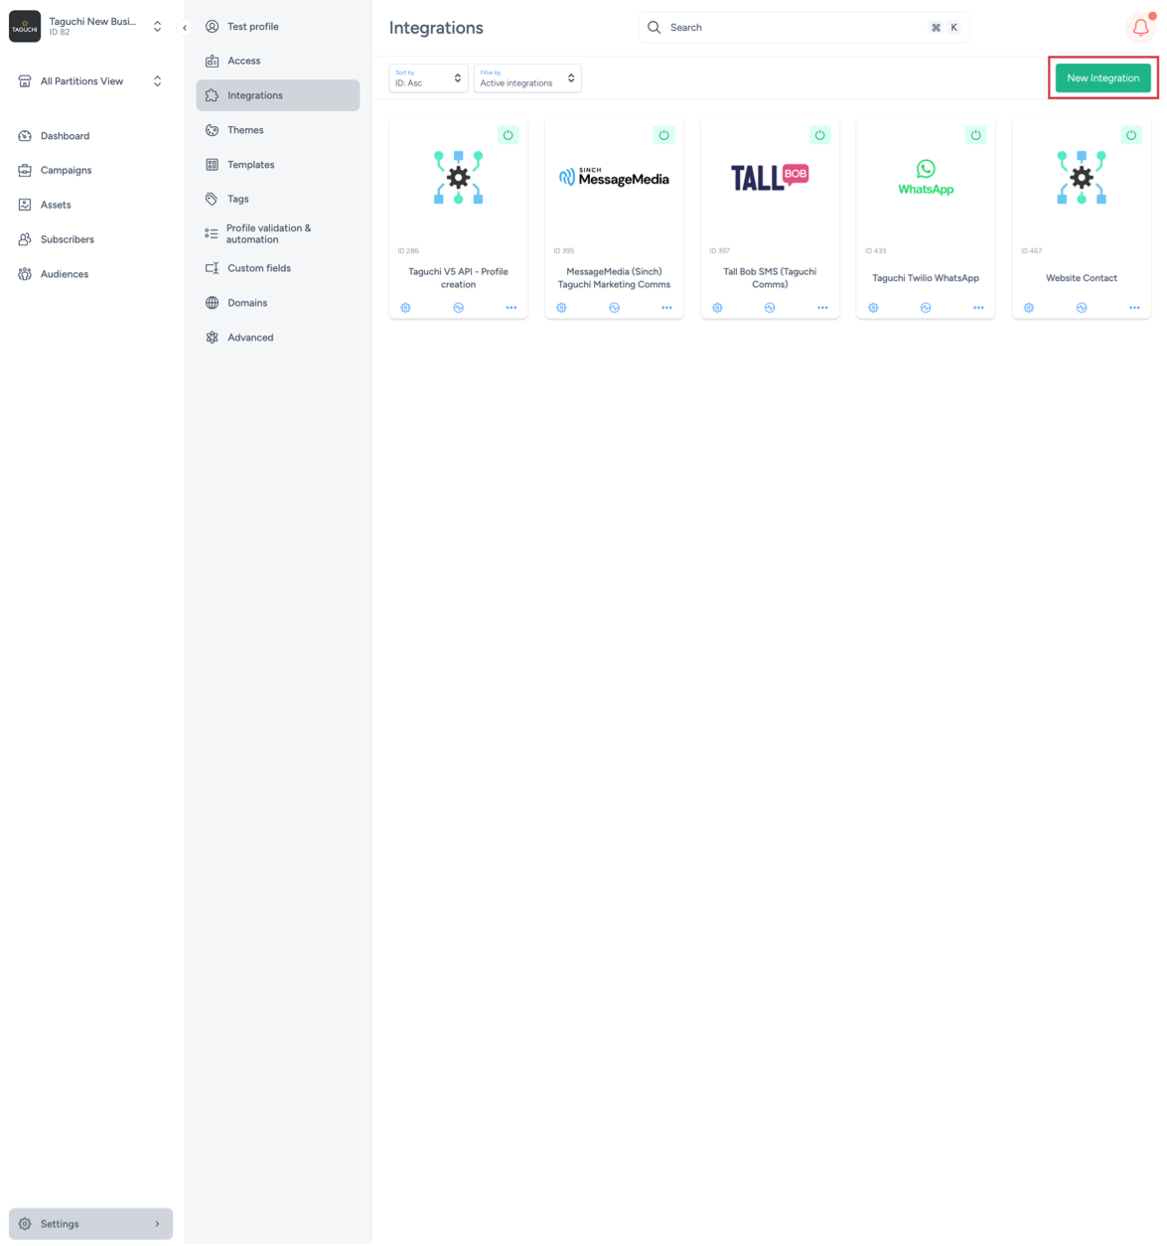
While setting up your webform integration, select API: V5 endpoint integration.html) under Details > Type. Link to v5 endpoint page.
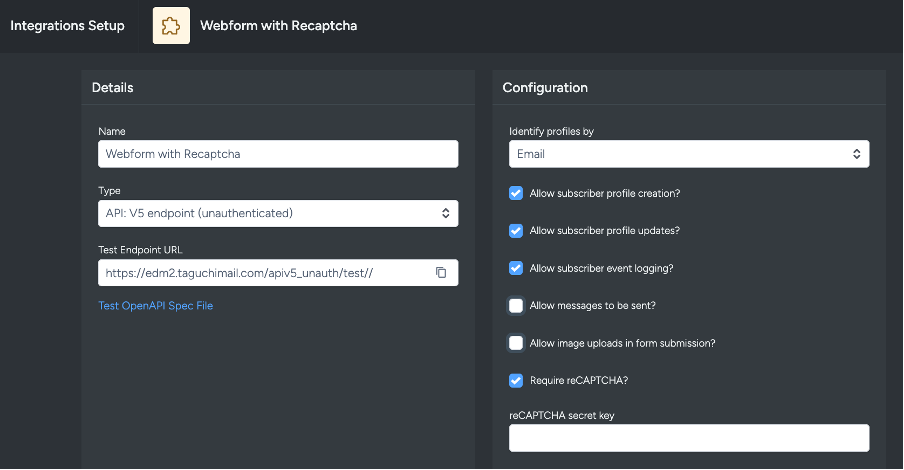
In the configuration section, you will be able to select what functionality you would like for your form.
To include reCAPTCHA, complete the following:
- Select the Require reCAPTCHA checkbox
- Enter your reCAPTCHA secret key in the 'reCAPTCHA secret key' text field.
This is all that’s required to enable reCAPTCHA in your form. Select the remaining configuration options which apply to your webform and select activate.
A secret key is like a password. Please don’t share your secret key with Taguchi staff.
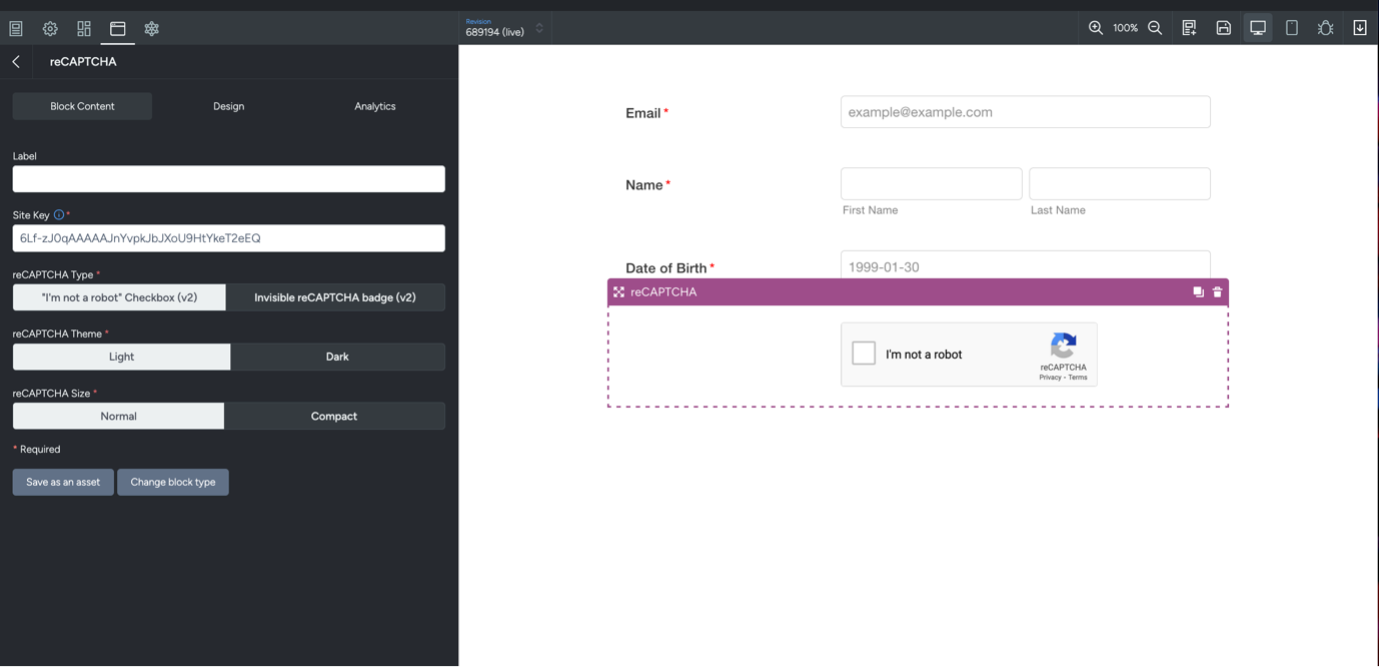
3. Adding a reCAPTCHA block to your webform
In your webform, add reCAPTCHA by using the Taguchi standard reCAPTCHA content block.
- Drag and drop the block into your form.

- Once added, add your Site key (from Google) in the ‘Site Key’ field of the block.
4. Testing reCAPTCHA functionality
Once everything is set up, we suggest you follow this process to test the reCAPTCHA.
- Complete the form: Go to the form where the reCAPTCHA block has been added.
- Submit the form: Enter the necessary details and attempt to submit the form.
- Verify reCAPTCHA: Ensure that the reCAPTCHA prompt appears and works as expected (e.g., selecting images, checkbox, or solving puzzles).
- Confirm submission: After passing the reCAPTCHA verification, check that the form submission is recorded correctly in your organisations database.
- Test multiple scenarios: Test under different conditions, such as:
- Submitting without completing the reCAPTCHA to ensure the form is blocked.
- Testing on multiple devices or browsers for consistency.
- Review submissions: Ensure that only legitimate submissions (after reCAPTCHA validation) are being recorded.
By thoroughly testing, you’ll confirm the reCAPTCHA is functioning properly and preventing unwanted submissions.
💬 For further assistance, contact Taguchi Support.