- Support Home
- Knowledge Base
- Integrations
- Event - Outgoing Webhook
Related articles
Need some help?
If you have questions or can't find what you're looking for, we're here for you.
Taguchi Support is available Monday to Friday, 9am - 5:30pm AEDT.
Create New TicketTaguchi Certified Training
Join our free and live online training sessions. You'll benefit from a better understanding of the platform's features and functionality. Plus with Taguchi Certified Rewards, every session you attend, you're not just learning - you're earning your way to some fantastic rewards.
About Taguchi Certified RewardsAPI Version 5
Did you know Taguchi has an API that supports all of the functionality provided by the admin interface and more?
Explore API Documentation
Thanks for your feedback!
Event - Outgoing Webhook
Taguchi provides an event-based webhook integration that supports sending of data to external endpoints and providers once triggered by an event. This allows for actions to be taken after an event has been triggered.
Use-cases include sending the outcome of a form submission to your own API service for marketing purposes.
Credentials
Credentials are not mandatory; please check with the API provider you are using if authentication is required.
Create Your Event: Outgoing Webhook Integration
New Integration
To create a new integration, ensure that you have the required User Type integration role privileges assigned to you.
- Navigate to Settings > Integrations.
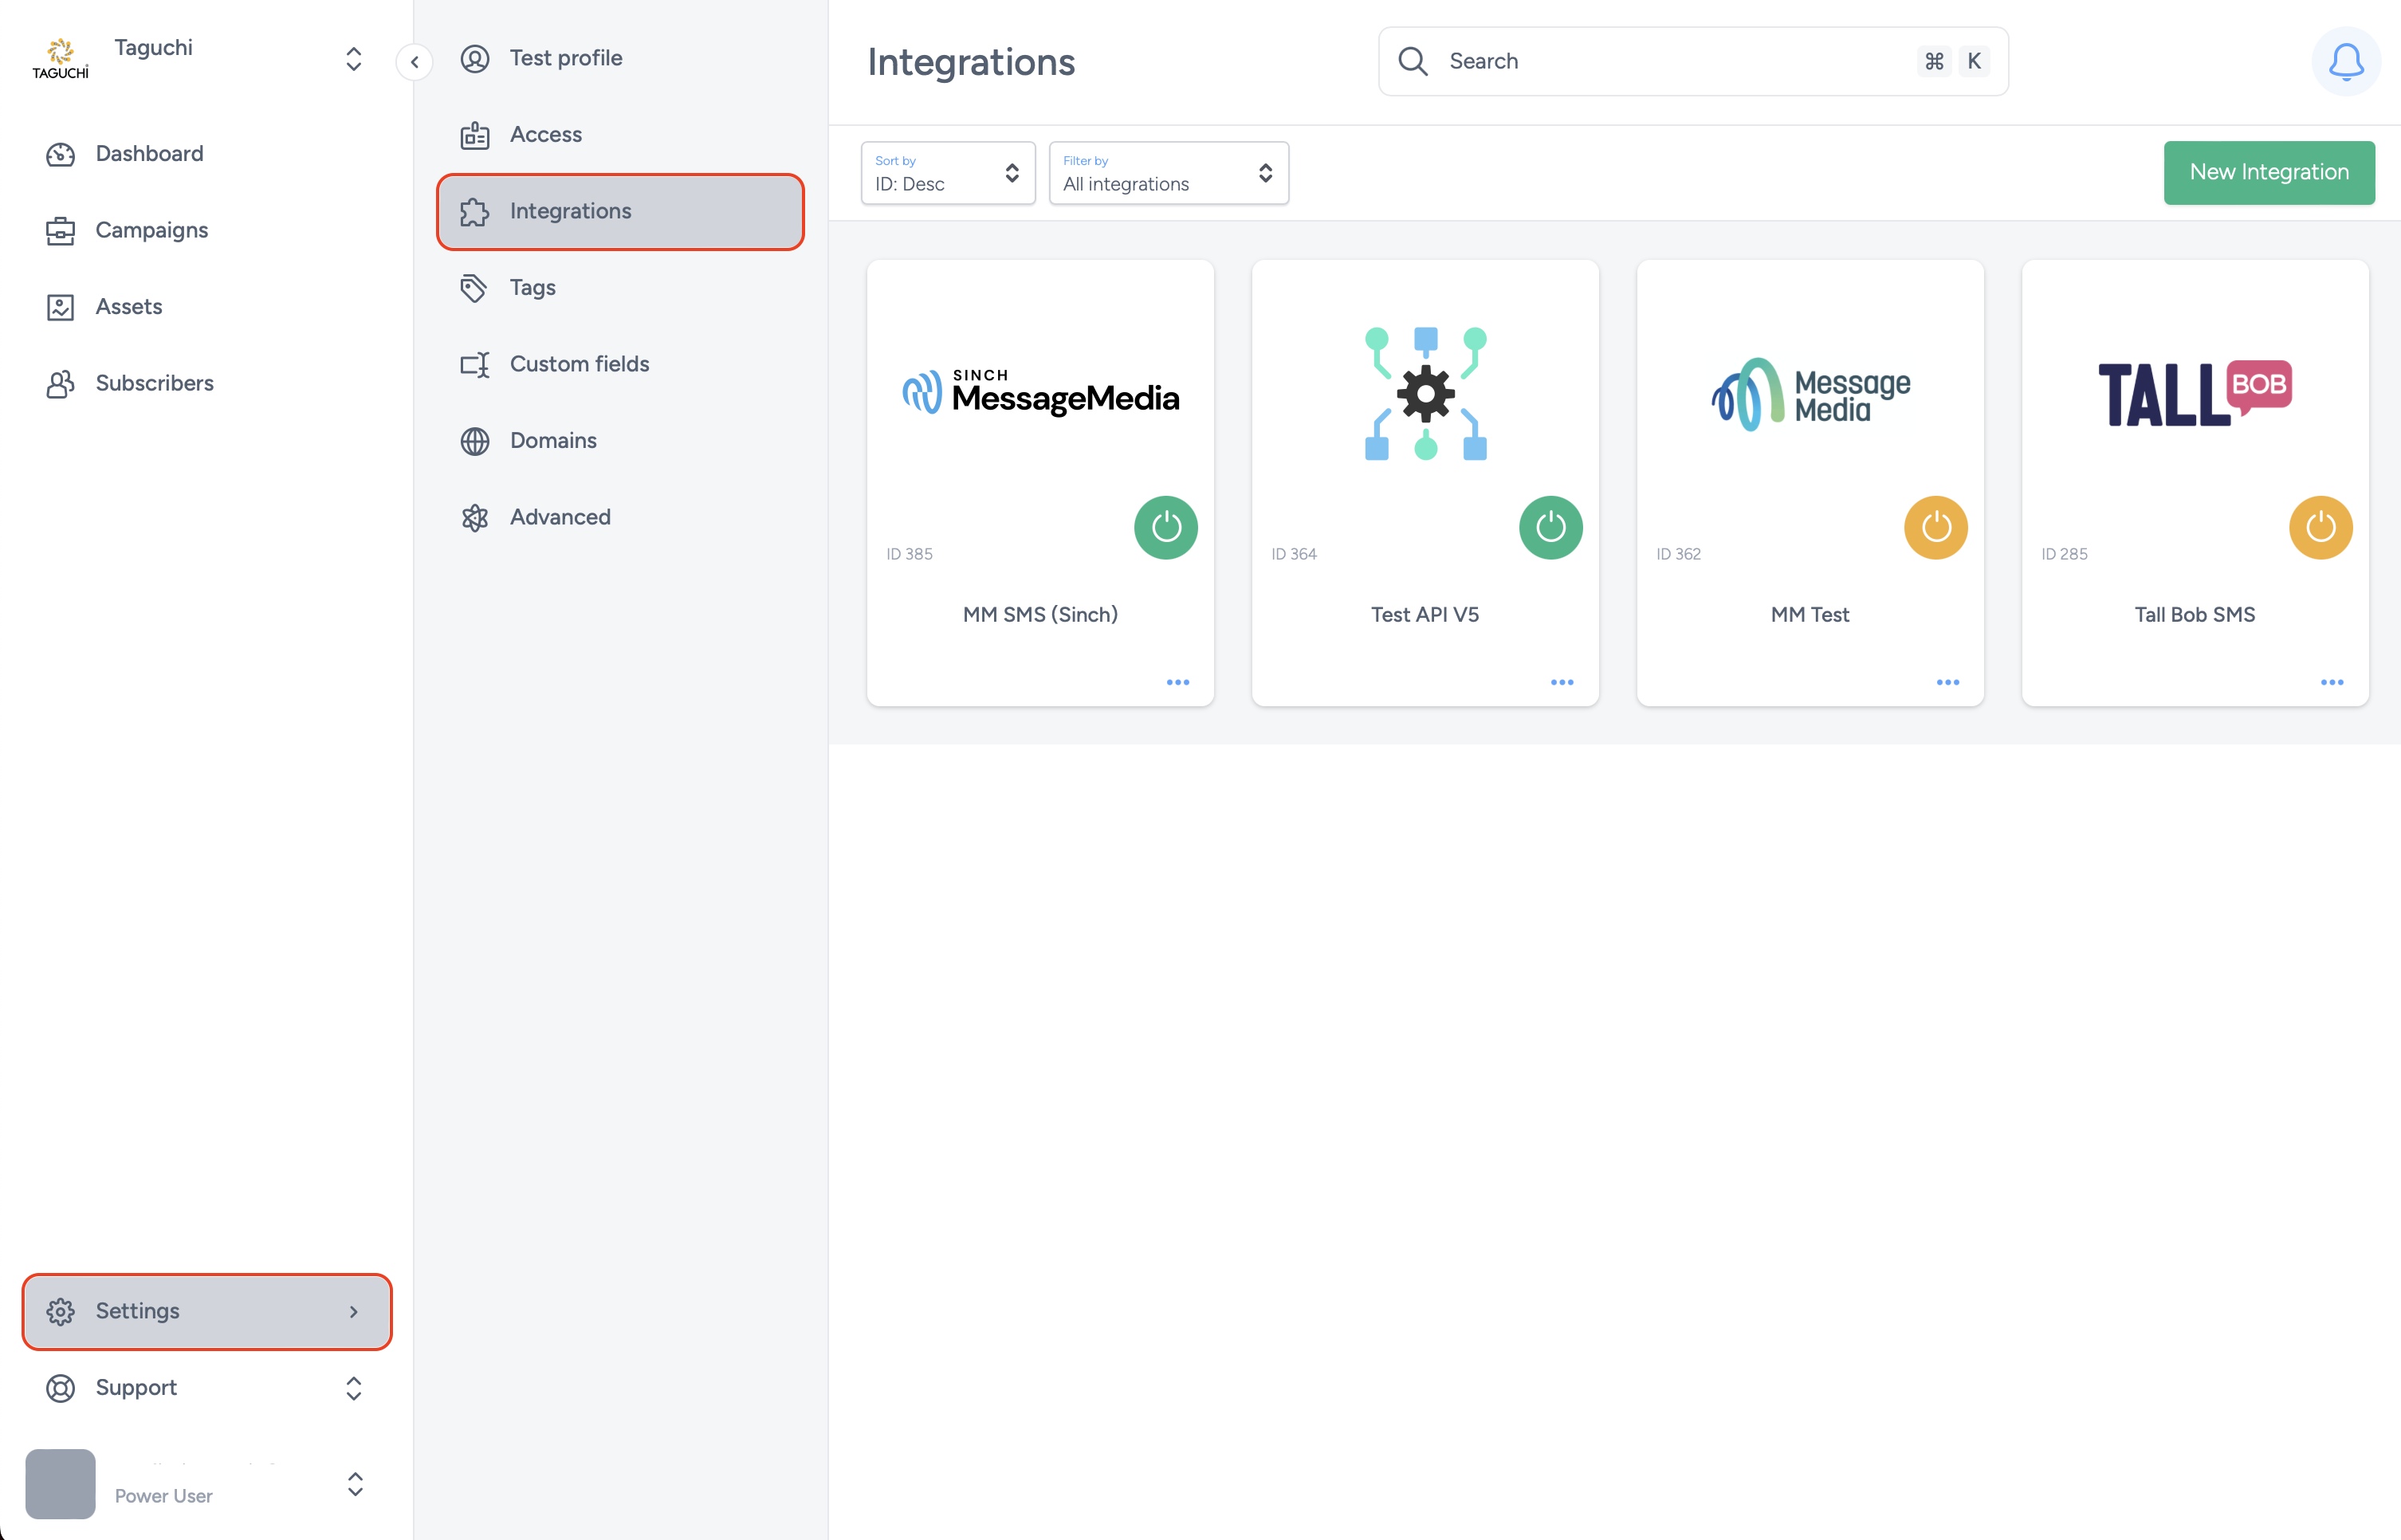
- Select ‘New Integration’ and a new screen will popup.

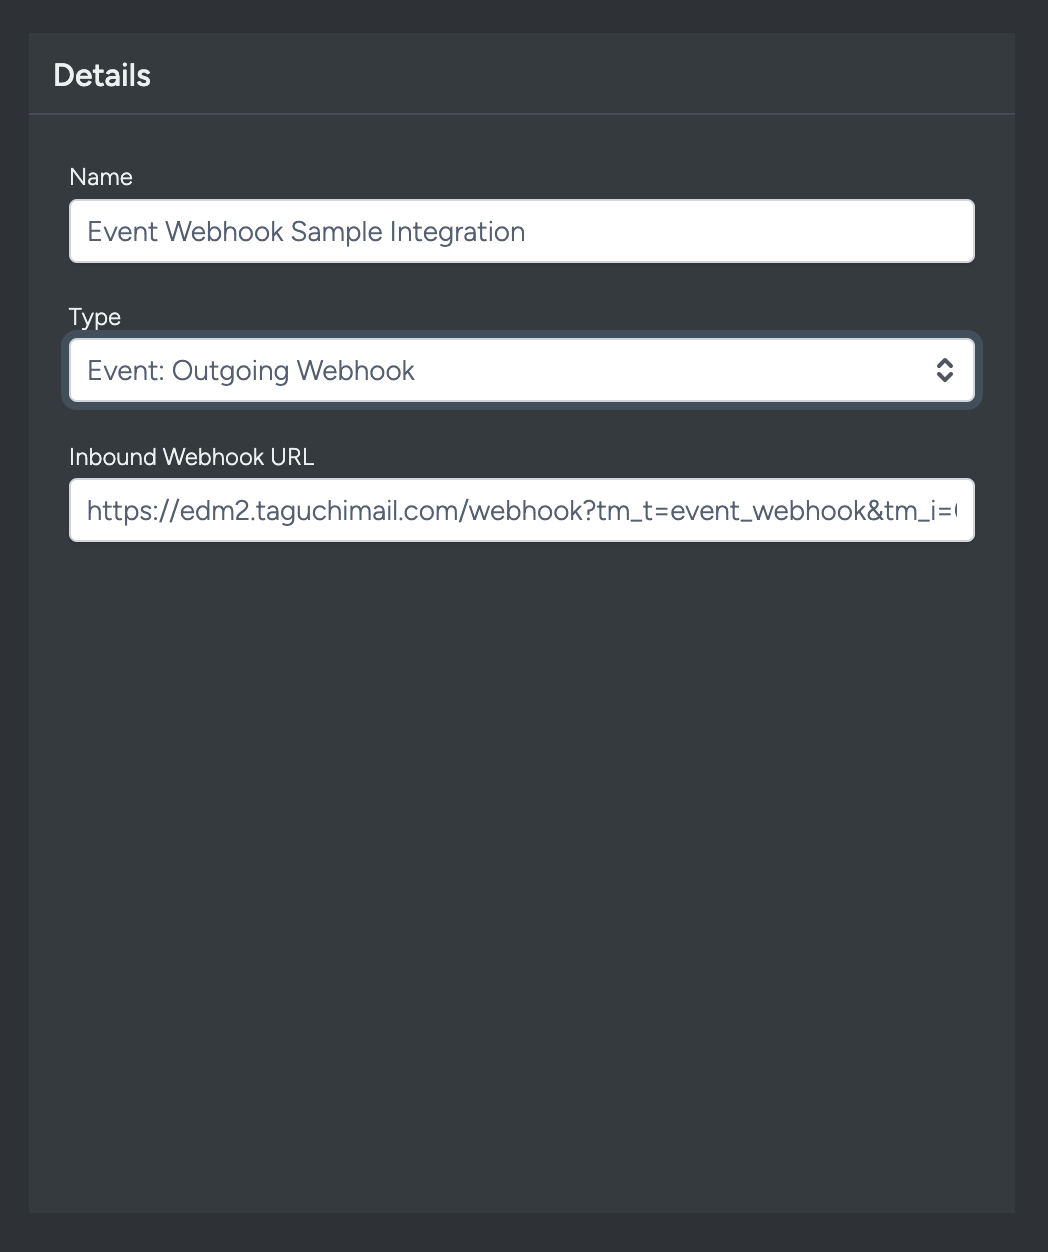
Details
Set the name of the integration.
Under 'Type', select 'Event: Outgoing Webhook'.
Configuration
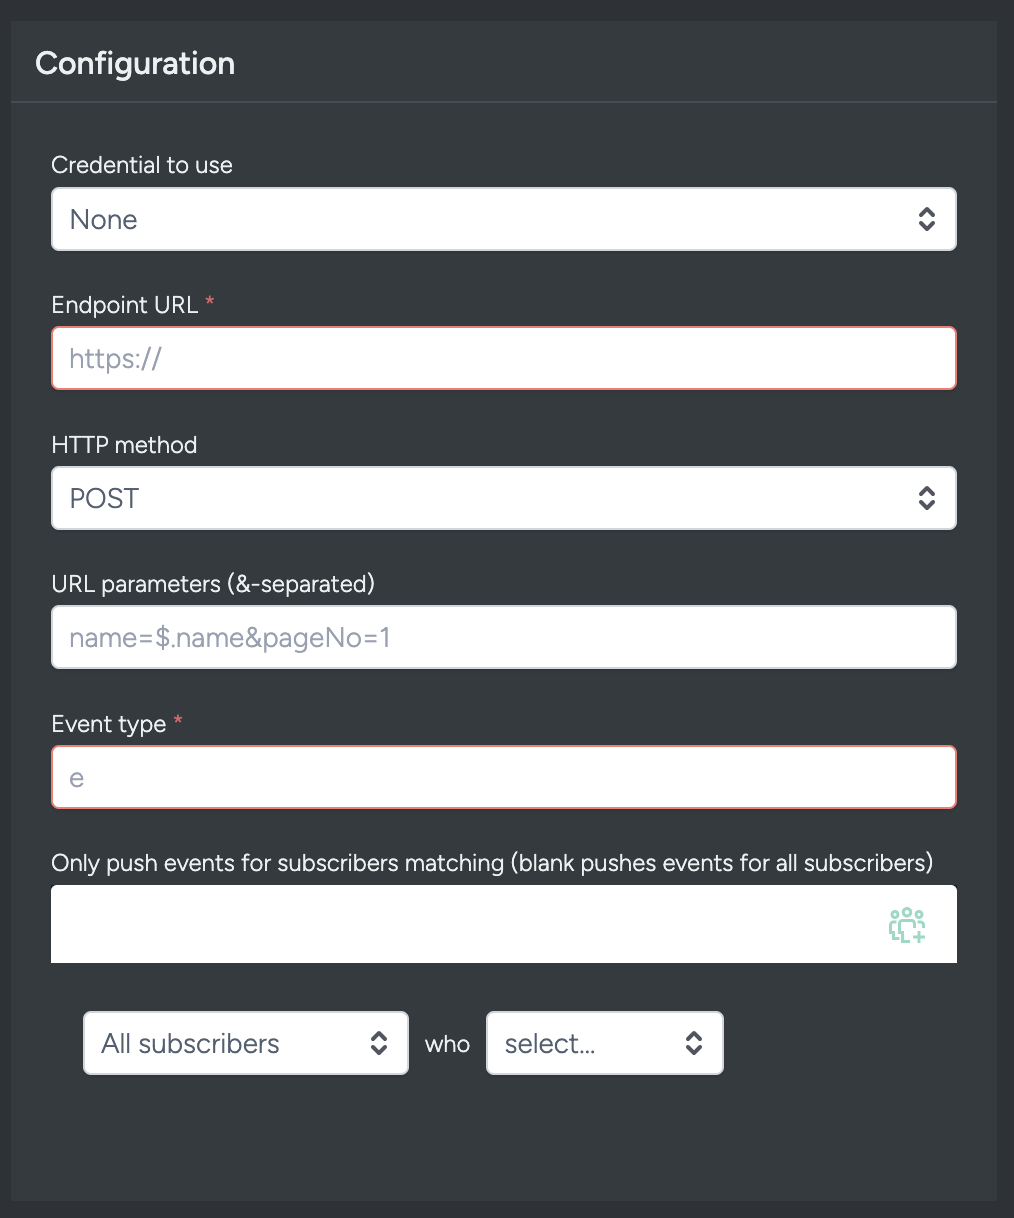
- Credential to use: This is set under Credentials on the settings page. You can leave this empty if no authentication is required. Otherwise please select a valid credential.
- Endpoint URL: The endpoint URL is the endpoint where the webhook sends HTTP requests to when a specified event occurs. You can input your endpoint URL here.
- HTTP method: The HTTP method that will be used when sending to the endpoint provided.
- URL parameters: This is used to provide any parameters to the endpoint URL as needed. Values are '&' separated. E.g. pageNo=1&email=john@test.com
- Event type: The event to listen to and trigger the endpoint call when matched.
- Only push events for subscribers matching: This field is optional. You can use this to only trigger API calls for subscribers that match certain conditions on top of the event type that is matched.
Event Types
The following event types can be used in the webhook integration:
Note: Sent (
s) and Viewed (v) events are not supported in the Event: Outgoing Webhook integration.
| Event | Event Name | Description |
|---|---|---|
| b | Bounced | A message delivery attempt failed due to the address being invalid. |
| c | Clicked | A subscriber visited a URL contained within an email, SMS or web page. |
| o | Opened | A subscriber loaded images within an email. |
| u | Unsubscribed | A subscriber opted out of further communications from a particular list. |
| x | Blocked | A subscriber opted out of all further communications. |
| sb | Subscribed | A subscriber submitted contact details or other information. |
| a | Annotated | Additional data was saved for an event. |
| up | Updated | A subscriber submitted contact details or other information. |
| r | Replied | A subscriber replied to a message. |
| t | Throttled | A message delivery attempt failed due to network congestion. |
| p | Converted | A conversion was received. |
| e | Entered | A subscriber entered a competition or other promotion. |
| wa | Analytics | A web analytics request was received. |
| ab | Abandoned | A purchase was abandoned. |
| of | Offer | A subscriber was issued an offer or redeemed one, in the form of a coupon or voucher. |
Map Data
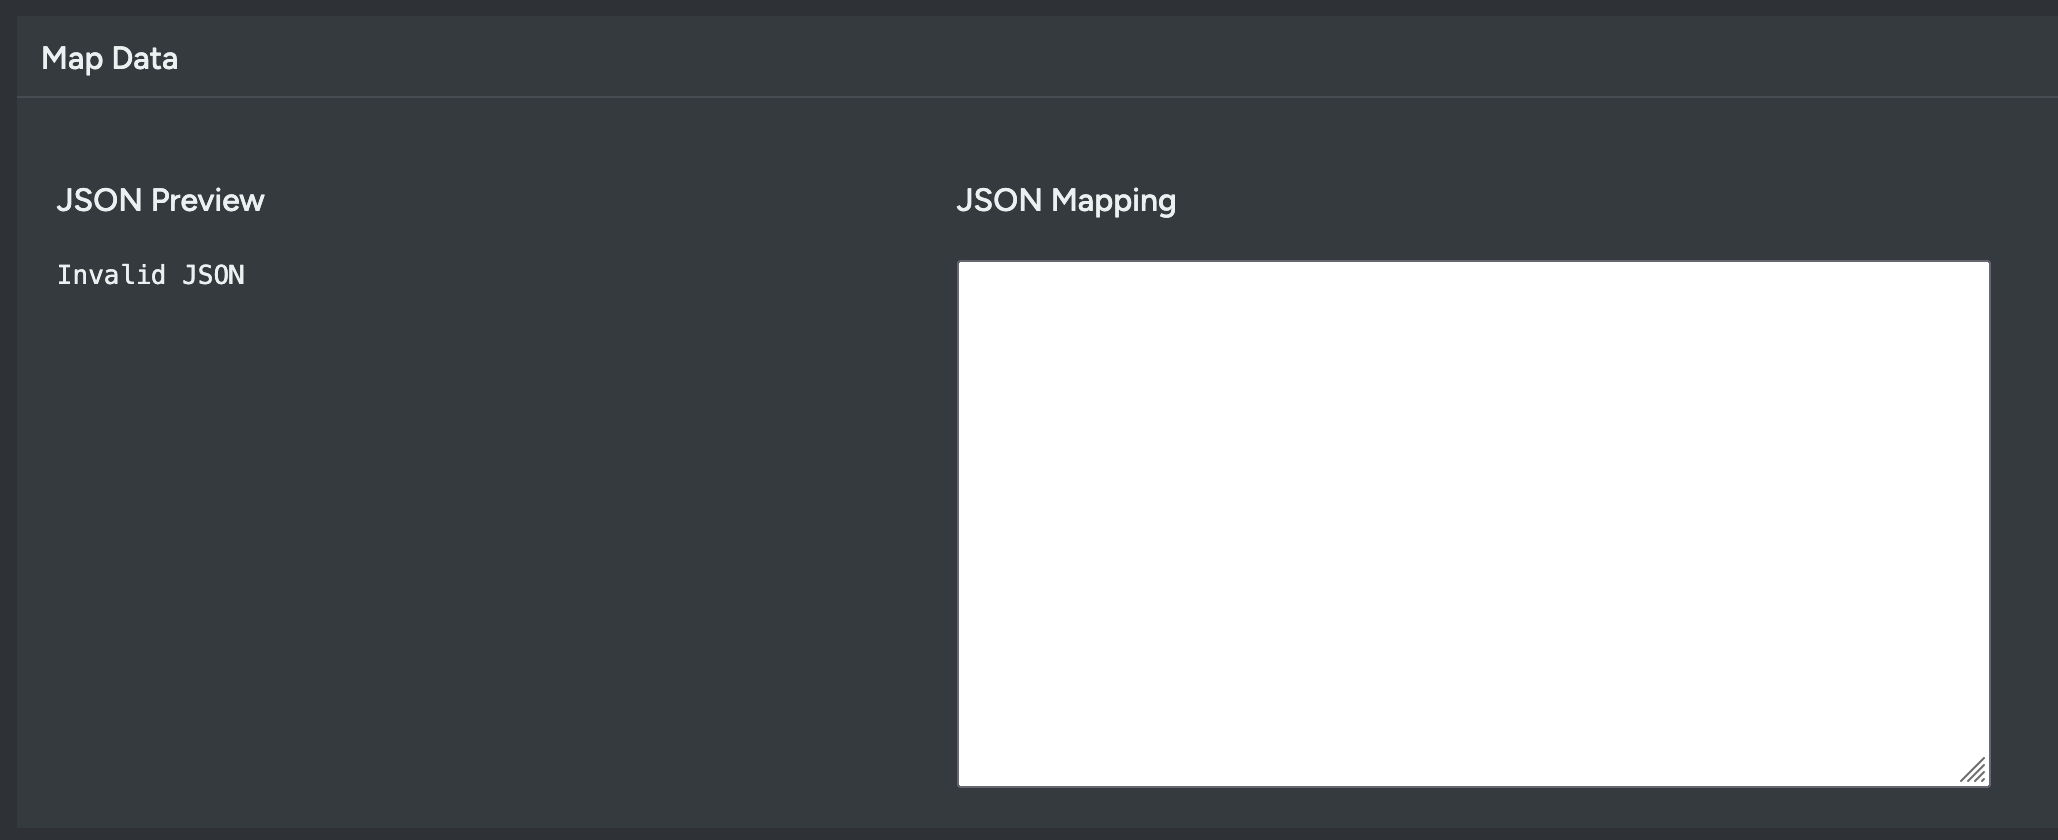
Sample mapping
{
    "id": "$.subscriber.id",
    "ref": "$.subscriber.ref",
    "email": "$.subscriber.email",
    "phone": "$.subscriber.phone",
    "firstname": "$.subscriber.firstname",
    "lastname": "$.subscriber.lastname",
    "unsubscribedAt": "$.event.loggedTimestamp",
    "invalidAt": null,
    "organizationId": "$.subscriber.organizationId",
    "campaignId": "$.event.campaignId",
    "listId": "61330"
}
Usage
Data can be retrieved from the event that this API call was triggered from as well as the subscriber linked to that event.
To get data related to the subscriber profile, use “$.subscriber.[field]”. This would translate to “$.subscriber.phone” for their phone number.
Event data and fields can be retrieved via “$.event.[field]”. “$.event.campaignId” would translate to the ID of the campaign the event’s activity originated from.
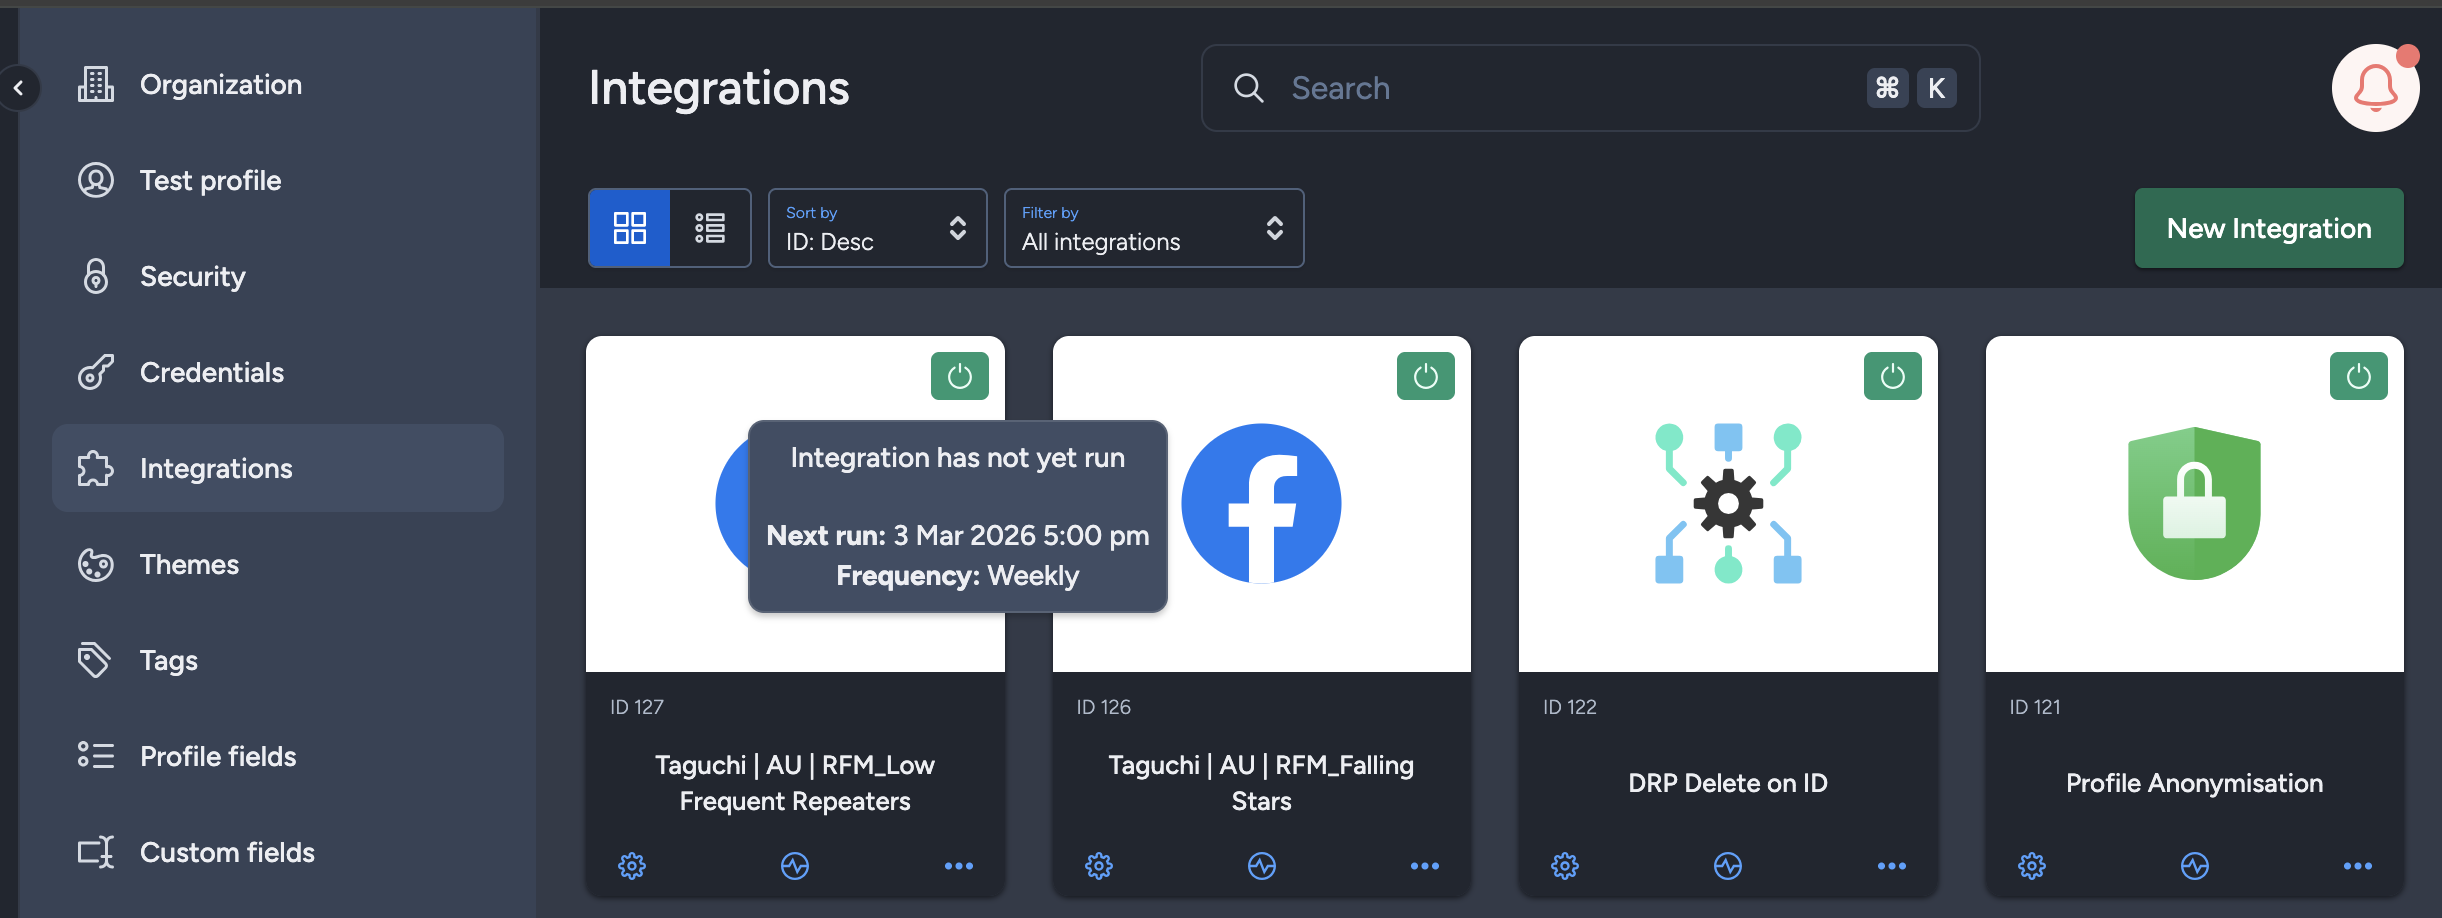
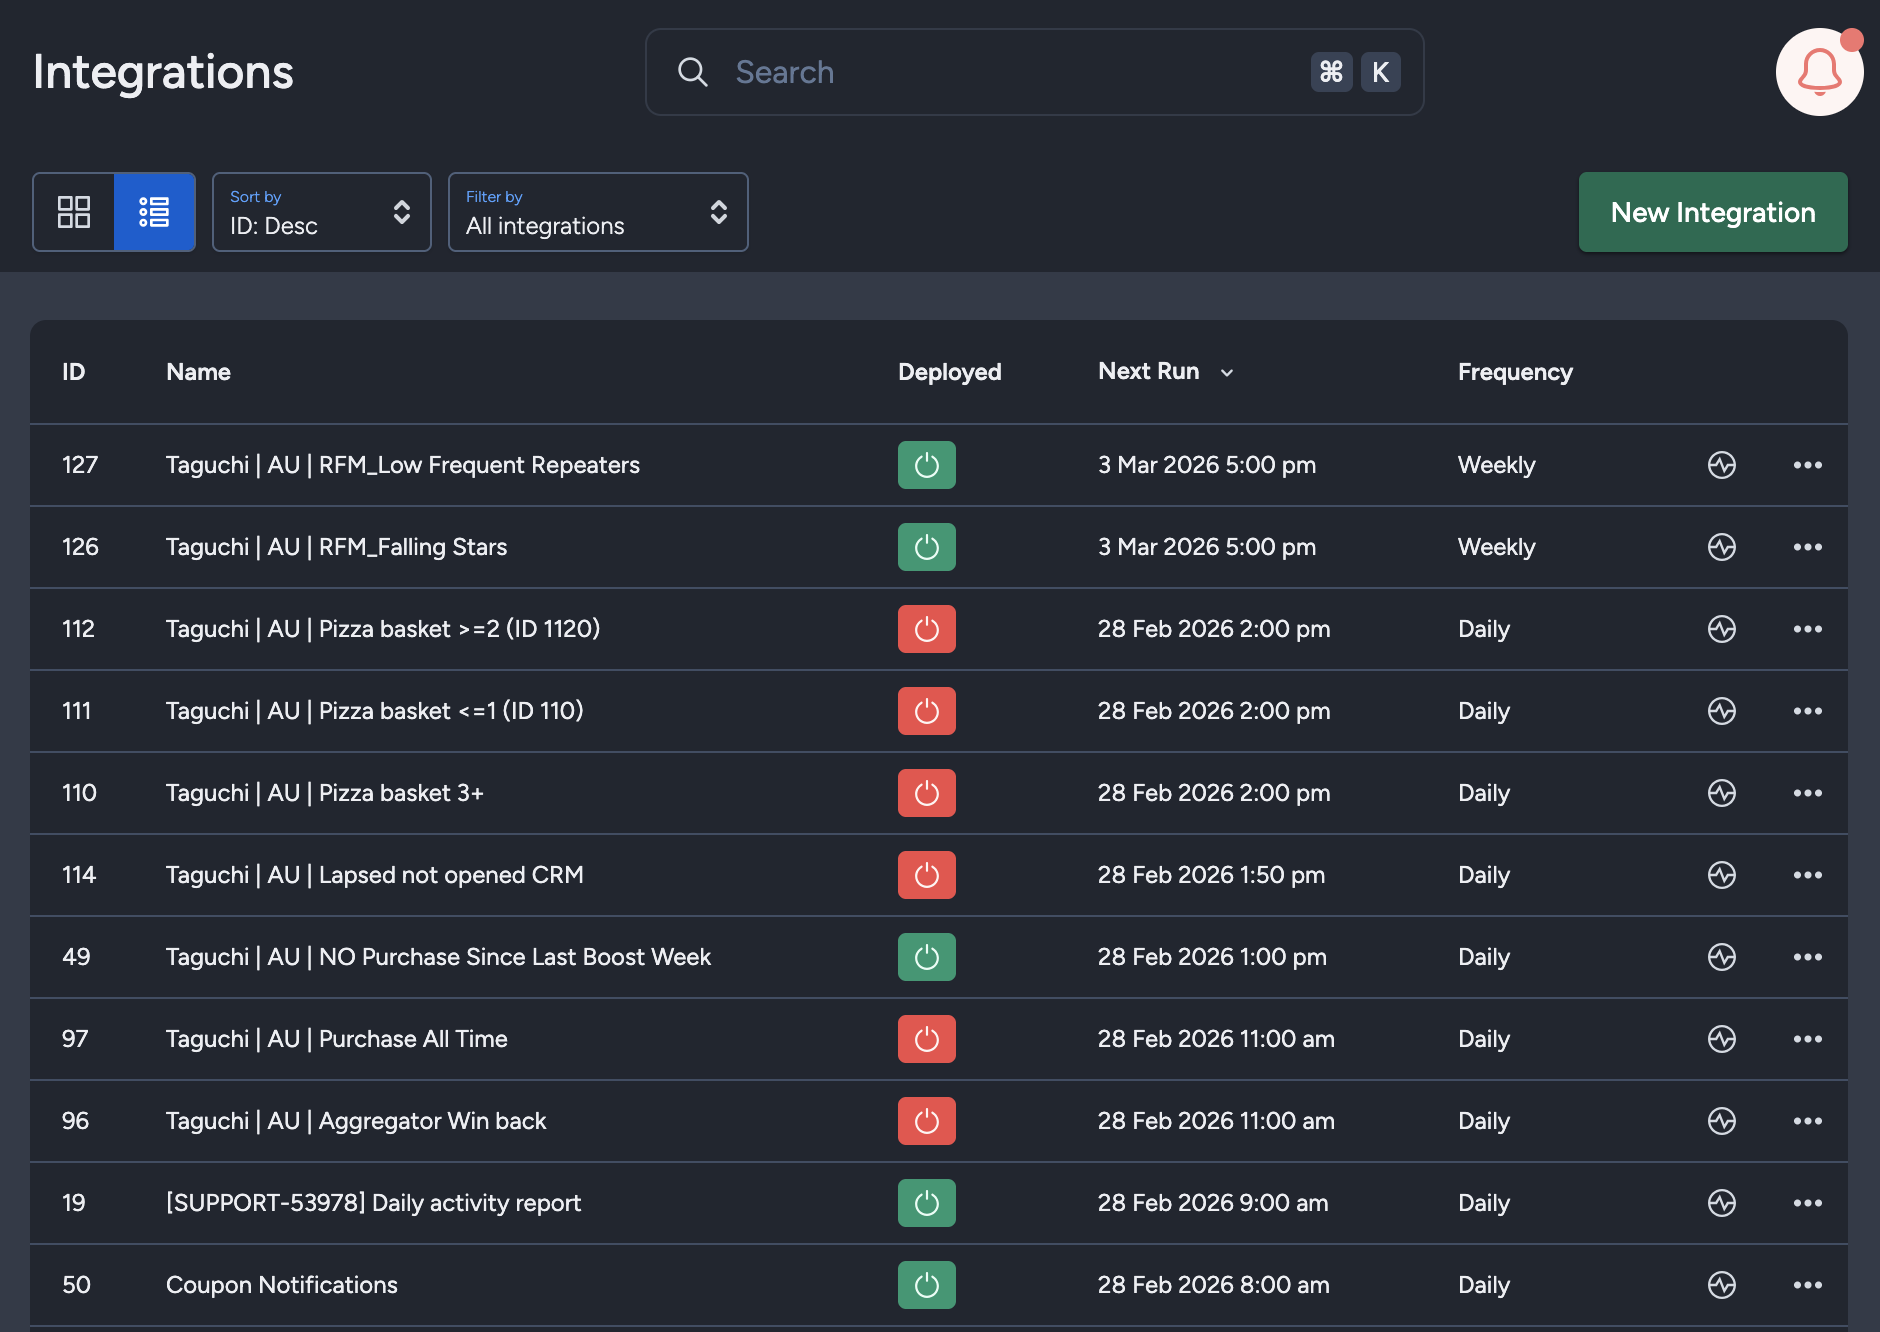
Viewing Integration Schedules and Next Run Details
The Integration UI provides visibility into integration schedules by displaying the scheduled frequency and the time of the next run when hovering over the status icon. Adding to that, the integration UI supports list view with sortable columns so you can see the next run timestamp and frequency there too.. This helps users quickly check when integrations are scheduled to execute and manage them more efficiently.
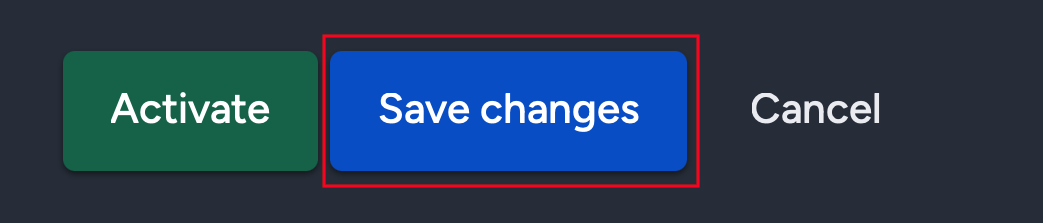
Save Changes and Activate

Once you have added your Details, Configuration and Target Expression, you will be able to save changes (1) and activate (2) the integration. You can only activate once you have saved changes.
Deactivate

To stop the integration, click on Deactivate. This will stop Taguchi from exporting data via the webhook.
Active Integration
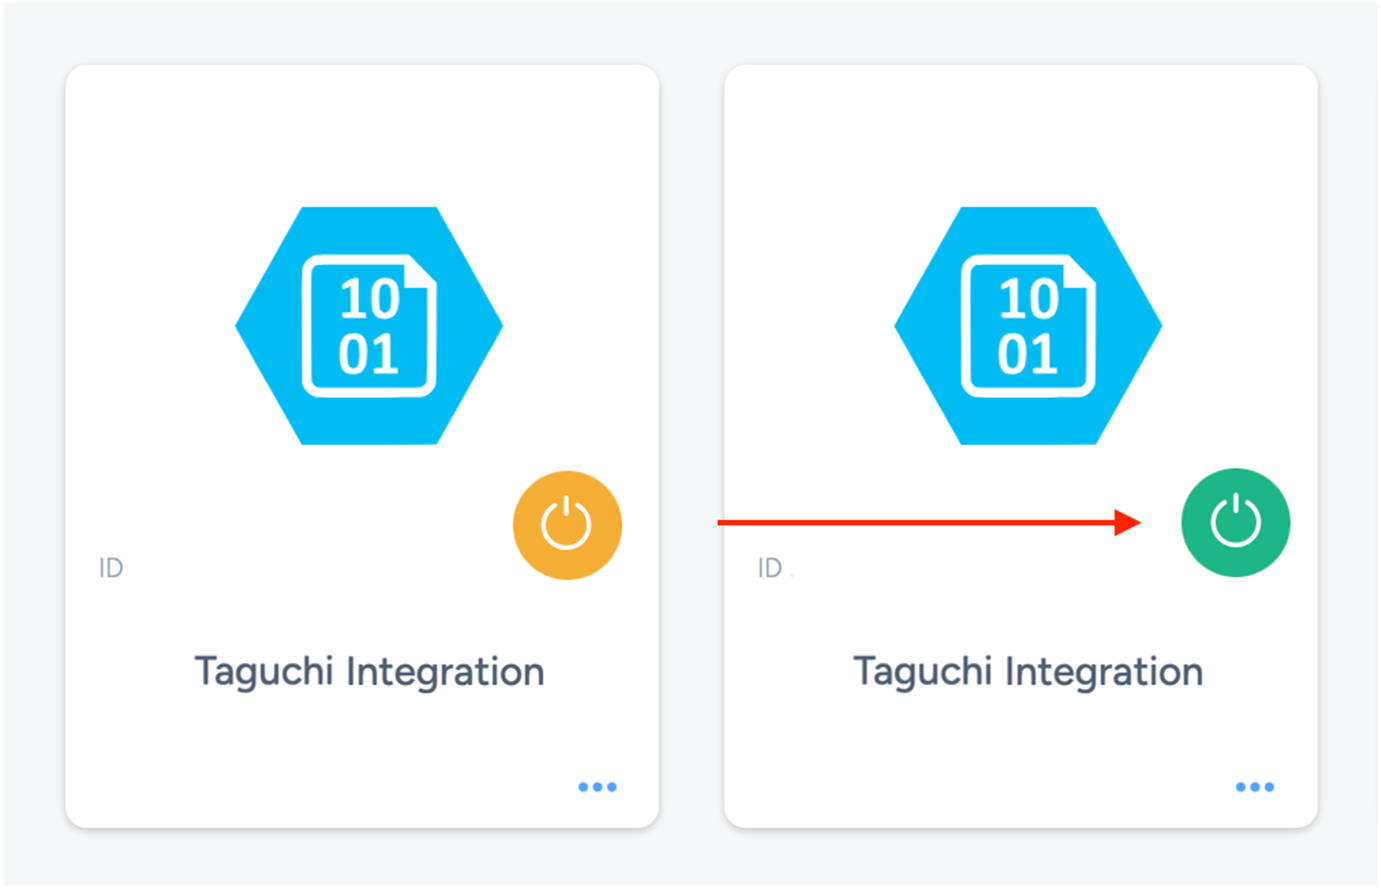
Once the integration has been saved and activated, the on/off icon of the integration card will change from yellow (Off) to green (On) which indicates that it is now activated.
Update Integration

If you want to update your Integration, you will be able to make the changes while it is activated or deactivated. Once the changes have been made, you will be able to update the integration by clicking on 'Save changes'. The Integration will be updated immediately.
Viewing Logs in the UI
Users can now view detailed integration logs directly in the Taguchi UI to troubleshoot issues.
To access logs:
- Navigate to Settings > Integrations.
- Select the integration you want to review.
- Click on View Status in the top right hand corner to see recent activity, including timestamps, status updates, and error messages (if any).

If an integration fails, checking the logs can help identify issues such as incorrect credentials, invalid audience configurations, or query timeouts.
If you are having trouble with this integration, please contact Taguchi Support for assistance.