- Support Home
- Knowledge Base
- Integrations
- TikTok Ads Integration
TikTok Ads Integration
Taguchi has an API integration with TikTok which creates a seamless and automated connection between your email marketing database in Taguchi, and TikTok.
You can now easily execute multi-channel marketing campaigns, truly leveraging your companies first party data to its full potential. You may choose to suppress your email marketing audience from TikTok ad campaigns, reducing unnecessary impressions and cost. Perhaps you may wish to extend your email marketing efforts into TikTok Ads, amplifying your message via other marketing channels.
The opportunities are endless.
This integration means you don't need to manually handle your subscriber data externally between Taguchi and TikTok to achieve the above, reducing the risk of data security issues and not to mention effort.
TikTok Custom Audiences
Our simple, self-serve integration tool offers a smart and secure way to get the most out of your ad campaigns; without the risk and inefficiencies of manually handling customer data.
Use Cases
Suppression - Send an audience to TikTok to suppress from your paid TikTok campaigns.
Targeting - Target a list of subscribers or a segmented audience based on custom field matching.
Campaign specific targeting - If a subscriber has or has not engaged with your email, SMS or web campaigns, re-target them to amplify your message.
Website tracking - Using Taguchi Web Tracking code, re-target subscribers who have visited any page on your website.
Conversion targeting – Using the transaction data stored in Taguchi, target customers who have purchased a specific product or range in the past who would qualify for a cross sell promotion. Similarly, if they havent purchase a product or range, you can target those people too.
Invalid email - If a profile has an invalid email or no email at all, communicate to them in another way or incentivise them to update their details.
A combination of all of the above.
Instructions
Getting Connected

To connect your Taguchi organisation to your TikTok Ad account, the user must:
Have Administrator access to Taguchi; and
Have the appropriate access level on TikTok.
- As an admin of Taguchi, you will see the ’Credentials’ page under Settings > Credentials.
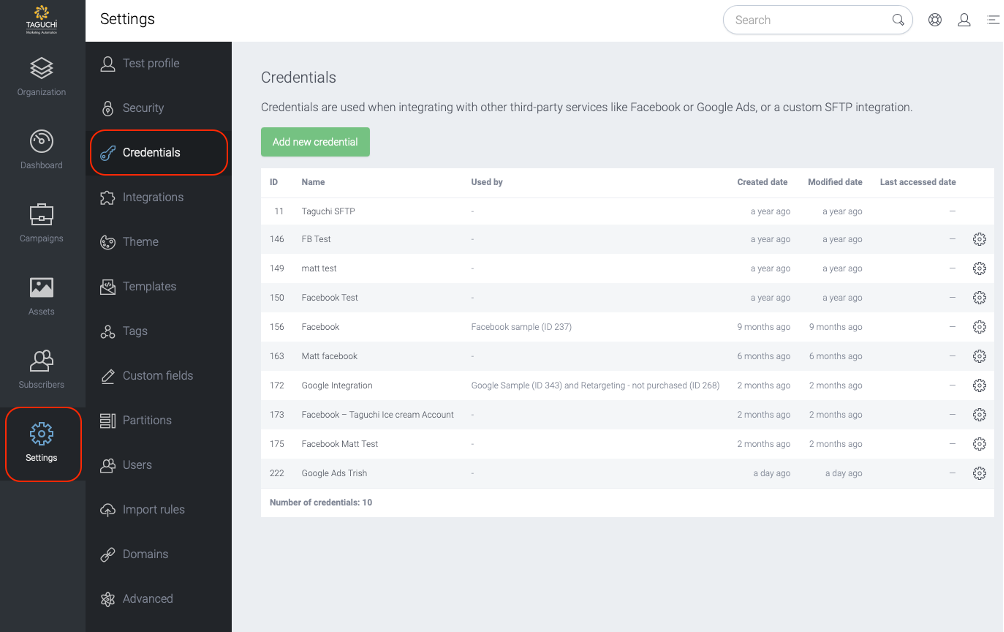
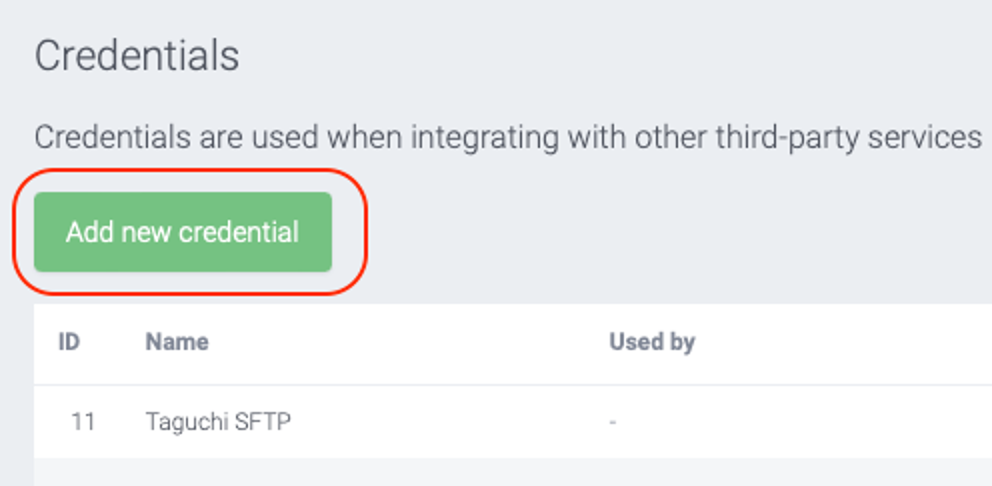
- Select ‘Add new Credential’ and a new screen will pop up.
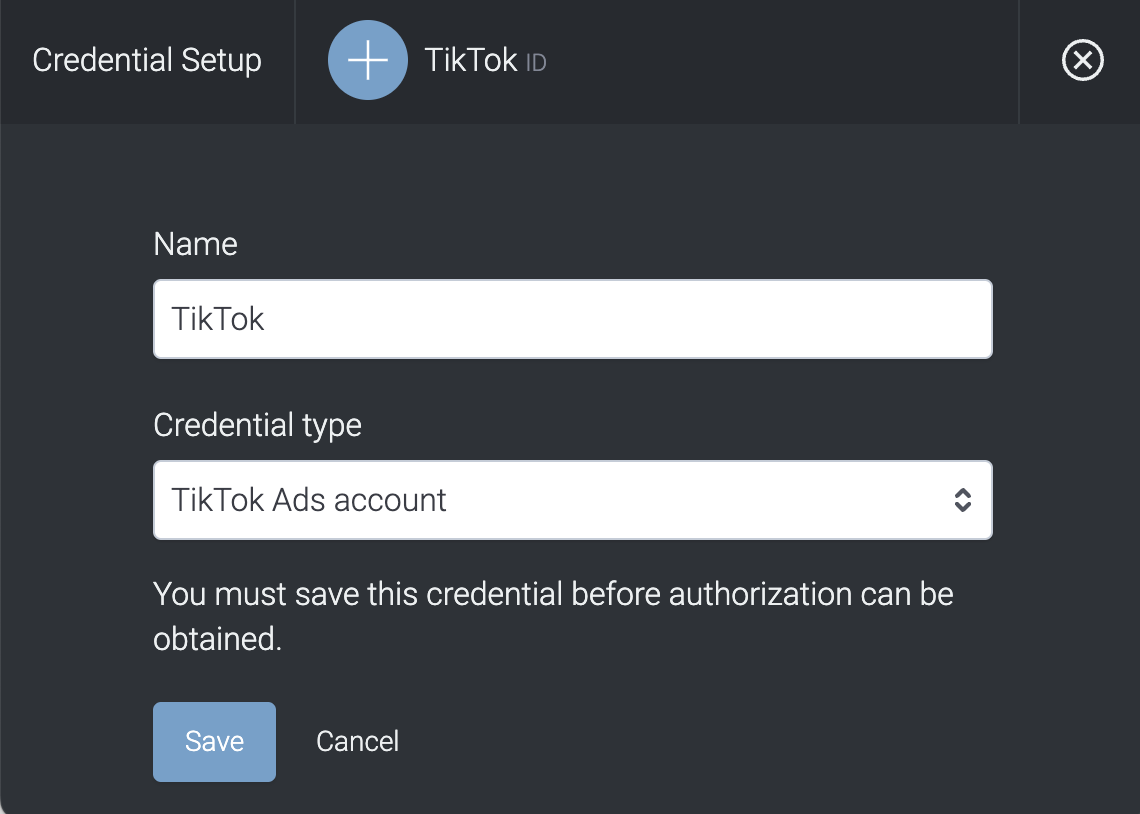
Type in a name – you may consider being specific about the account name should you operate more than 1 ad account.
Select the ‘Credential type’ in the drop down and choose "TikTok Ads account" (note: there are other standard integration credentials available in Taguchi which are included in this list).
Click Save. At this point, it will ask you to save but the account is not yet connected.
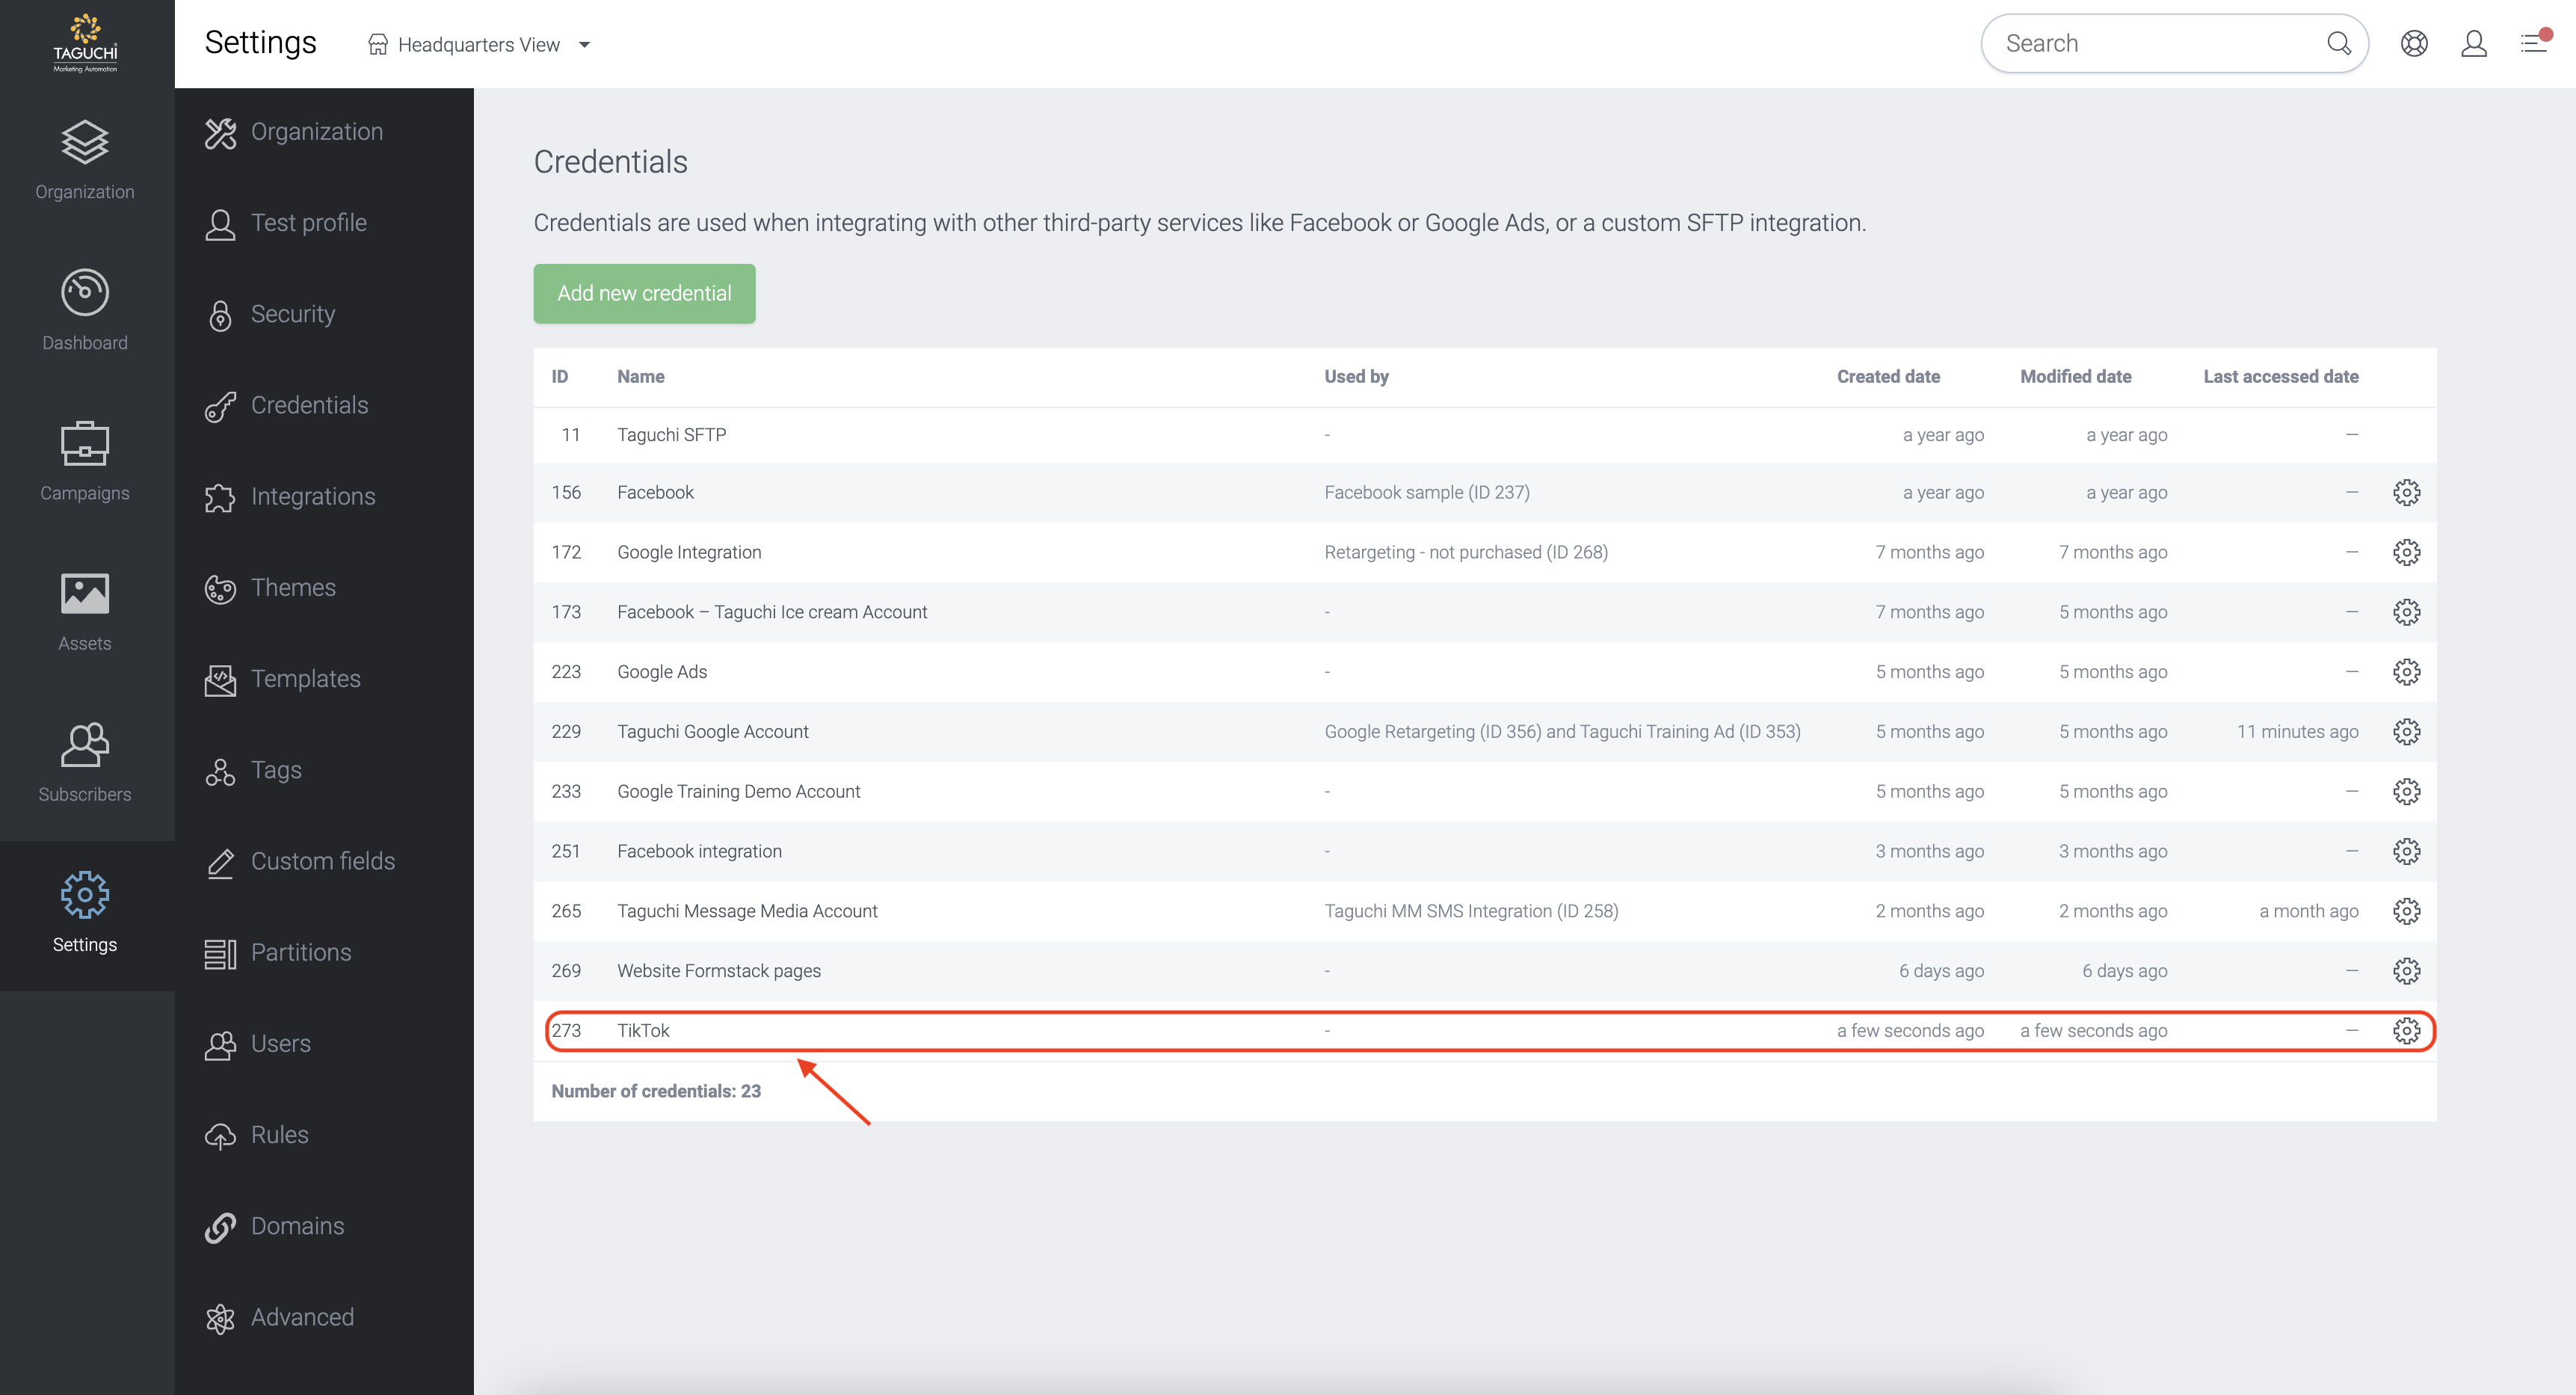
Once saved, this will close the screen and return you to the list of Credentials. The new Credential name will appear in this list.
Click on the new credential to start the authorisation process.
- Once clicked, it will re-open the credential page. What appears now, is a link to request Authorization from TikTok.
Request Authorization from TikTok
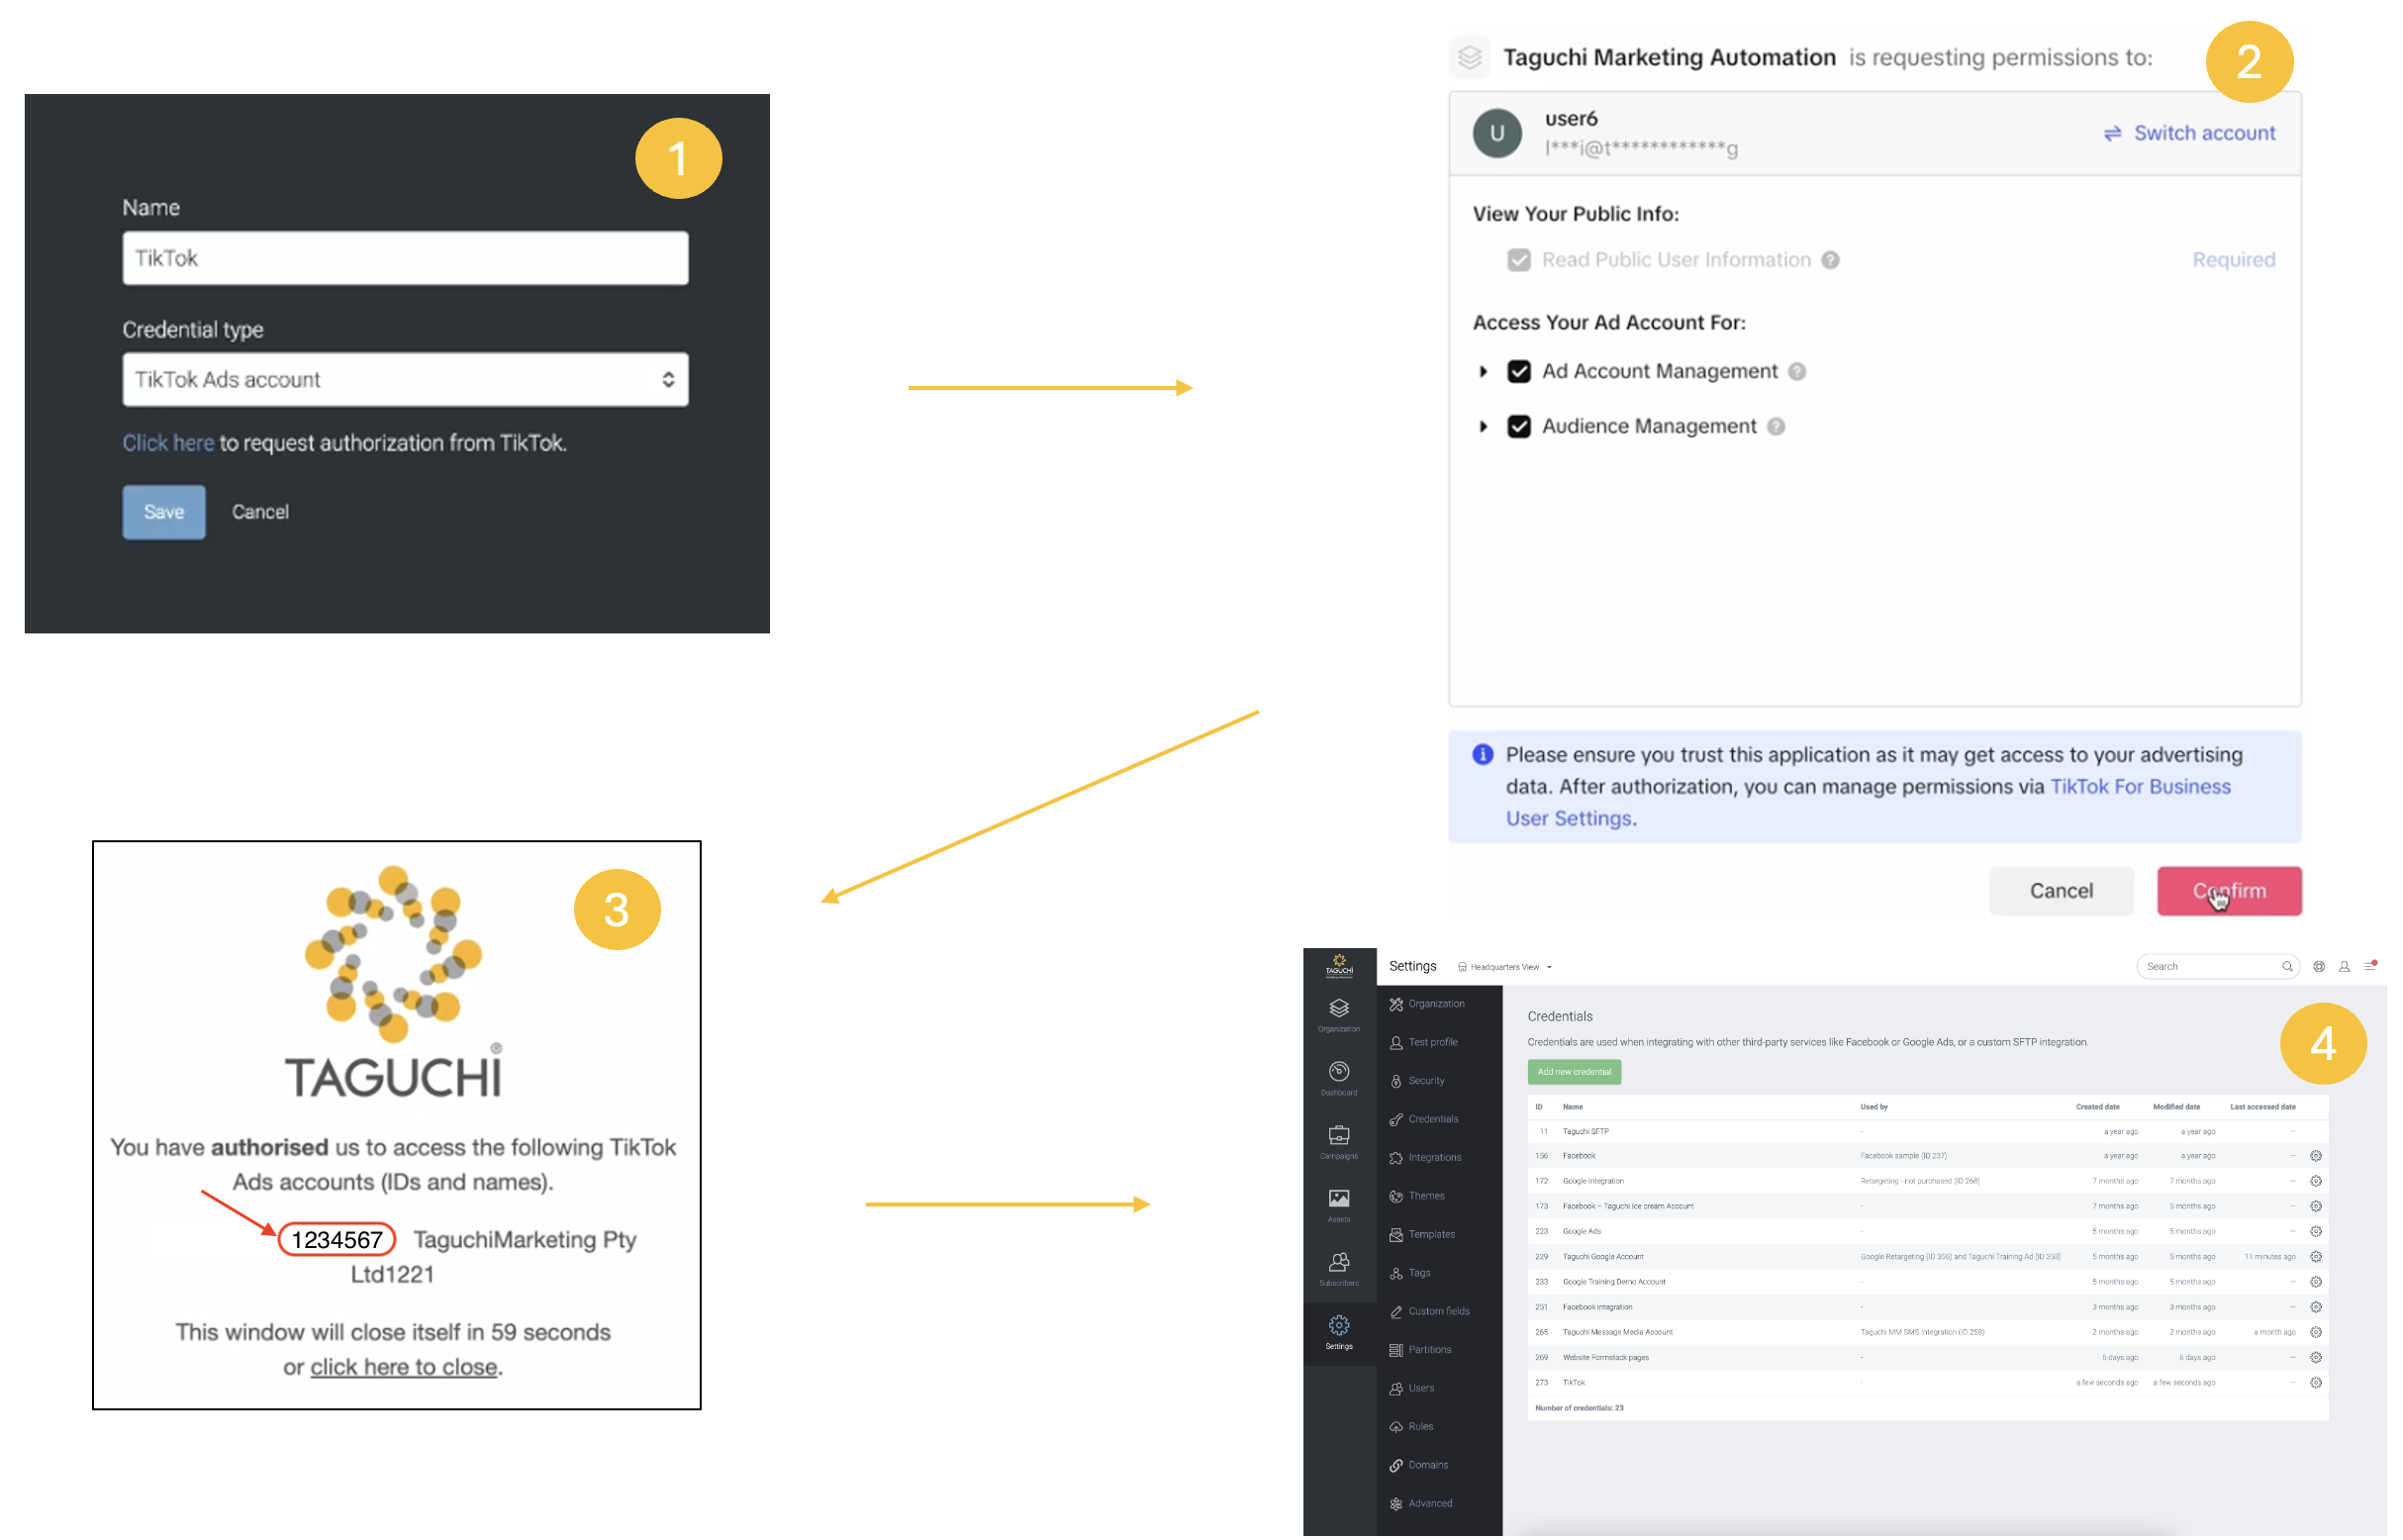
Click on 'Click here' to request authorisation.
This will redirect you to TikTok. You will be prompted to login to your account if you have not logged into it yet. You will be asked to provide access for the "Ad Account Management" and "Audience Management" via the checkboxes for Taguchi to access the TikTok ads account. Once you have provided access, Select 'Confirm" to make the changes.
You will be redirected to an authorisation confirmation page which will display your TikTok account ID which is now authorised. The TikTok Account ID shown in the page will be used for the "Target TikTok account ID" within the Integration setup page later.
After 60 seconds you will be redirected back to the Taguchi platform.
The email address of your subscriber profile in Taguchi must be the same email address within the ads platform, hence you will need to ensure that the addresses are the same for both platforms.
Create Your Integration
New Integration
To create a new integration, ensure that you have the required User Type integration role privileges assigned to you. The 'integration' page is under Settings > Integrations.
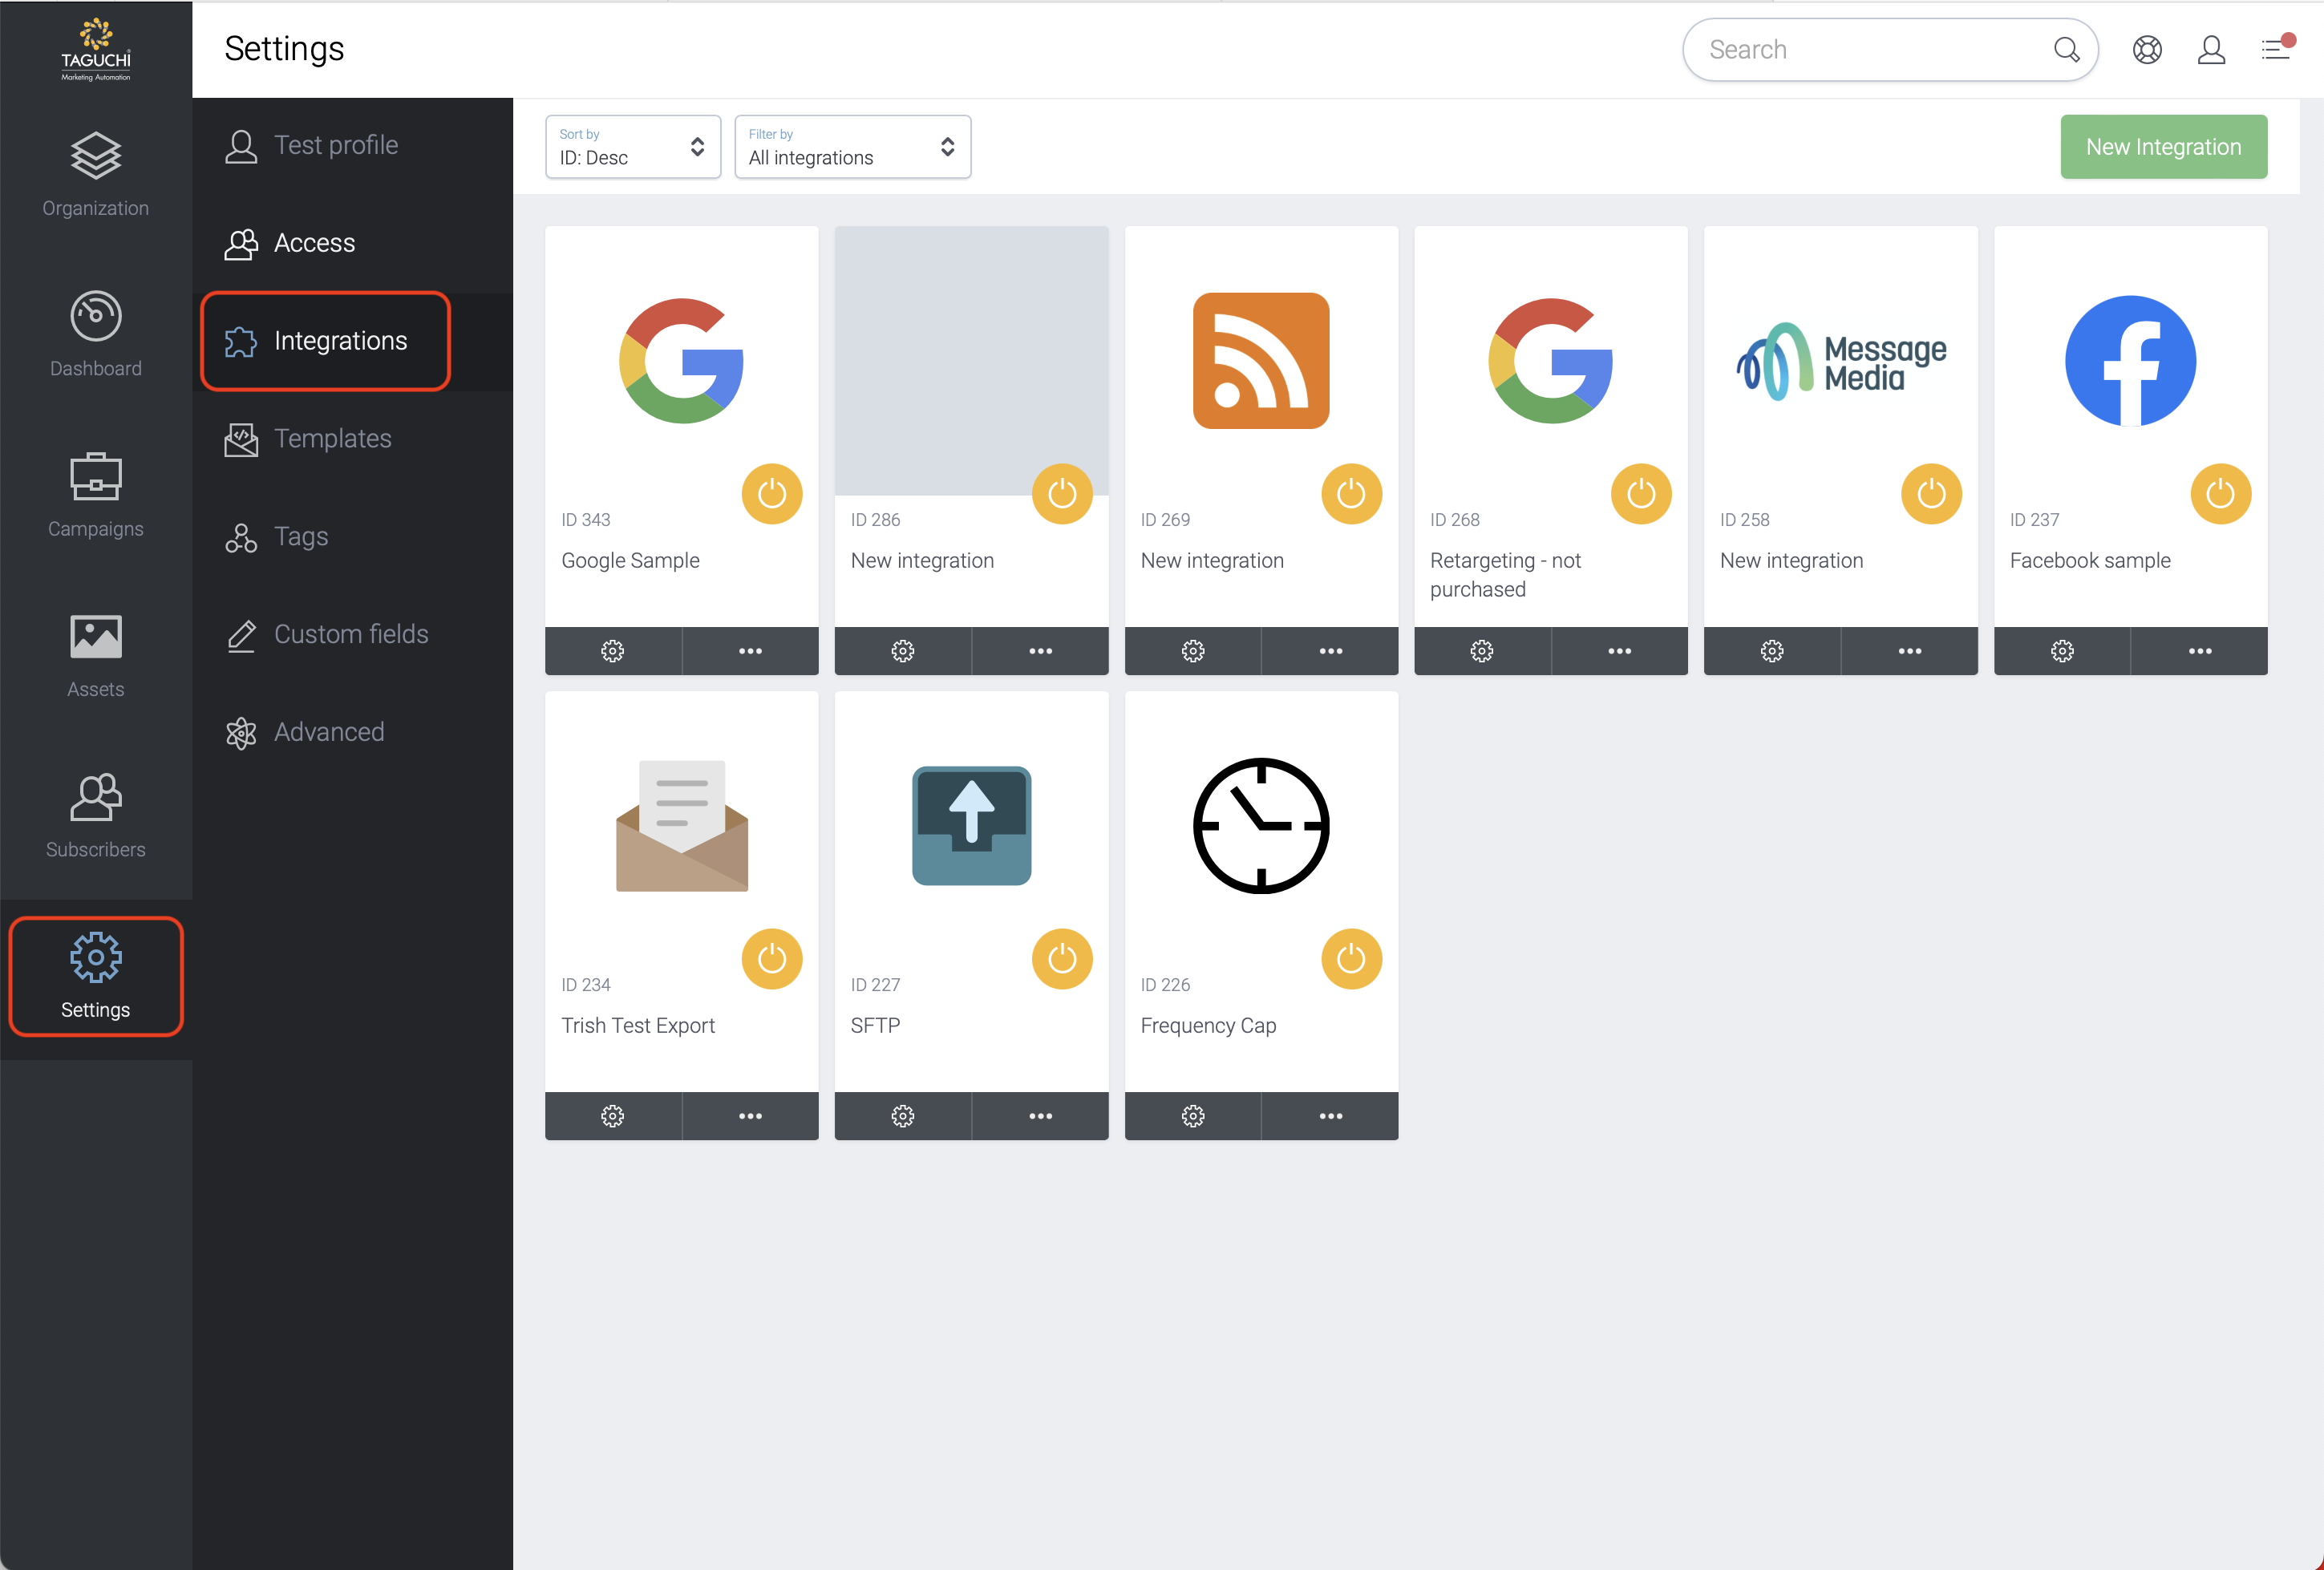
Select ‘New Integration’ and a new screen will popup.

Details
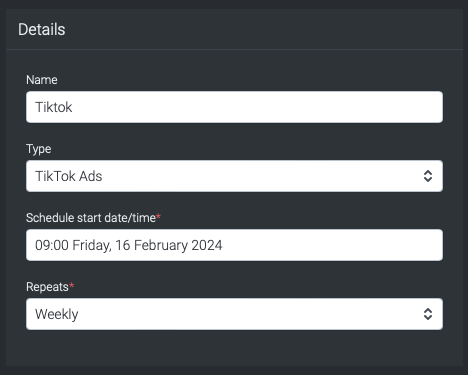
Set the name of the integration.
Under 'Type', select 'TikTok Ads'. Under 'Type', select 'Import: TikTok Ads'. When selecting the integration type, do take note that the integrations are arranged in five different groups which are API, Import, Export, Messaging, Scheduled and that some integrations would appear in multiple groups.
The Schedule start date/time allows the integration to start at the specified time/date. When used in tandem with "Repeats" (Weekly), this allows the integration to repeat weekly at 09:00 (based on the example above).
Repeats allow you to conduct the integration multiple times without having to create a new integration. You could choose either Yearly, Monthly, Weekly, Daily and Hourly. Some platforms have processing limitation whereby it could take some time to process the data. Hence hourly repeats might be affected and daily repeat might be a preferred option instead.
Configuration
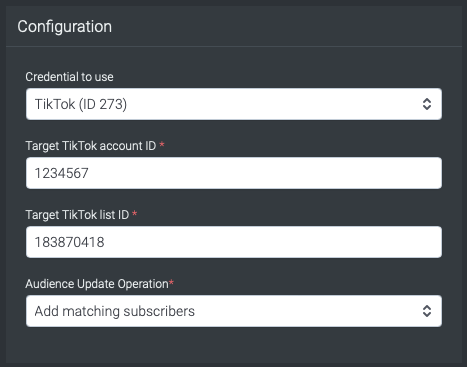
Choose the desired credential to use that you have set up in the credential page.
Add the TikTok account ID of the account that you want to feed the data to. Since the TikTok account ID is not pre-populated, you would need to obtain the TikTok account ID via the TikTok Ads Account.
The TikTok Audience ID is equivalent to the Taguchi List ID whereby you would be able to access the list of audiences you would like to target. To obtain the TikTok list ID, you would need to create an audience list in TikTok which would generate the ID. Once the ID has been generated, copy and paste it into the TikTok list ID input box. The TikTok Audience ID is located in your TikTok Ads Account.

- Audience Update Operation allows us to "Add matching subscribers" or "Replace subscribers".
"Add matching subscribers" will add subscribers to TikTok who match the target expression set up in the integration. This is a cumulative feed.
"Replace subcribers" allows users to refresh subscriber data in TikTok with new information. This process works by removing the old data of the subscriber in TikTok and adding new information of the subscriber.
Target Expression

Target expressions allows us to target specific subscribers in a list or based on other variables.
For more on Target Expressions see our article ‘What are target expressions?’
Save Changes and Activate

Once you have added your Details, Configuration and Target Expression, you will be able to save changes (1) and activate (2) the integration. You can only activate once you have save changes.
Deactivate

To stop the integration, click on Deactivate. This will stop Taguchi and TikTok from sharing data.
Active Integration
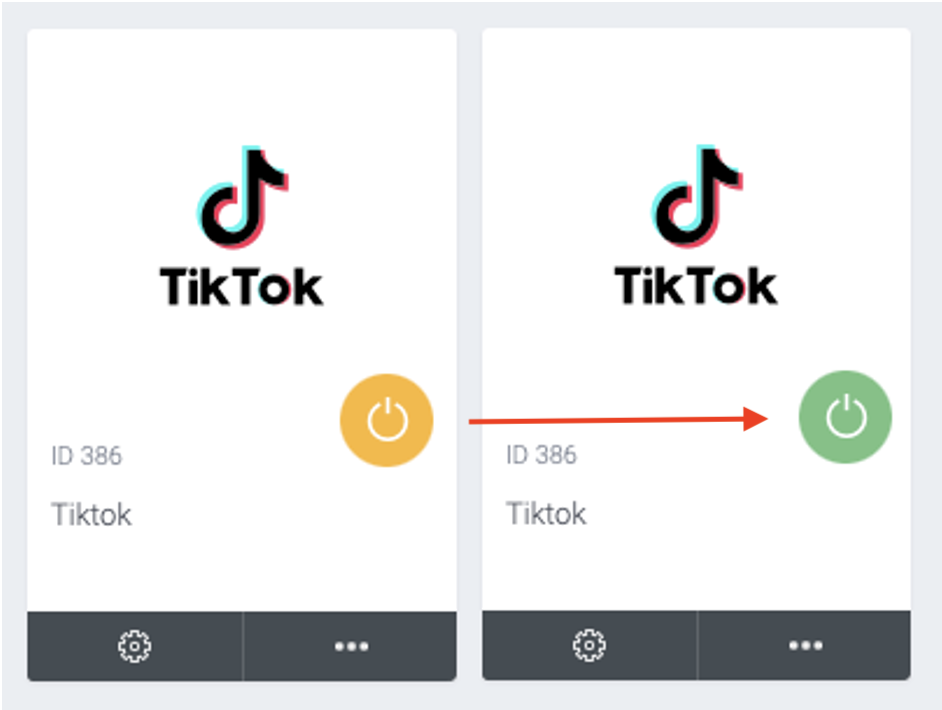
Once the integration has been saved and activated, the on/off icon of the integration card will change from yellow (Off) to green (On) which indicates that it is now activated.
Update Integration


If you want to update your Integration, you will be able to make the changes while it is activated or deactivated. Once the changes have been made, you will be able to update the integration by clicking on 'Save changes'. The Integration will be updated immediately.
Integration Status & Logs
Users can determine the status of an integration by looking for the status symbol (On/Off icon) colour within the integration tile.
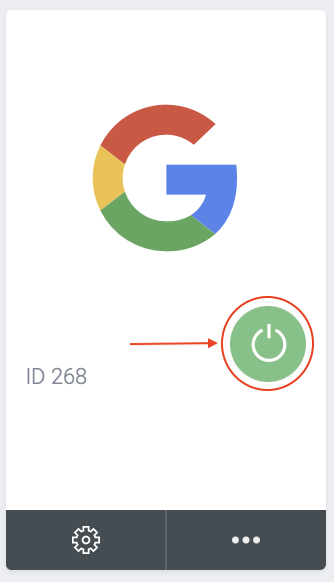
Green – This colour indicates that integration is active and has either been deployed or awaiting deployment.
Yellow – This colour indicates that the integration has been deactivated.
Red – This colour indicates that the integration has failed to deploy the extract.
Viewing Logs in the UI
Users can now view detailed integration logs directly in the Taguchi UI to troubleshoot issues.
To access logs:
- Navigate to Settings > Integrations.
- Select the integration you want to review.
- Click on View Status in the top right hand corner to see recent activity, including timestamps, status updates, and error messages (if any).

If an integration fails, checking the logs can help identify issues such as incorrect credentials, invalid audience configurations, or query timeouts.
Integration Deployment Status
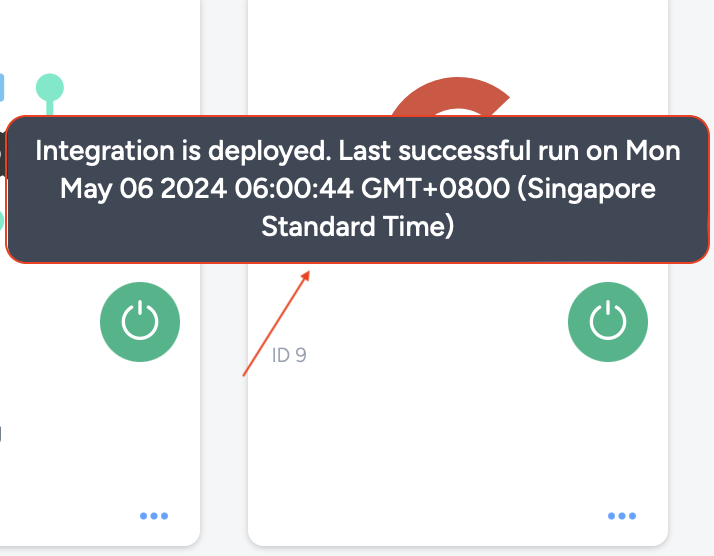
Users will be able to view the integration status message by hovering their cursor over the status symbol (On/Off) icon.
The messages the users will see will vary based on the deployment of the integration.
Green – "Integration has not yet run (Start time/date have not occurred yet) / Integration is deployed. Last successful run on Mon May 06 2024 06:00:44 GMT+0800 (Singapore Standard Time)"
Yellow – "Integration is not deployed (Deactivated)"
Red – "Integration Failed to run on Mon May 06 2024 06:00:44 GMT+0800 (Singapore Standard Time)"
Troubleshooting Measures
Users would need to ensure that the email address that they used in their credential authorization is the same email address that is used in their subscriber profile in Taguchi. Using the wrong email address will result in the connection between Taguchi and your ad manager platform to break. The issue will only be resolved once the email address is the same and the credential is reauthorized.
Your ads platform account can have multiple accounts (Account IDs) in which each account ID can have multiple lists (Lists IDs) associated with it. So, when populating the integration, the user would need to take into consideration which account and list they will be sending the extract over to and to ensure that the correct account ID and list ID is added into the integration configuration and that the account ID and list ID matches the ads platform.
Do ensure that you do not mix your list ID and account ID as that will also break the connection.
When choosing the interval (Hourly, Daily, Weekly and Monthly) in the integration setup, users would need to take into consideration that the ads platform (TikTok) that will receive the data from us will take 24 - 48 hours to ingest which would mean that an hourly repeat for the integration would result in the data not being displayed on your ads platform and could also result in your connection being potentially cut. Hence, we recommend using Daily, Weekly or Monthly instead of Hourly.
To reauthorize the credentials, you would need to click on “Click to request authorization from TikTok” within the choosen credential. The link will lead you to an authorization page. The steps to reauthorize the credentials is the same as the authorization steps above.
Any request issued by Taguchi has a 15-minute timeout limit. If the request takes longer, it will fail. To avoid this, ensure that queries on the receiving end (TikTok) are optimized to run within 15 minutes.
If you are having trouble with this integration, please contact Taguchi Support for assistance.
