- Support Home
- Knowledge Base
- Integrations
- TASK Import Integration
Related articles
Need some help?
If you have questions or can't find what you're looking for, we're here for you.
Taguchi Support is available Monday to Friday, 9am - 5:30pm AEDT.
Create New TicketTaguchi Certified Training
Join our free and live online training sessions. You'll benefit from a better understanding of the platform's features and functionality. Plus with Taguchi Certified Rewards, every session you attend, you're not just learning - you're earning your way to some fantastic rewards.
About Taguchi Certified RewardsAPI Version 5
Did you know Taguchi has an API that supports all of the functionality provided by the admin interface and more?
Explore API Documentation
Thanks for your feedback!
TASK Import Integration
The TASK Import Integration for Taguchi is a self-service solution designed to streamline the process of importing data from TASK into your Taguchi account.
This integration supports secure, automated file transfers – making it easy to import large volumes of data such as subscriber data and purchase history. With end-to-end encryption and scheduled syncs, the data stays up to date in Taguchi without the need for manual intervention, ensuring both efficiency and security.
Credentials set up
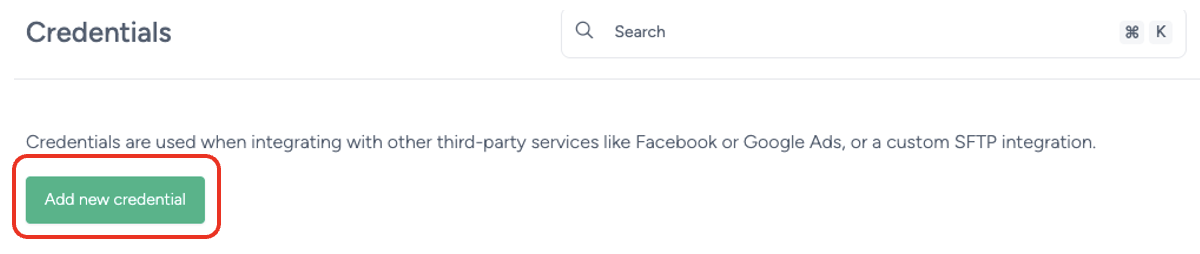
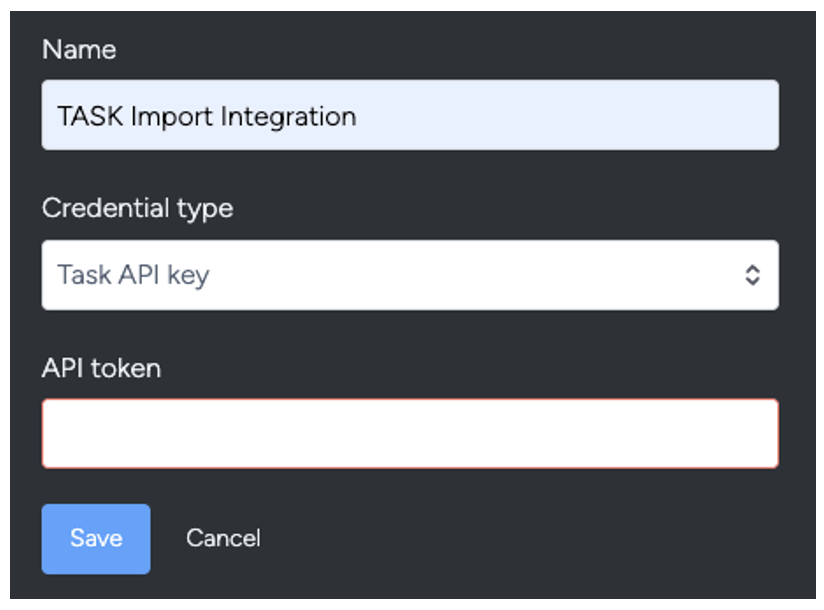
You will need to choose the appropriate credential type (Task API key) and add the API token (ensure that this has been retrieved securely).
Once the API token has been added, save the credentials.
Integration setup
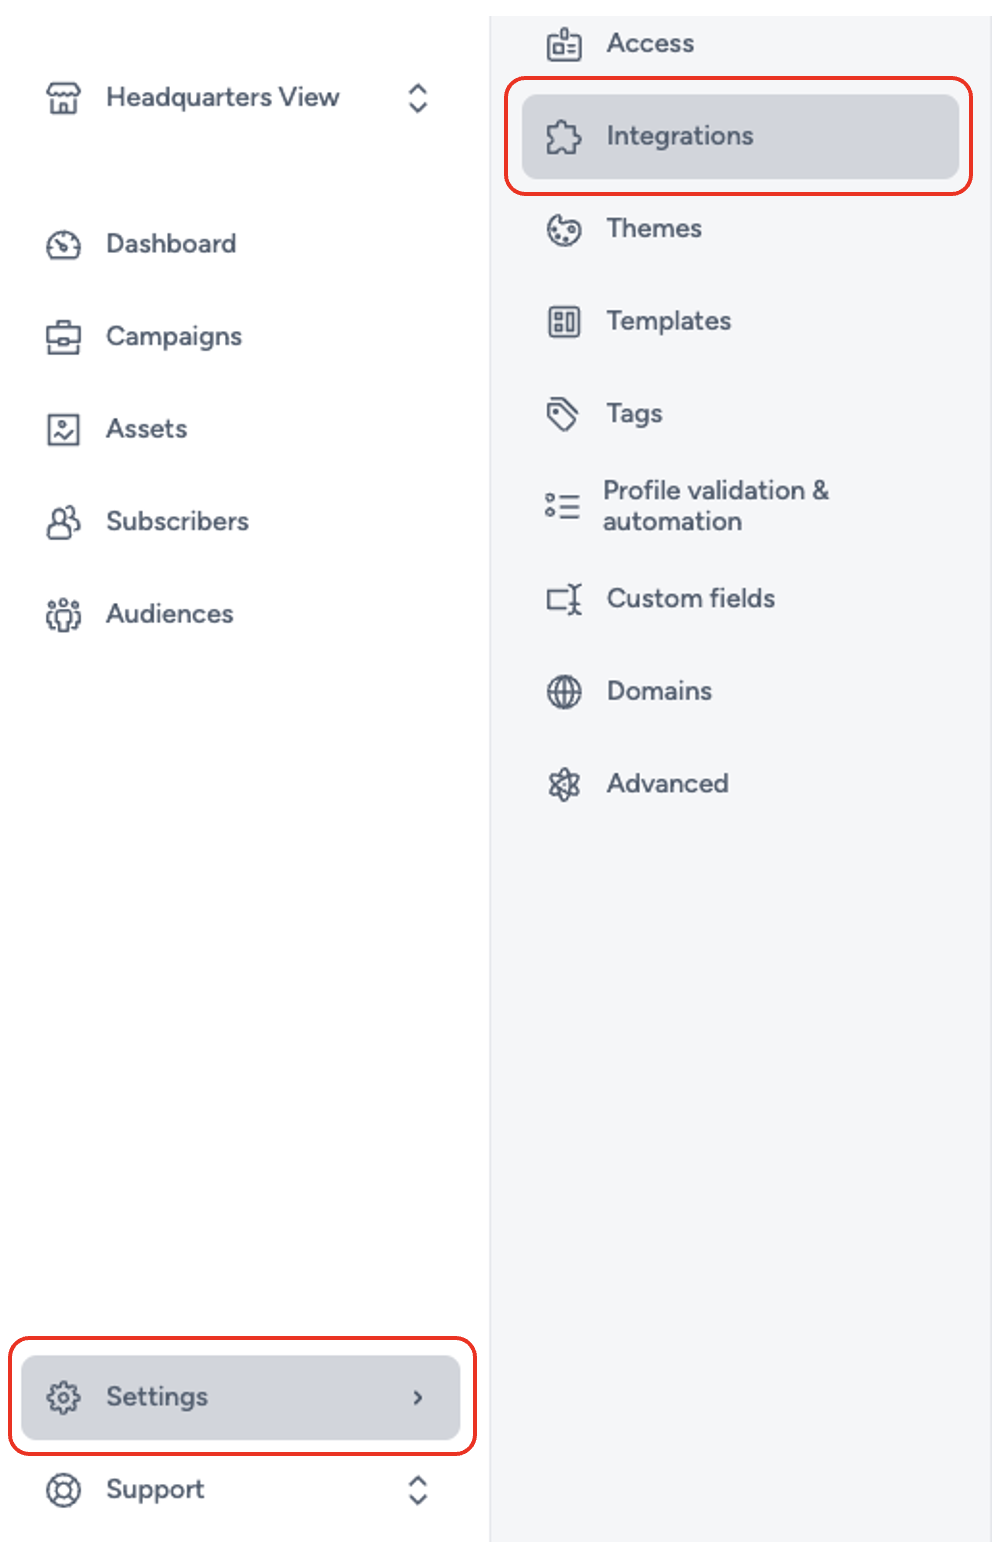
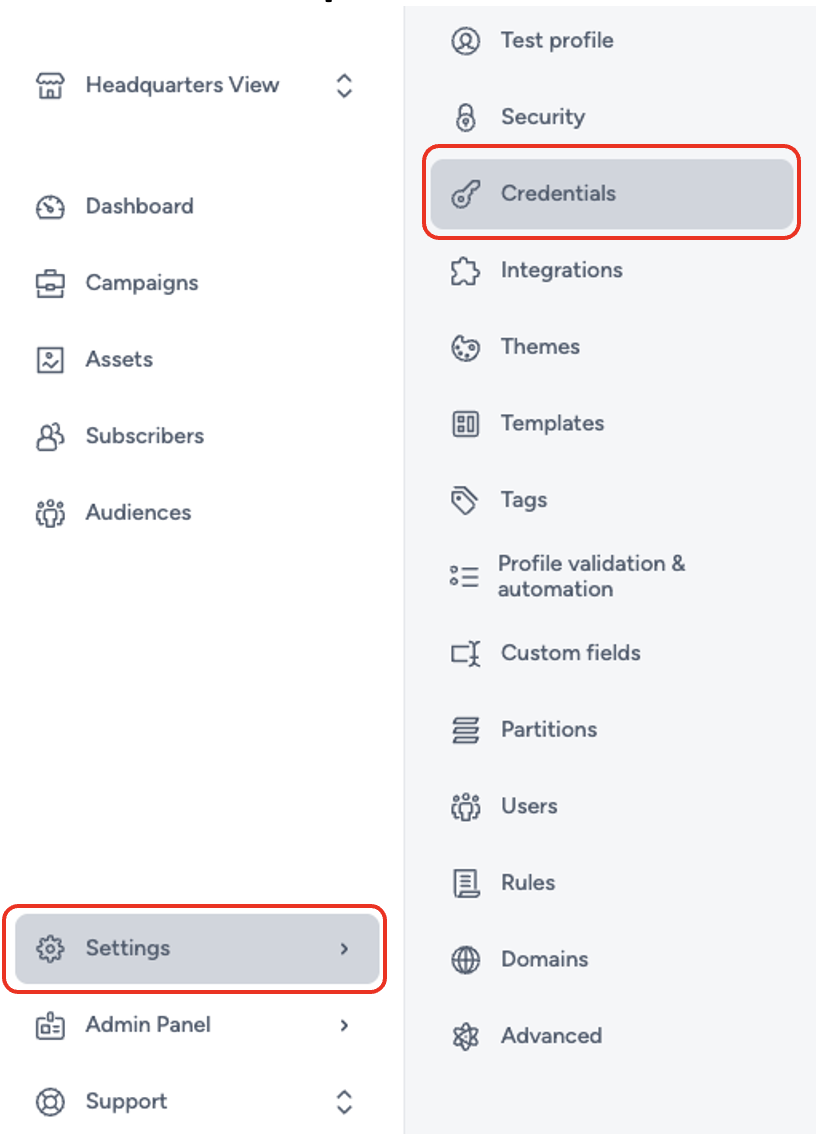
To create a new TASK import integration, make sure your user account has the necessary Integration role privileges assigned. Without the appropriate permissions, you won’t be able to access or configure integrations.
To begin, go to Settings > Integrations in your Taguchi dashboard. From there, you’ll be able to create and manage integrations, including setting up your TASK import.
Setting up a new integration
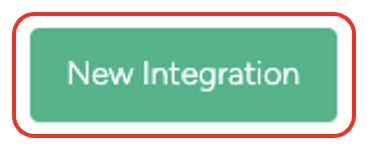
Select ‘New Integration’

Integration setup overview
Within the integration setup screen, you'll find 4 key sections that will guide you through the process:
- Details
- Configuration
- Map Data
- Notes
These sections are designed to walk you through the setup step-by-step, ensuring a smooth and efficient integration process.
Details
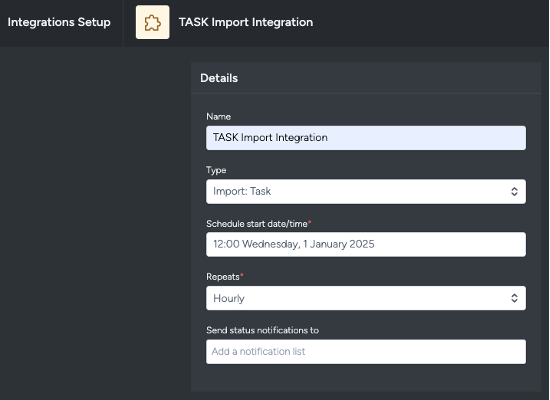
Name the integration: Provide a clear, descriptive name to help you and your team easily identify the integration.
Choose the type of integration: Under type, select ‘Import: Task’.
Note: Integration types are grouped into 9 categories:- API
- Audience Sync
- Event
- Export
- Import
- Messaging
- Notification
- Push Notification
Scheduled
Schedule start date/time: Determines when the integration will first run from. Combined with Repeat, it allows recurring imports (e.g., hourly at 12:00 starting from 01 January 2025).
Repeats: Set how often the integration should run: Yearly, Monthly, Weekly, Daily, or Hourly. Be mindful of processing limitations; daily may be more reliable than hourly.
Send status notifications to (optional): Specify an email list to receive notifications about the integration’s status.
Configuration
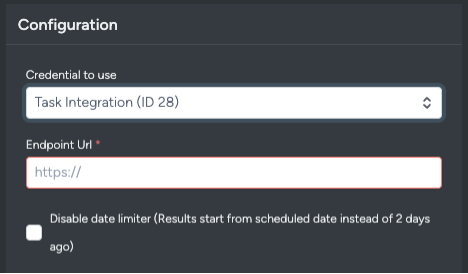
Choose the credential to use: Must be set up prior to the integration. Follow the earlier instructions to create and manage credentials.
Endpoint URL: Main URL where TASK data is exposed without additional parameters; this is the base endpoint.
Disable date limiter (Results start from scheduled date instead of 2 days ago):
- If ticked, integration retrieves data starting from the scheduled date/time.
- Default (unticked) pulls data from two days prior.
- Normally, keep unticked; contact support if override is needed.
Map data

This TASK import integration has 5 ‘Taguchi Objects’ for data mapping:
- Subscriber Normal
- Conversion
- Subscriber custom field manual mapping
- Partition custom field manual mapping
- Product custom field manual mapping
For all Taguchi Objects, a ‘ref’ field is mandatory.
Subscriber Normal
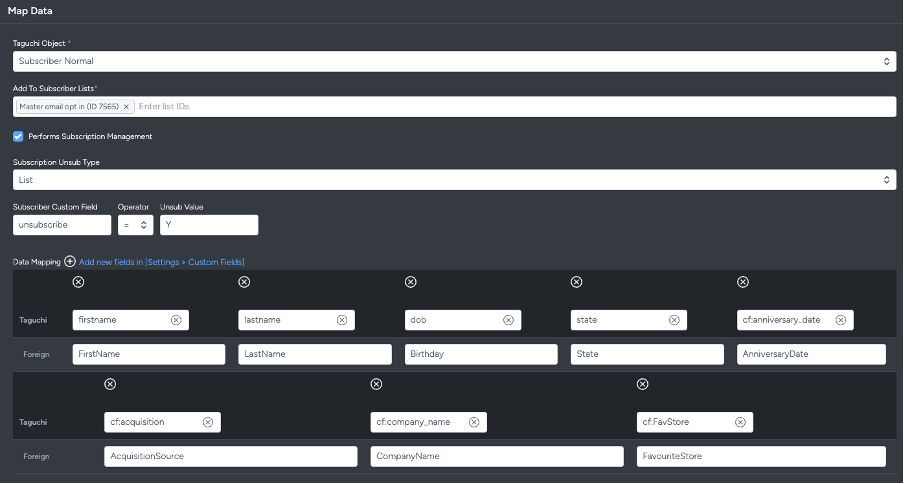
Add to subscriber list: Add a subscriber list ID for mapping.
Performs subscription management: Checkbox reveals two fields:
- Subscription unsub type: List or global.
- Subscriber custom field, Operator, and Unsub value: Determines unsubscription logic. Operators:
=or!=.
Data mapping: Map subscriber standard and custom fields.
- Taguchi fields: Standard or custom fields already set up in Taguchi.
- Foreign fields: Field values from the 'Endpoint URL'.
Conversion
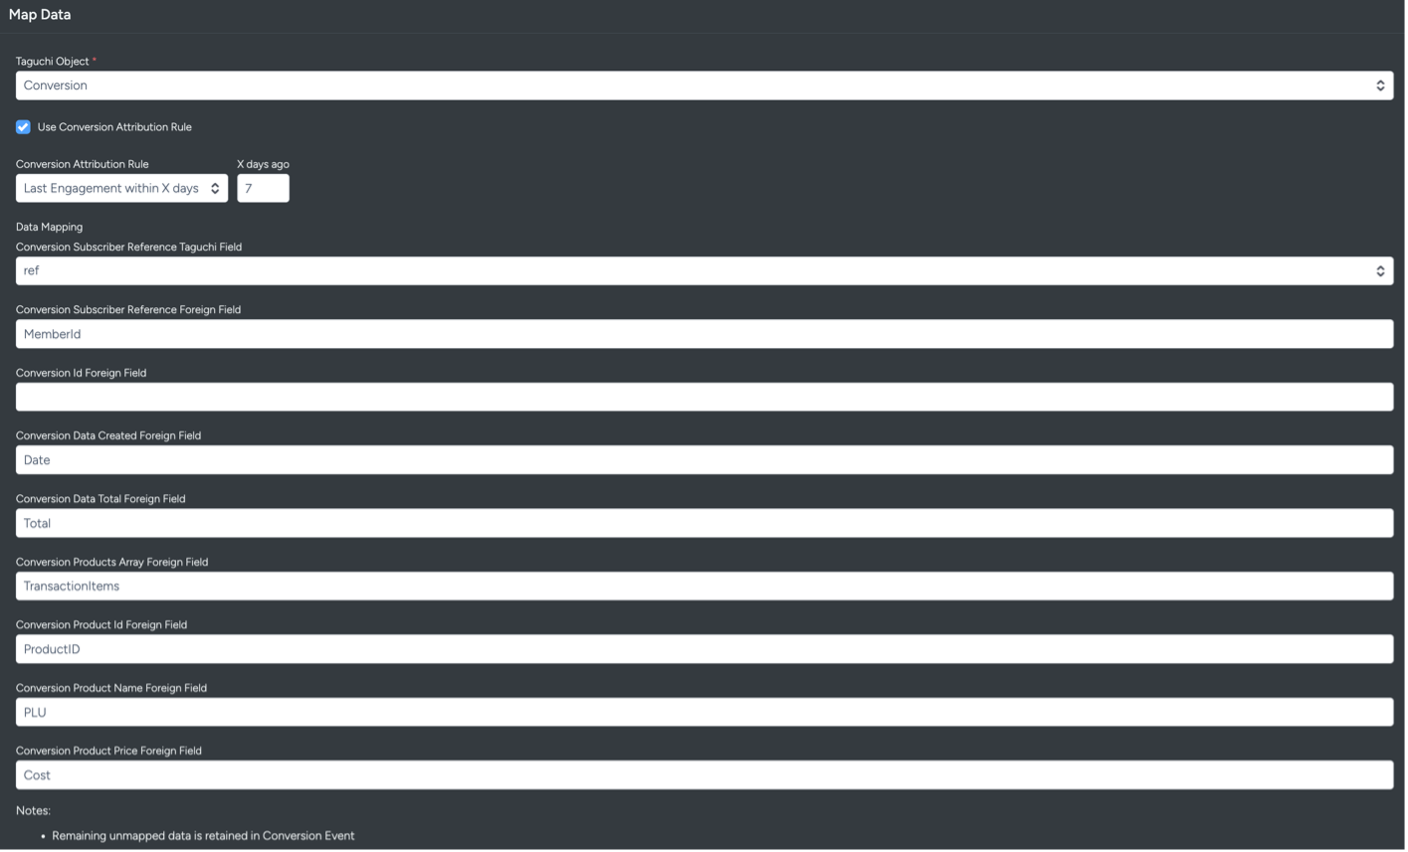
- Use Conversion Attribution Rule Checkbox: Set conversion attribution rule (e.g., Last Engagement within X days).
- Conversion Subscriber Reference Taguchi Field: Foreign key linking conversion to subscriber.
- Conversion Subscriber Reference Foreign Field: Foreign key to specific subscriber.
- Conversion Id Foreign Field: Links other entities with conversion by ConversionId.
- Conversion Data Created Foreign Field: Creation timestamp of the conversion.
- Conversion Data Total Foreign Field: Total value of the conversion.
- Conversion Products Array Foreign Field: Links conversion to multiple products.
- Conversion Product Id Foreign Field: Links conversion to specific product ID.
- Conversion Product Name Foreign Field: Links conversion to product name.
- Conversion Product Price Foreign Field: Establishes relationship with product pricing.
Subscriber custom field manual mapping

- Add to subscriber list: Map/add data into a subscriber list ID.
- Performs subscription management: Same as Subscriber Normal.
- Data mapping: Map standard and custom fields.
- Taguchi fields: Standard or custom fields in Taguchi.
- Foreign fields: Field values from 'Endpoint URL'.
Partition custom field manual mapping
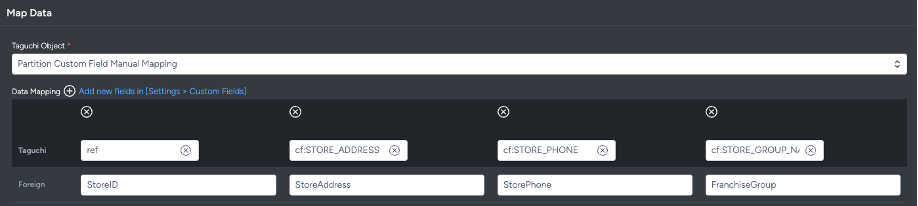
- Data mapping: Map partition standard and custom fields.
- Taguchi fields: Standard or custom fields in Taguchi.
- Foreign fields: Field values from 'Endpoint URL'.
Product custom field manual mapping
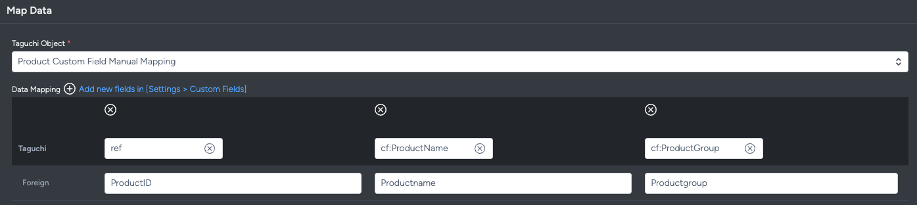
- Data mapping: Map product standard and custom fields.
- Taguchi fields: Standard or custom fields in Taguchi.
- Foreign fields: Field values from 'Endpoint URL'.
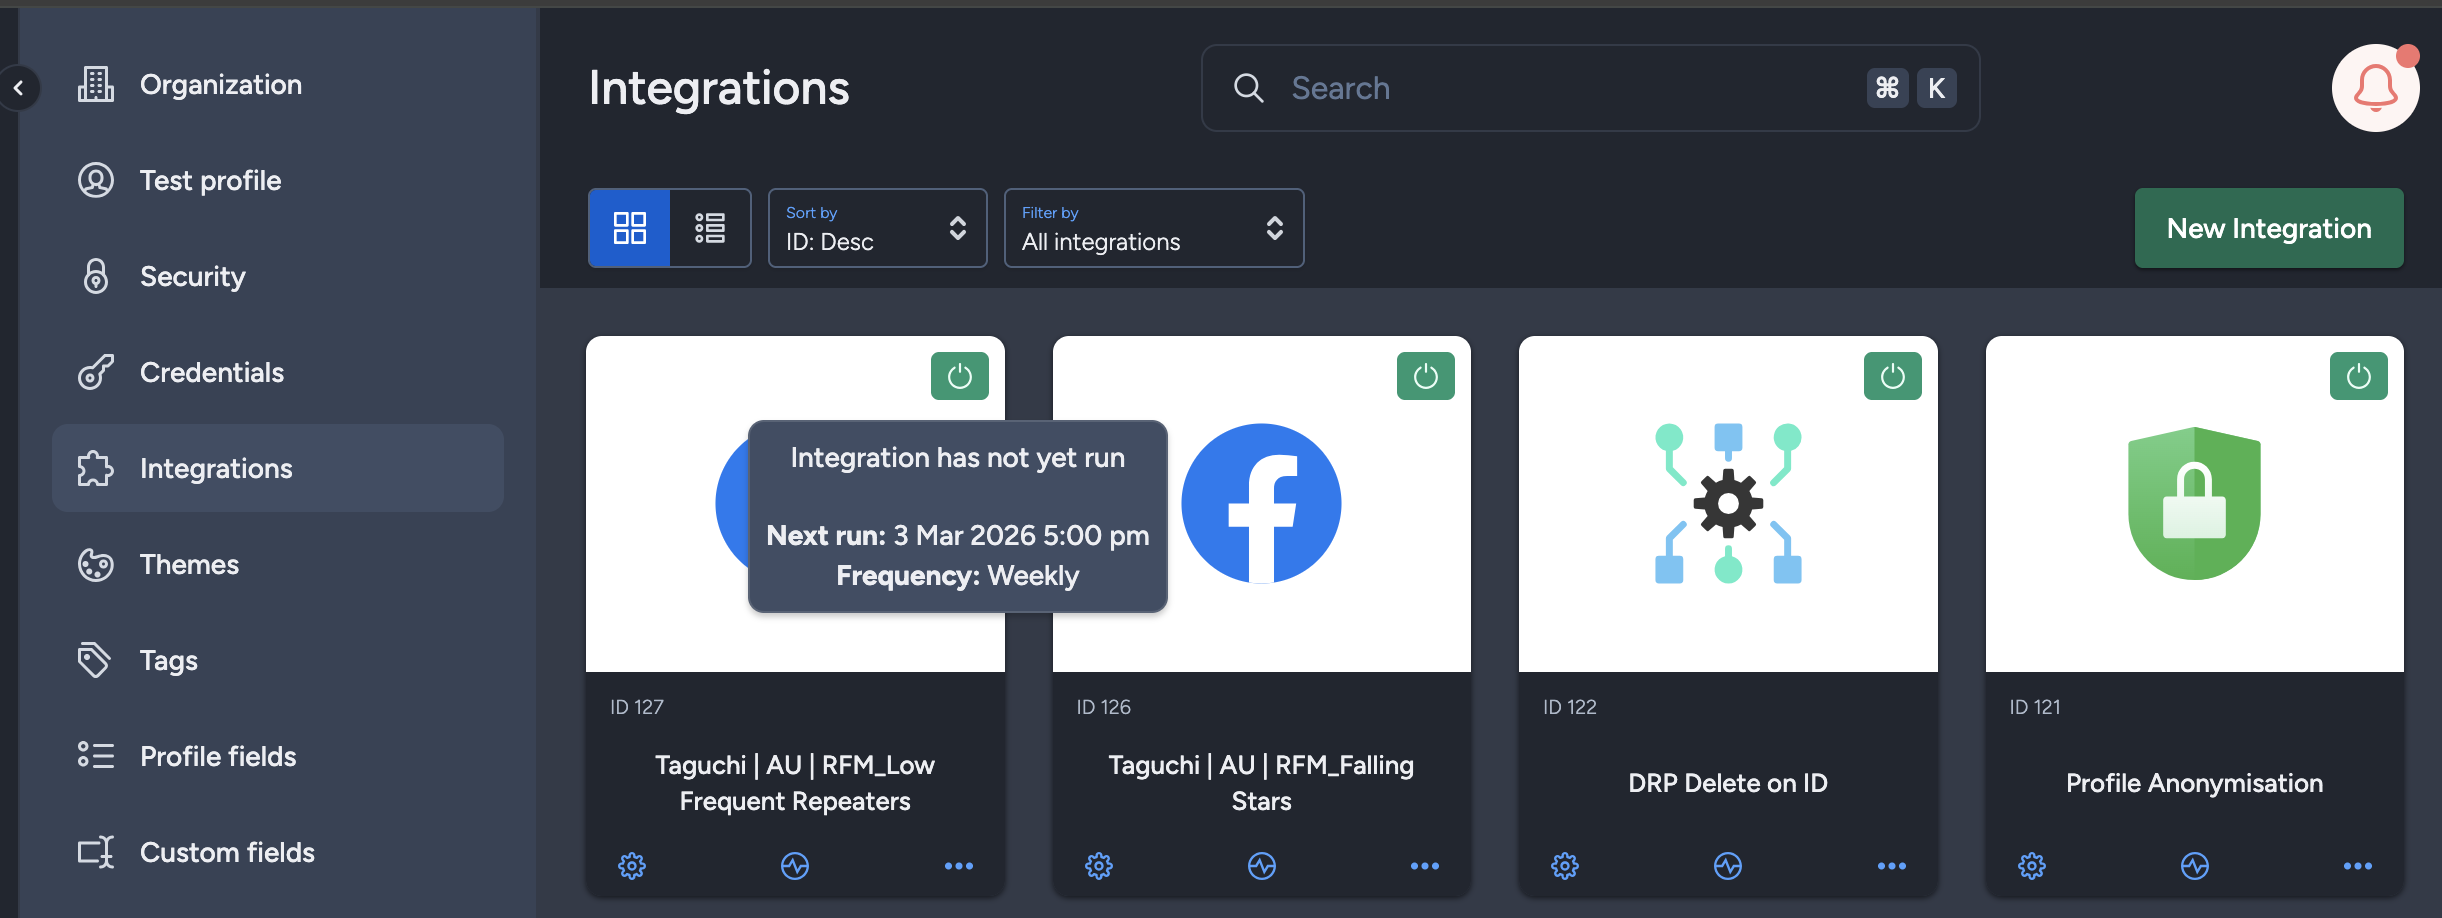
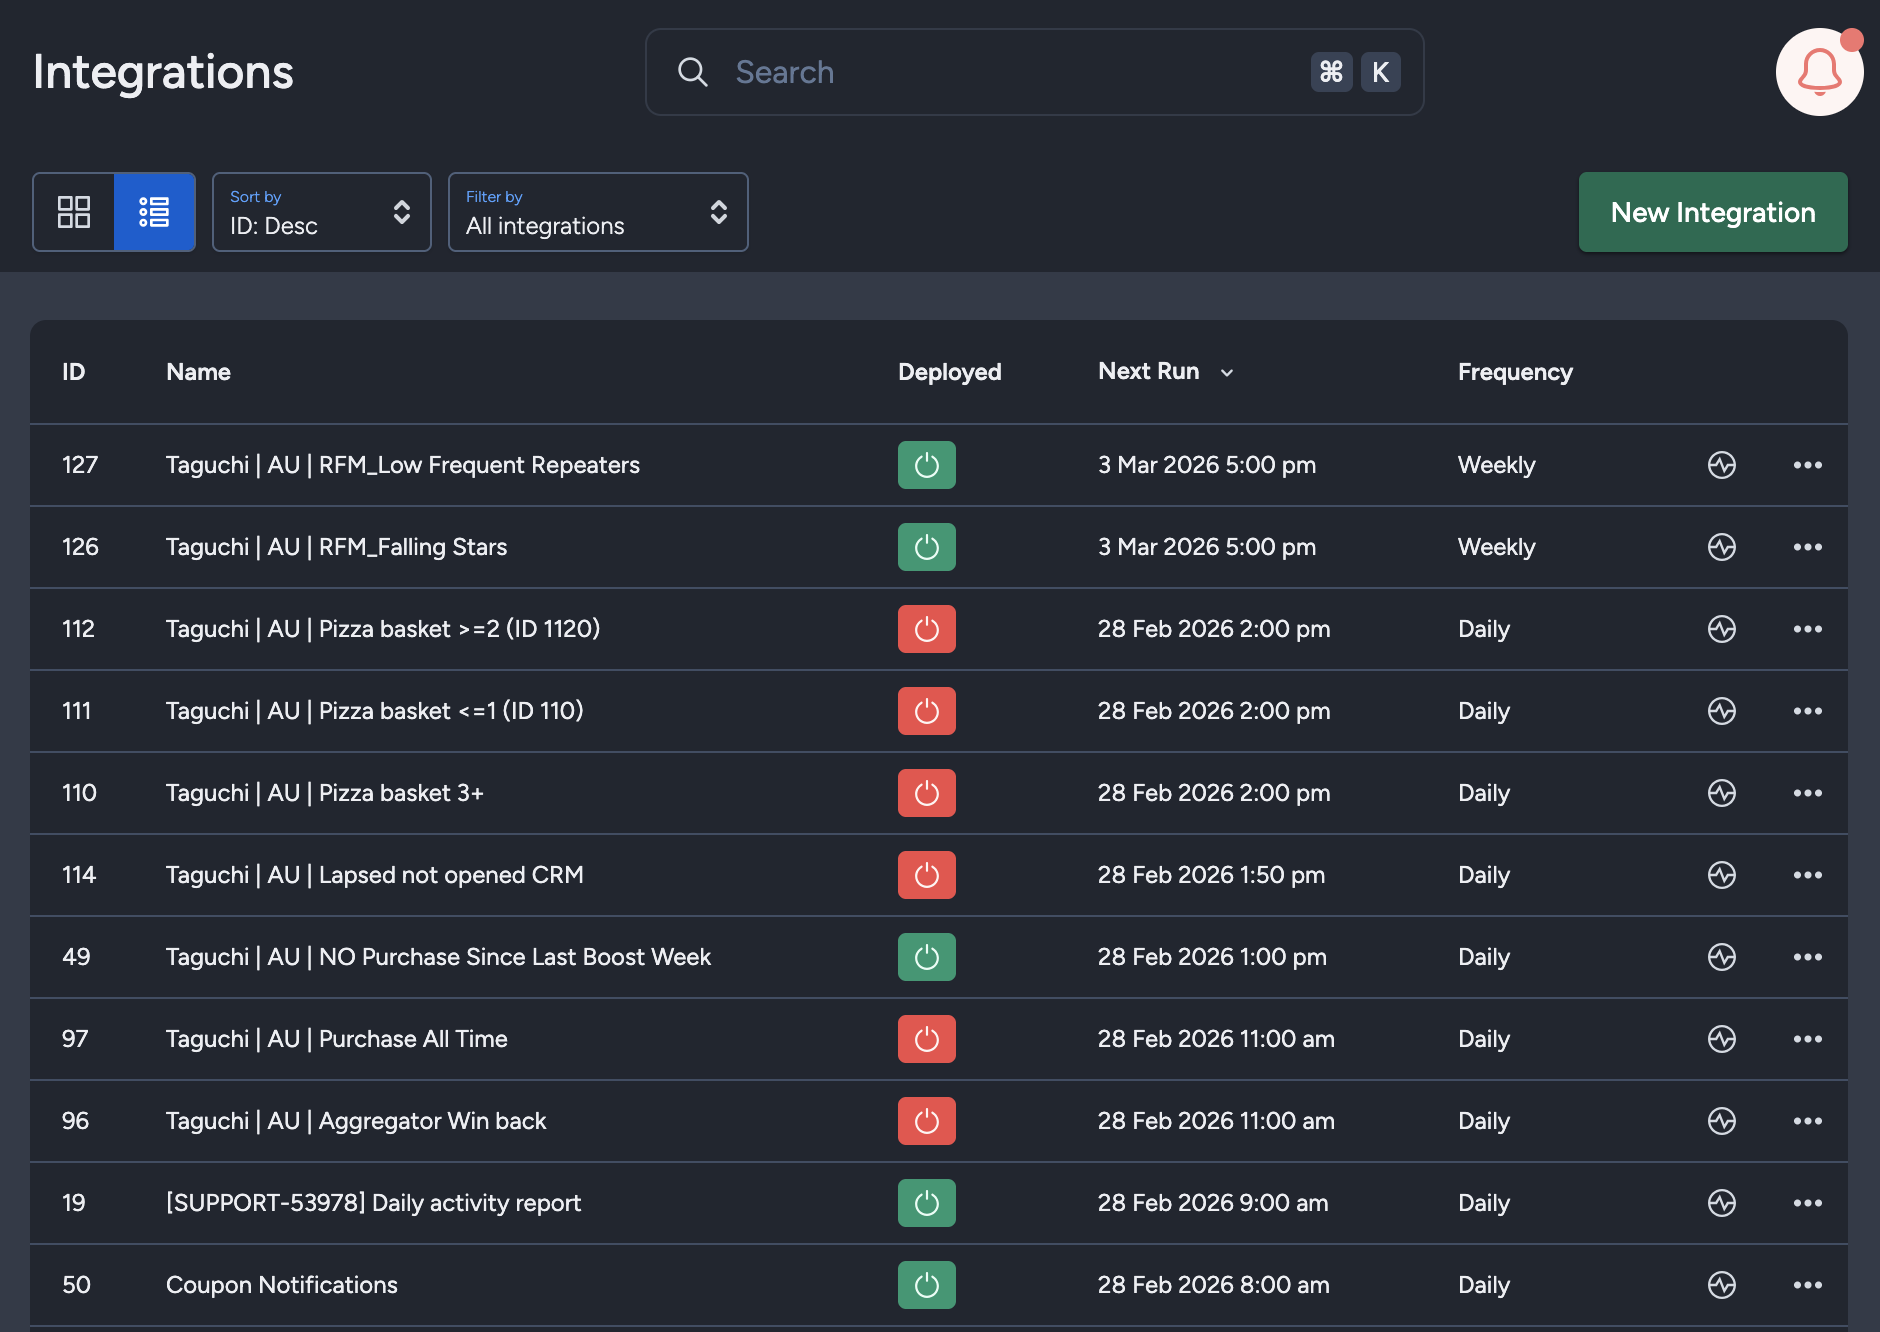
Viewing Integration Schedules and Next Run Details
The Integration UI provides visibility into integration schedules by displaying the scheduled frequency and the time of the next run when hovering over the status icon. Adding to that, the integration UI supports list view with sortable columns so you can see the next run timestamp and frequency there too.. This helps users quickly check when integrations are scheduled to execute and manage them more efficiently.
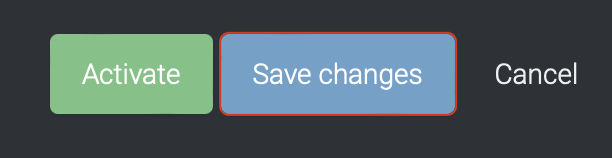
Save Changes and Activate

Once you have added your Details, Configuration and Target Expression, you will be able to save changes (1) and activate (2) the integration. You can only activate once you have saved changes.
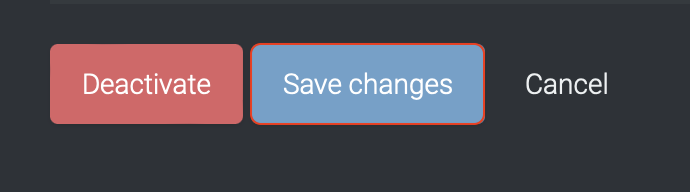
Deactivate

To stop the integration, click on Deactivate. This will stop Taguchi from exporting to Azure Blob.
Active Integration
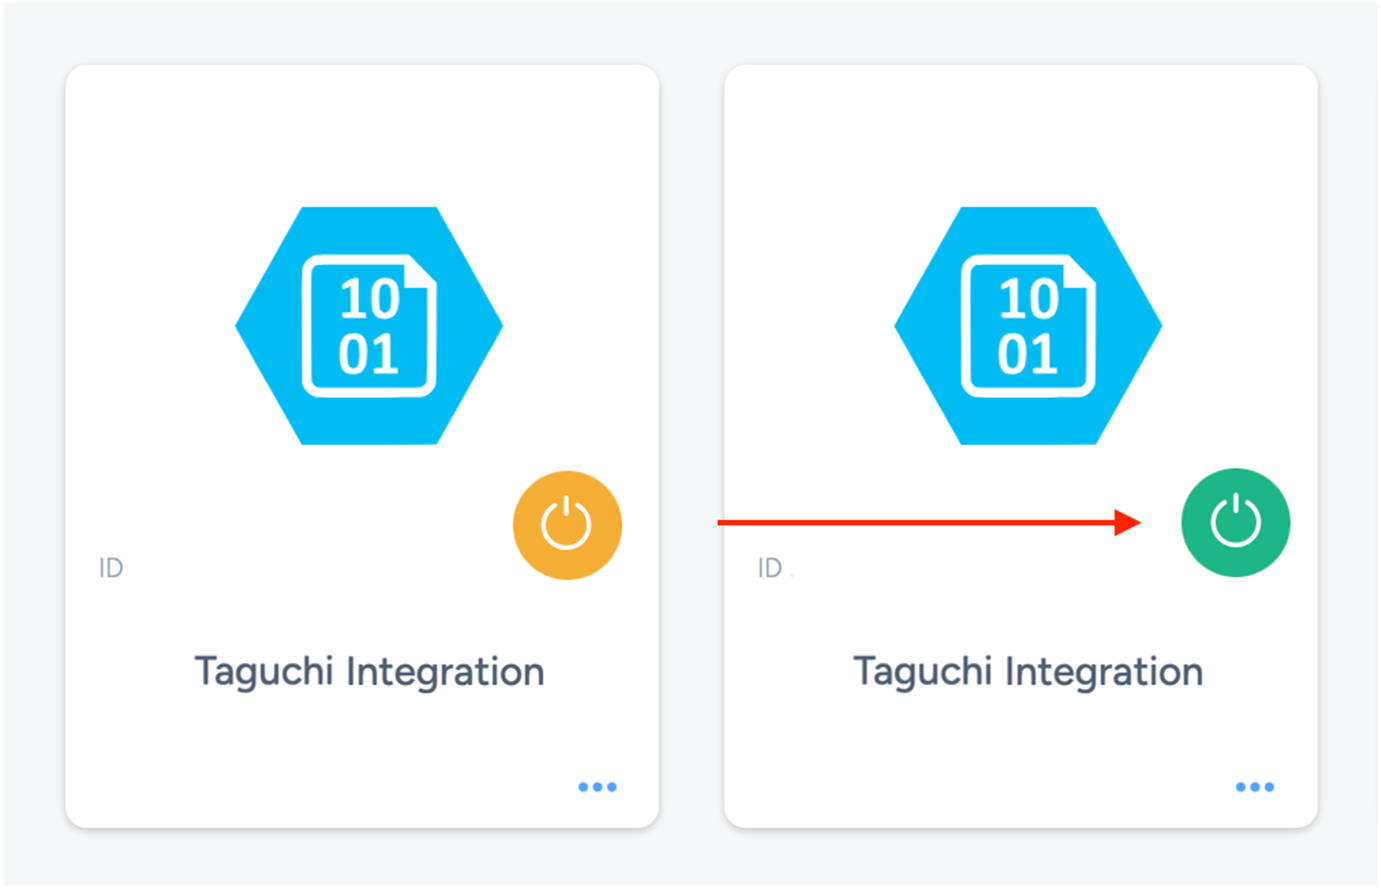
Once the integration has been saved and activated, the on/off icon of the integration card will change from yellow (Off) to green (On) which indicates that it is now activated.
Update Integration
If you want to update your Integration, you will be able to make the changes while it is activated or deactivated. Once the changes have been made, you will be able to update the integration by clicking on 'Save changes'. The Integration will be updated immediately.
Viewing Logs in the UI
Users can now view detailed integration logs directly in the Taguchi UI to troubleshoot issues.
To access logs:
- Navigate to Settings > Integrations.
- Select the integration you want to review.
- Click on View Status in the top right hand corner to see recent activity, including timestamps, status updates, and error messages (if any).

If an integration fails, checking the logs can help identify issues such as incorrect credentials, invalid audience configurations, or query timeouts.
If you are having trouble with this integration, please contact Taguchi Support for assistance.