- Support Home
- Knowledge Base
- Web Forms
- Conditional Logic in Webforms
Related articles
Need some help?
If you have questions or can't find what you're looking for, we're here for you.
Taguchi Support is available Monday to Friday, 9am - 5:30pm AEDT.
Create New TicketTaguchi Certified Training
Join our free and live online training sessions. You'll benefit from a better understanding of the platform's features and functionality. Plus with Taguchi Certified Rewards, every session you attend, you're not just learning - you're earning your way to some fantastic rewards.
About Taguchi Certified RewardsAPI Version 5
Did you know Taguchi has an API that supports all of the functionality provided by the admin interface and more?
Explore API Documentation
Thanks for your feedback!
Conditional Logic in Webforms
Conditional Logic in Webforms
Conditional logic in Webforms allows you to control what subscribers see or interact with based on their responses.
This feature helps streamline the user experience by dynamically showing or hiding fields, making forms smarter and more relevant.
What Is Conditional Logic?
Conditional logic refers to setting up rules that trigger specific actions on a form — such as showing, hiding, enabling, or disabling fields — based on user input.
These rules let you customise the form’s behaviour in real time.
Example Scenarios:
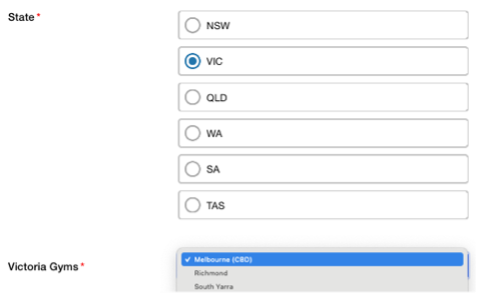
- Display a “Suburb” field based on state selection:
Show the Suburb field only when the user selects a specific state (e.g., Victoria) from the “What state?” dropdown. - Reveal additional fields dynamically:
If a user selects Victoria, display a list of stores in Victorian suburbs and additional fields for more details.
Why Use Conditional Logic?
Conditional logic improves both the form experience and the data you collect:
- 🧭 Improved user experience: Show only relevant fields based on subscriber responses.
- ⚙️ Streamlined data collection: Gather only the data that matters for specific audiences.
- ✅ Fewer errors: Reduce unnecessary submissions and irrelevant inputs.
When applied thoughtfully, conditional logic can make forms faster, clearer, and more user-friendly.
Supported Field Types
Conditional logic can be applied to the following field types in Taguchi Webforms:
- Address
- Single choice
- Dropdown
- Checkboxes
- Phone
- Short-text
- Long-text
- Number
How to Use Conditional Logic in V5 Webforms
Follow the steps below to apply conditional logic in your Taguchi Webform.
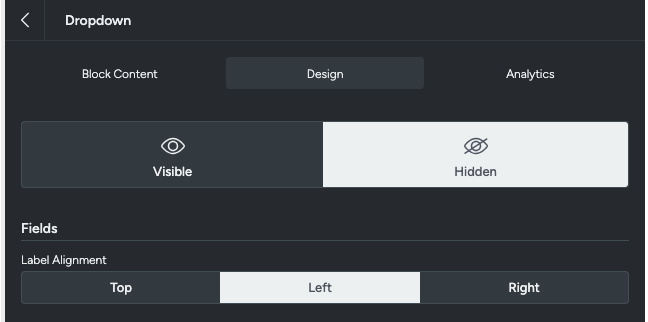
Step 1: Select the Target Fields
If a field should start hidden, mark it as Hidden in the field’s design settings.
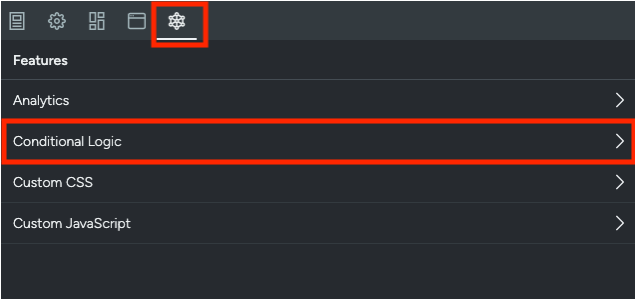
Step 2: Access the Conditional Logic Section
- In the left-hand menu, select Features.
- Click on Conditional Logic.
Step 3: Define Your Conditions
Conditional logic is configured using If and Not Equal To statements that determine how a field reacts to user input.
“If” Statements
In the Conditions section of the Webform editor, define rules that specify what happens when certain criteria are met.
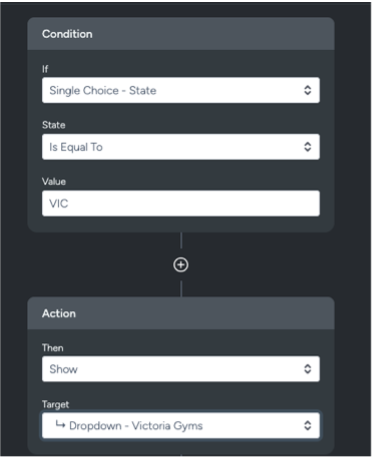
Example:
If the State field equals VIC, then display the Victoria Gyms field.
“Not Equal To” Logic
You can also create conditions based on the opposite case — when a field value does not match a specified value.
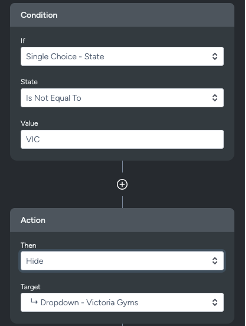
Example:
If State is not equal to VIC, hide the Victoria Gyms field.
“Set Options” Logic
The Set Options area allows you to dynamically define the list of options shown in a dropdown or selection field based on another field’s value.
This logic is configured directly within the conditional logic setup — no external data sources required.
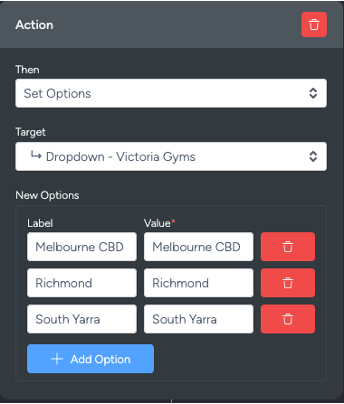
Example:
When a user selects a State value, the Set Options logic updates the available Store list dynamically.
“Checked” and “Not Checked” Logic
Conditional logic also applies to checkbox fields.
This allows you to show or hide elements depending on whether a checkbox is selected.
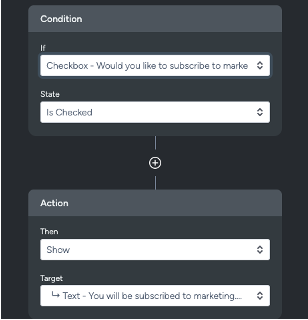
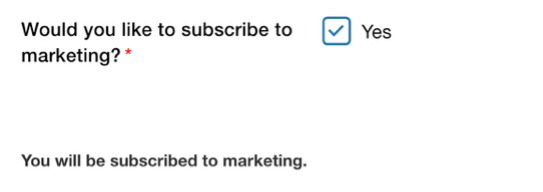
Example:
If a checkbox labelled Would you like to subscribe to marketing? is checked, an additional text field appears to confirm that the subscriber will be added to the marketing list.
Best Practices
- Keep conditional rules simple — avoid nested or conflicting conditions.
- Always test form logic in preview mode before publishing.
- Use clear labels for dependent fields to help users understand why new fields appear.
💬 For further assistance, contact Taguchi Support.