- Support Home
- Knowledge Base
- Integrations
- Import - Snowflake Integration
Related articles
Need some help?
If you have questions or can't find what you're looking for, we're here for you.
Taguchi Support is available Monday to Friday, 9am - 5:30pm AEDT.
Create New TicketTaguchi Certified Training
Join our free and live online training sessions. You'll benefit from a better understanding of the platform's features and functionality. Plus with Taguchi Certified Rewards, every session you attend, you're not just learning - you're earning your way to some fantastic rewards.
About Taguchi Certified RewardsAPI Version 5
Did you know Taguchi has an API that supports all of the functionality provided by the admin interface and more?
Explore API Documentation
Thanks for your feedback!
Import - Snowflake Integration
Taguchi offers a self-service Snowflake integration that allows you to import data directly from your Snowflake data warehouse into Taguchi using custom SQL queries. This integration provides automated, scheduled imports of subscriber data, custom fields, lists, and audiences, with intelligent field mapping based on your query results.
This integration enables secure and efficient data transfers from Snowflake, allowing you to leverage your existing data warehouse infrastructure for marketing operations. With the Snowflake import integration, the process is fully automated, ensuring that your data is regularly updated without manual intervention.
Key Features
- Query-based data import: Write custom SQL queries to retrieve exactly the data you need
- Intelligent field detection: Automatically detects available fields from your query results
- Field metadata display: See data types and sample values for all fields to assist with mapping
- Two-phase setup: Simplified configuration process for new integrations
- Multiple import types: Support for subscriber data, custom fields, lists, partition data, and audiences
- Scheduled execution: Run imports on hourly, daily, weekly, monthly, or yearly schedules
- Secure credential management: Encrypted storage of Snowflake credentials
Prerequisites
Credentials
You will need to set up a Snowflake credential before you can create a Snowflake import integration. The credential should include:
- Account name
- Username
- Programmatic access token (stored securely)
- Database name
- Warehouse name
- Schema name
- Role (optional)
In order to set up credentials, you will need to be an administrator of your organization. Navigate to Settings > Credentials to create a new Snowflake credential.
For more information about setting up Snowflake credentials, refer to the relevant section of the Snowflake User Guide.
Snowflake Permissions
Your Snowflake user account must have appropriate permissions to:
- Execute SELECT queries on the tables and views you want to access
- Use the specified warehouse
- Access the specified database and schema
Snowflake Import Integration Setup
To create a new integration, ensure that you have the required User Type integration role privileges assigned to you. The 'integration' page is under Settings > Integrations.
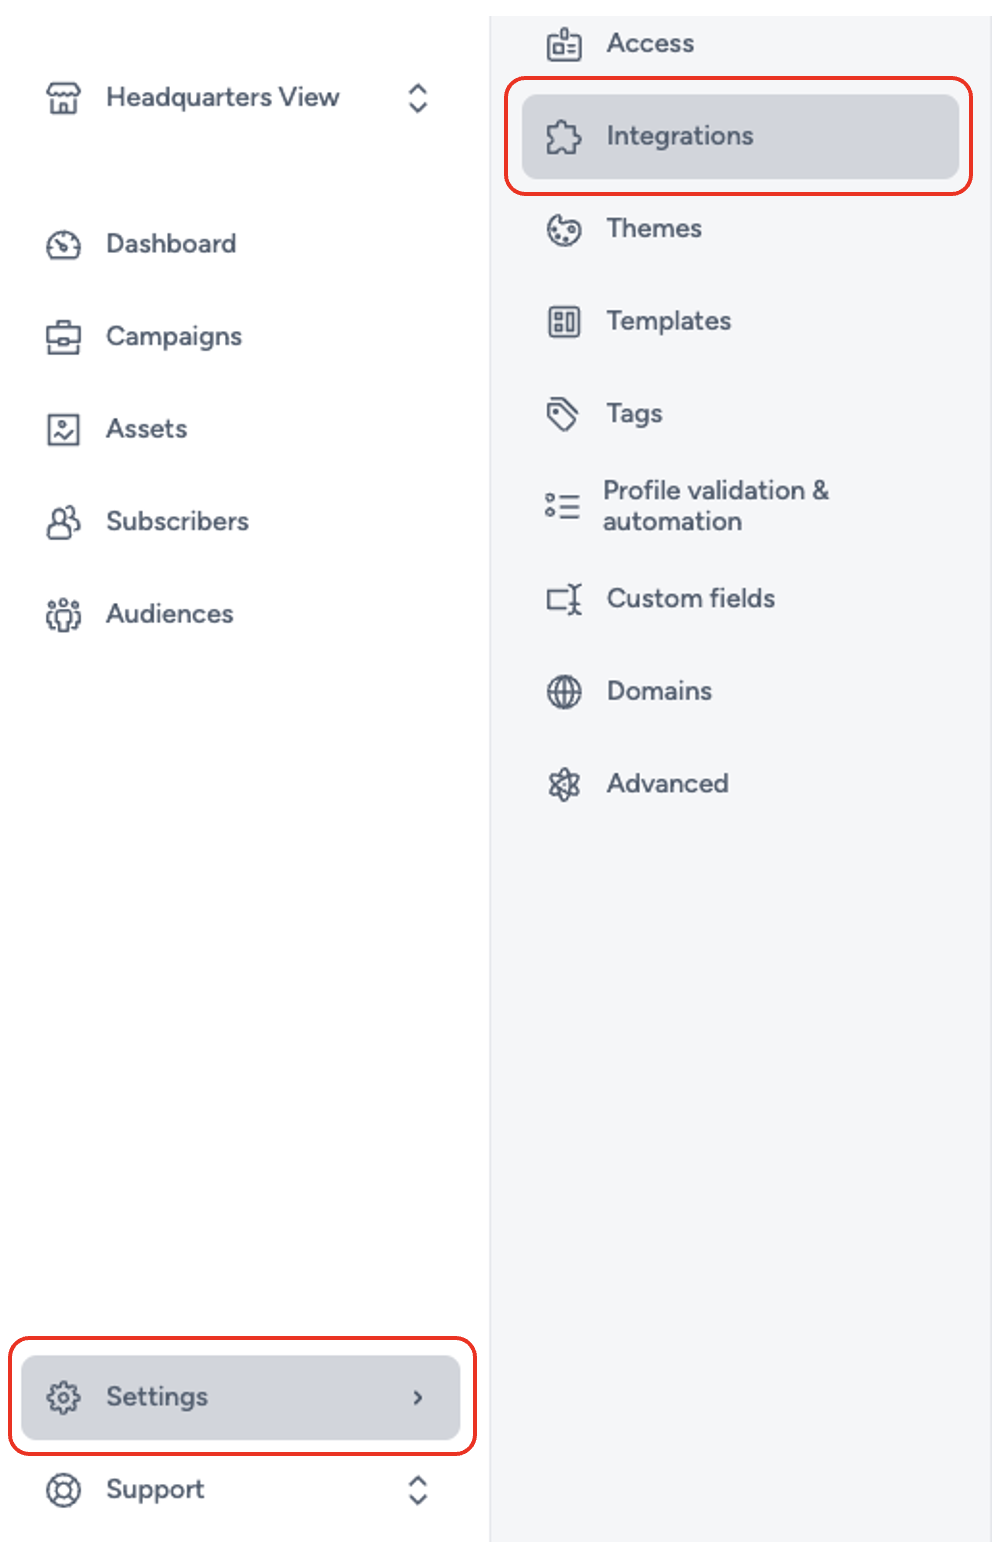
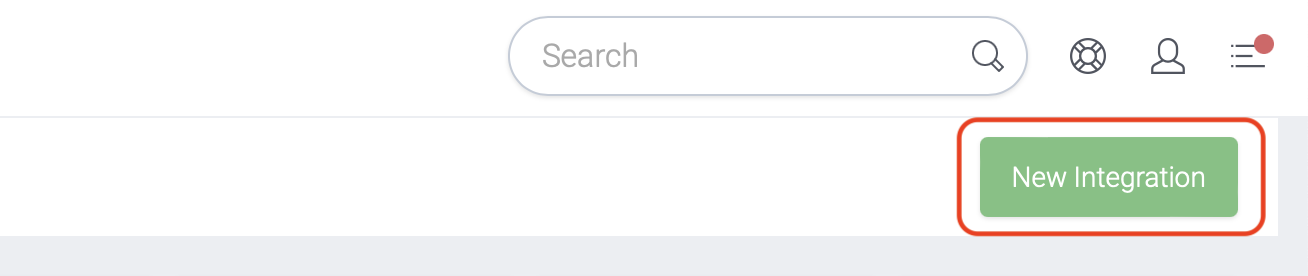
Select 'New Integration' and a new screen will popup.
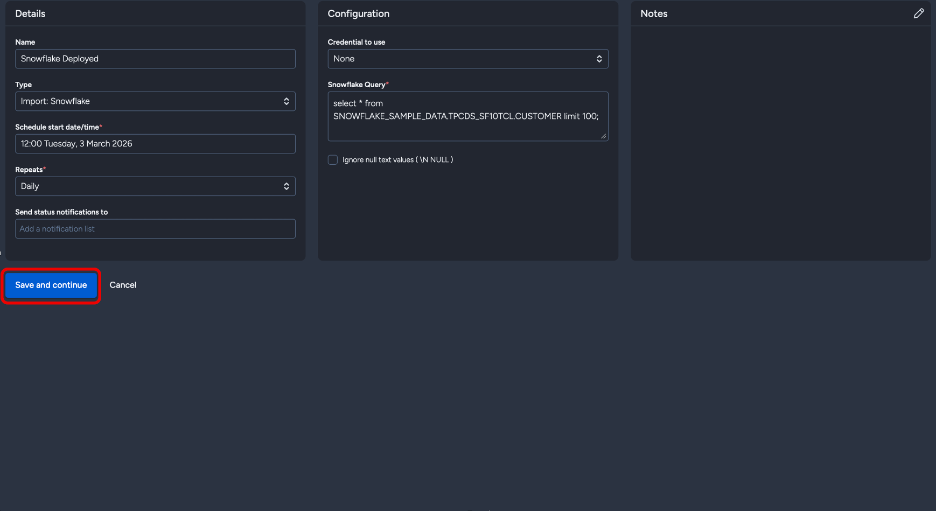
Two-Phase Setup for New Integrations
When creating a new Snowflake integration, you'll follow a two-phase setup process:
Phase 1: Configuration
In the first phase, you'll only see three sections:
- Details - Basic integration information
- Configuration - Snowflake connection and query settings
- Notes - Optional notes about the integration
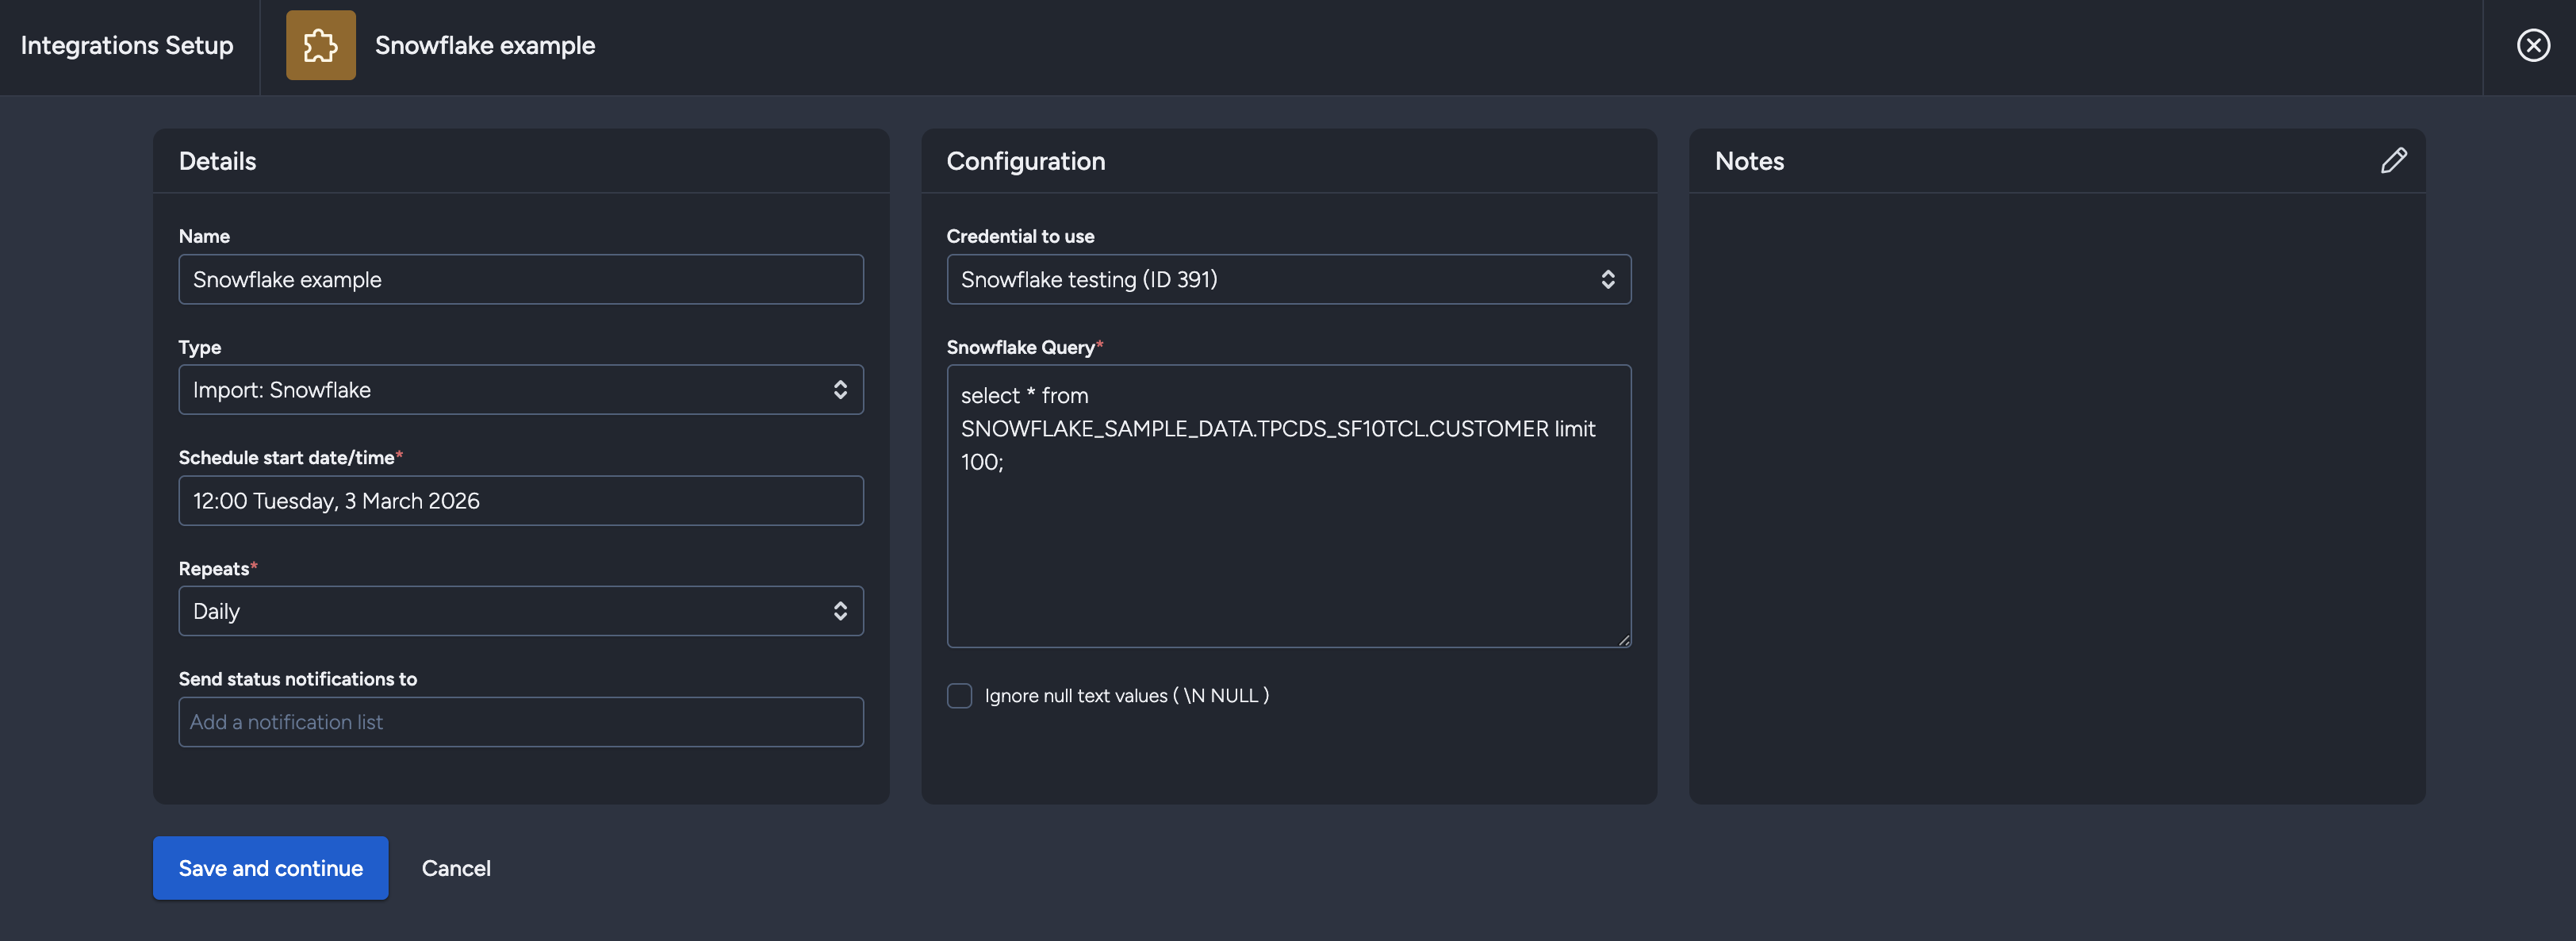
The save button will read "Save and continue" instead of "Save changes".
Phase 2: Data Mapping
After clicking "Save and continue", Taguchi will:
- Save your integration configuration
- Execute your SQL query with a LIMIT 1 to retrieve field information
- Display the complete setup modal with all available fields from your query
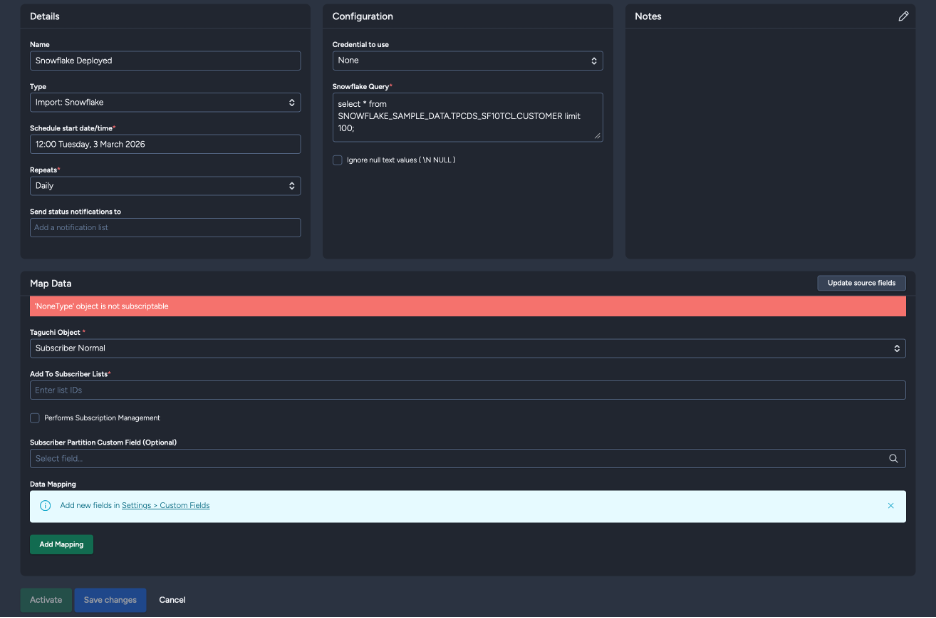
You'll then see additional sections:
- Map Data - Configure how Snowflake fields map to Taguchi fields
- Extract Target - Set target expressions for filtering
- Activate/Deactivate buttons
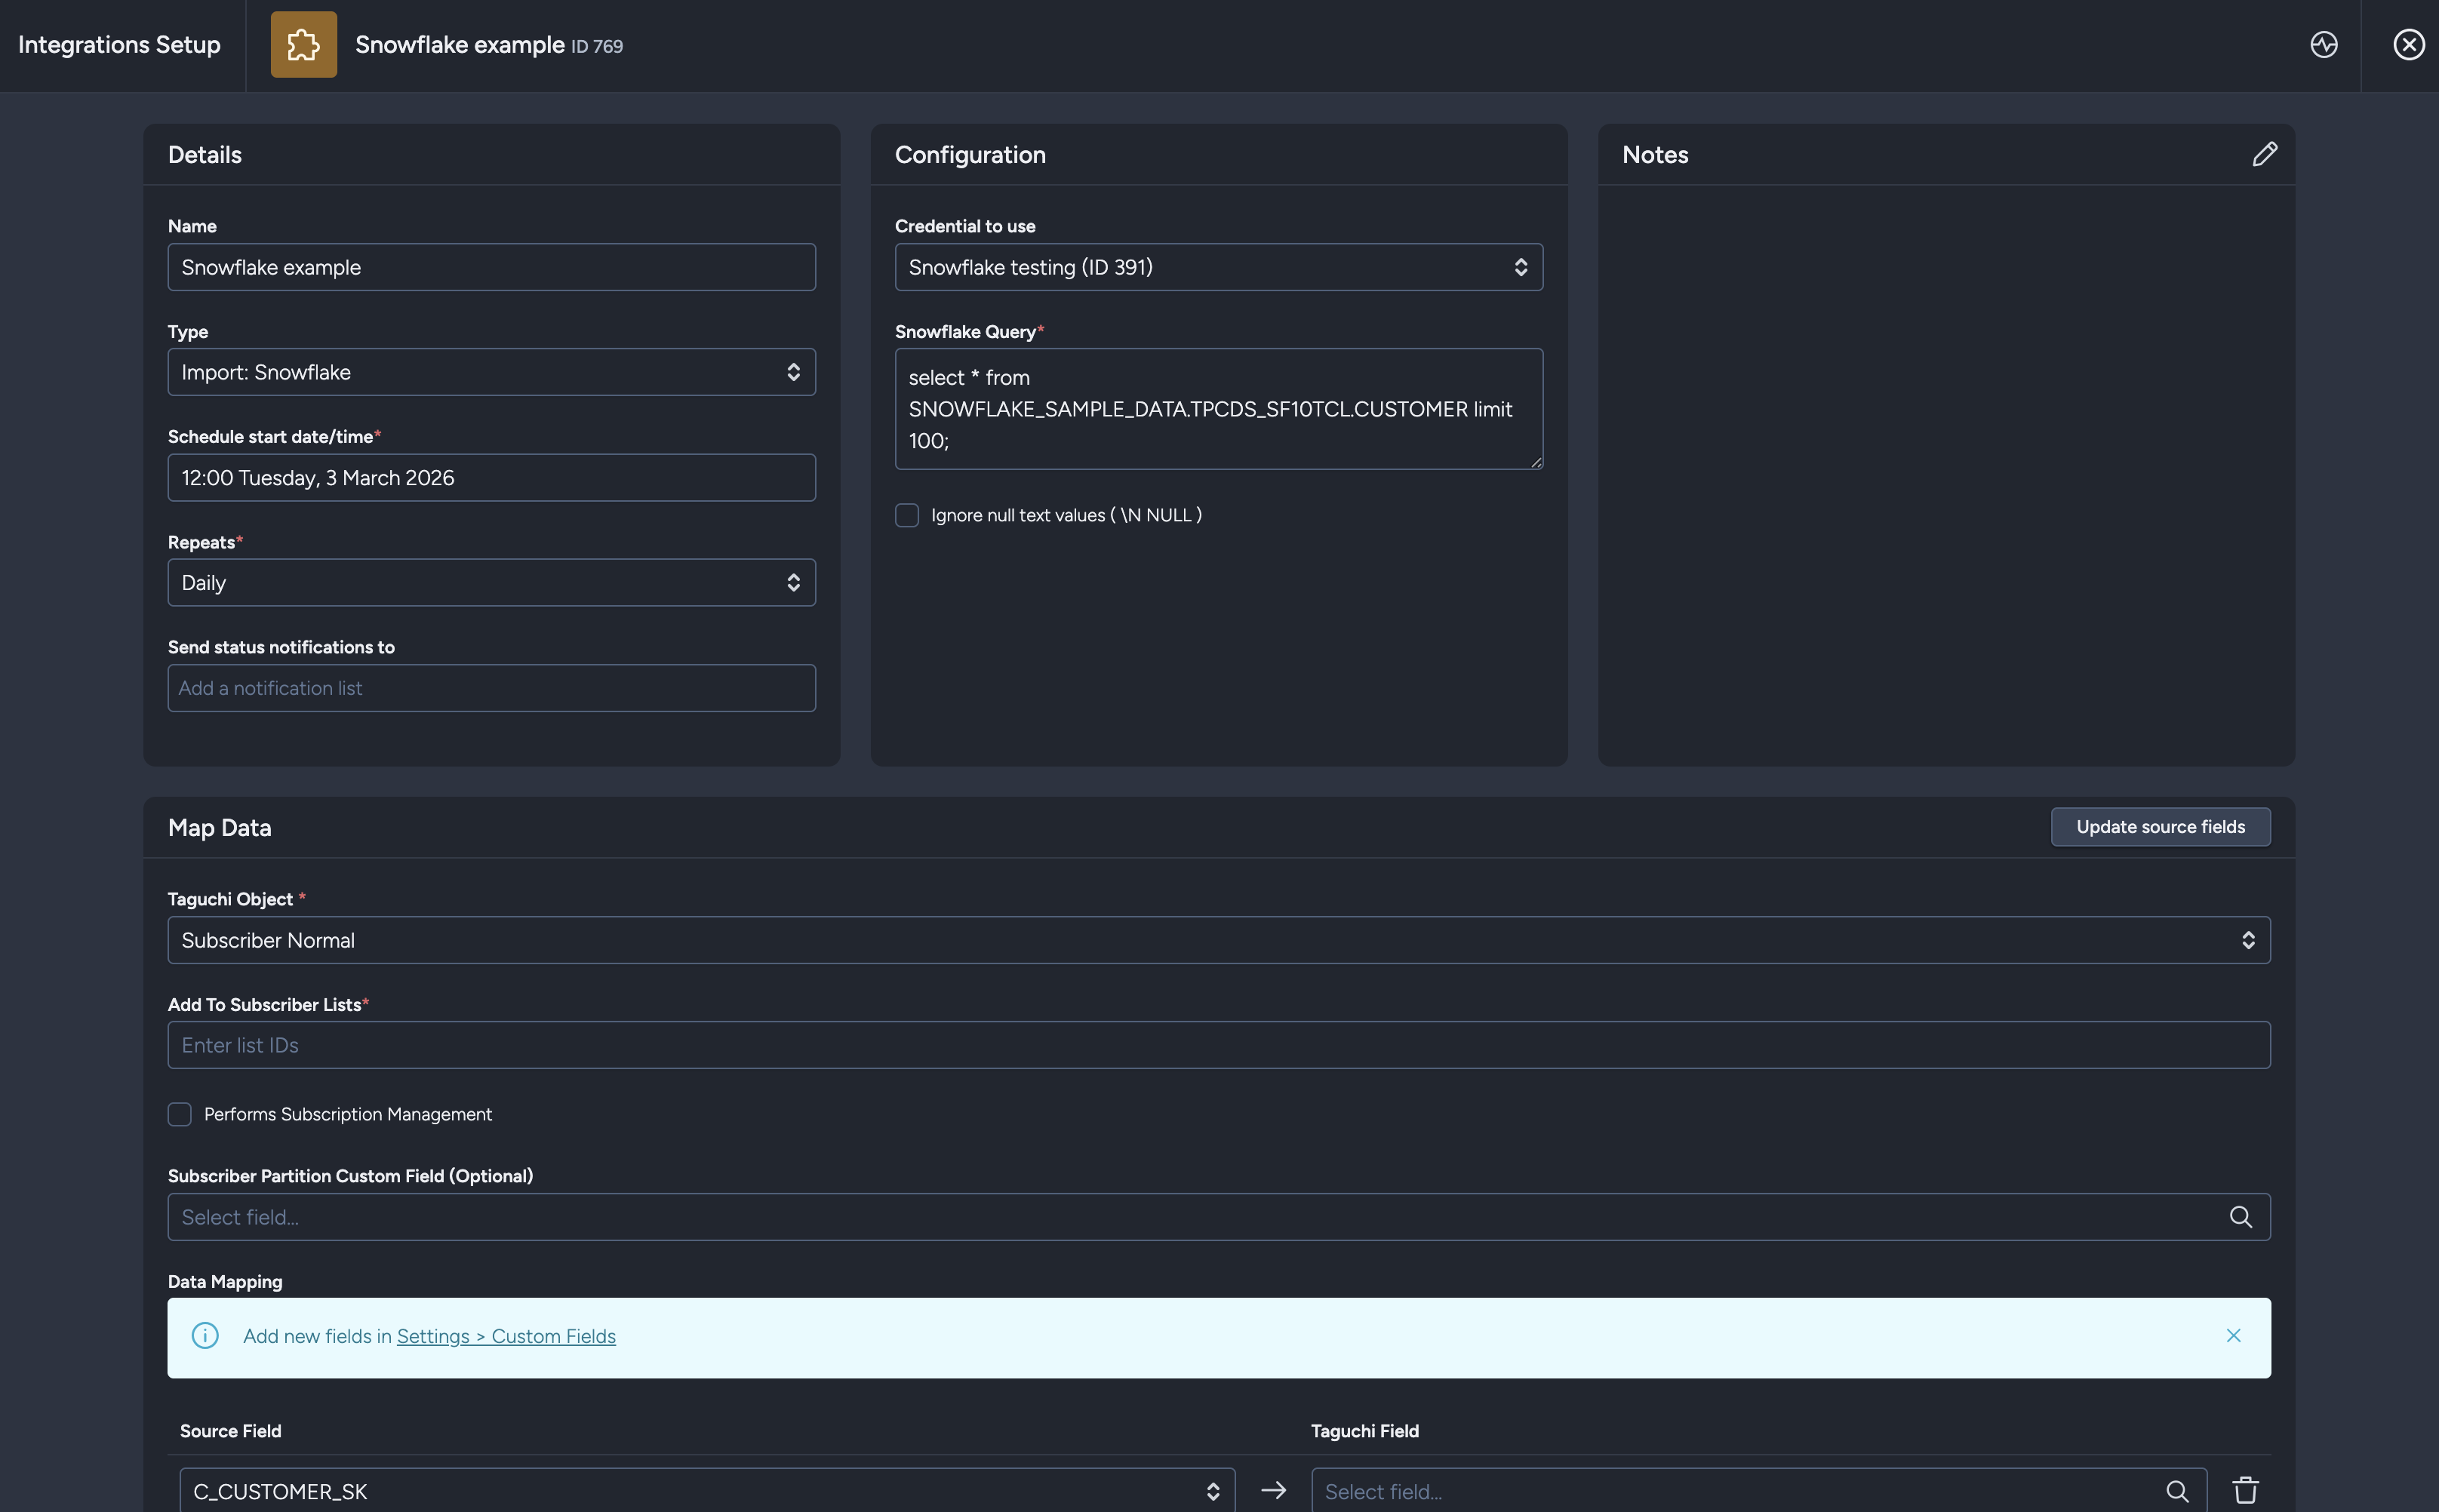
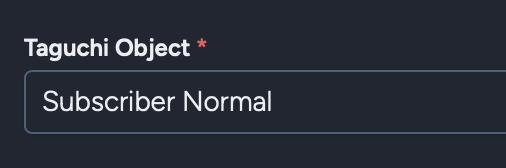
The Taguchi Object will default to "Subscriber Normal" for convenience.
Configuration Sections
Details
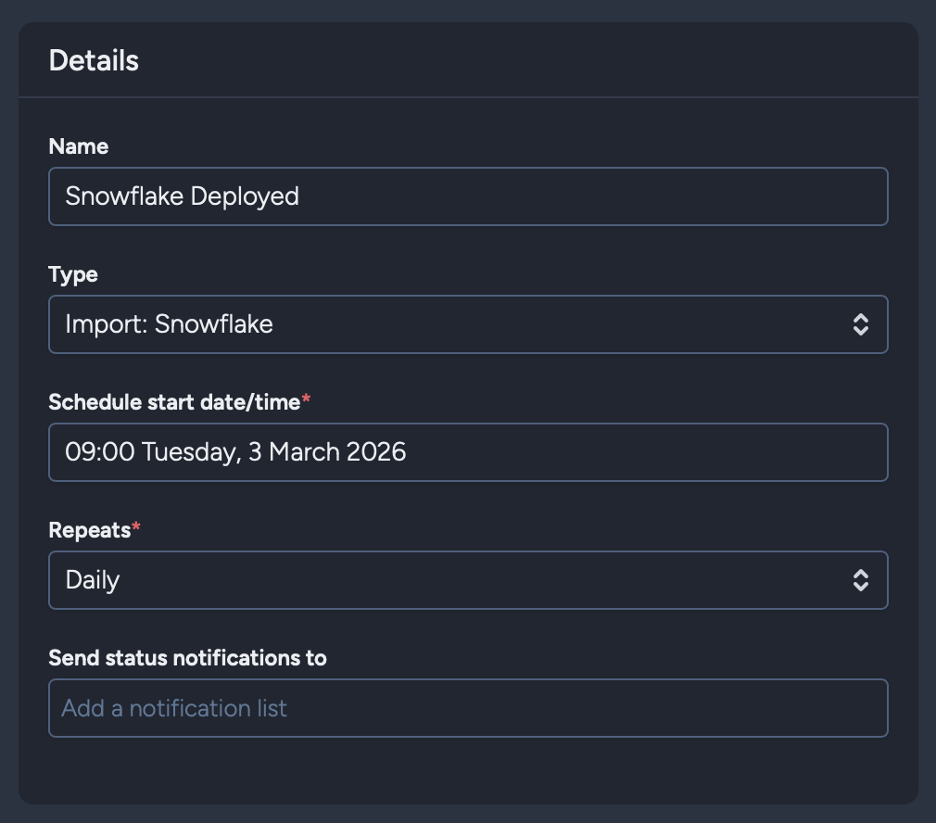
Name: Set the name of the integration.
Type: Select 'Import: Snowflake'. When selecting the integration type, note that integrations are arranged in groups: API, Import, Export, Messaging, and Scheduled. Some integrations may appear in multiple groups.
Schedule start date/time: Determines when the integration will first run. When used in tandem with the Repeats setting, this controls the ongoing schedule.
Repeats: Choose the frequency for running the integration:
- Yearly
- Monthly
- Weekly
- Daily
- Hourly
Note: Consider Snowflake query execution time and data processing requirements when selecting frequency. Daily or weekly repeats are recommended for most use cases.
Send status notifications to: Optionally add a notification list to receive status updates when the integration runs.
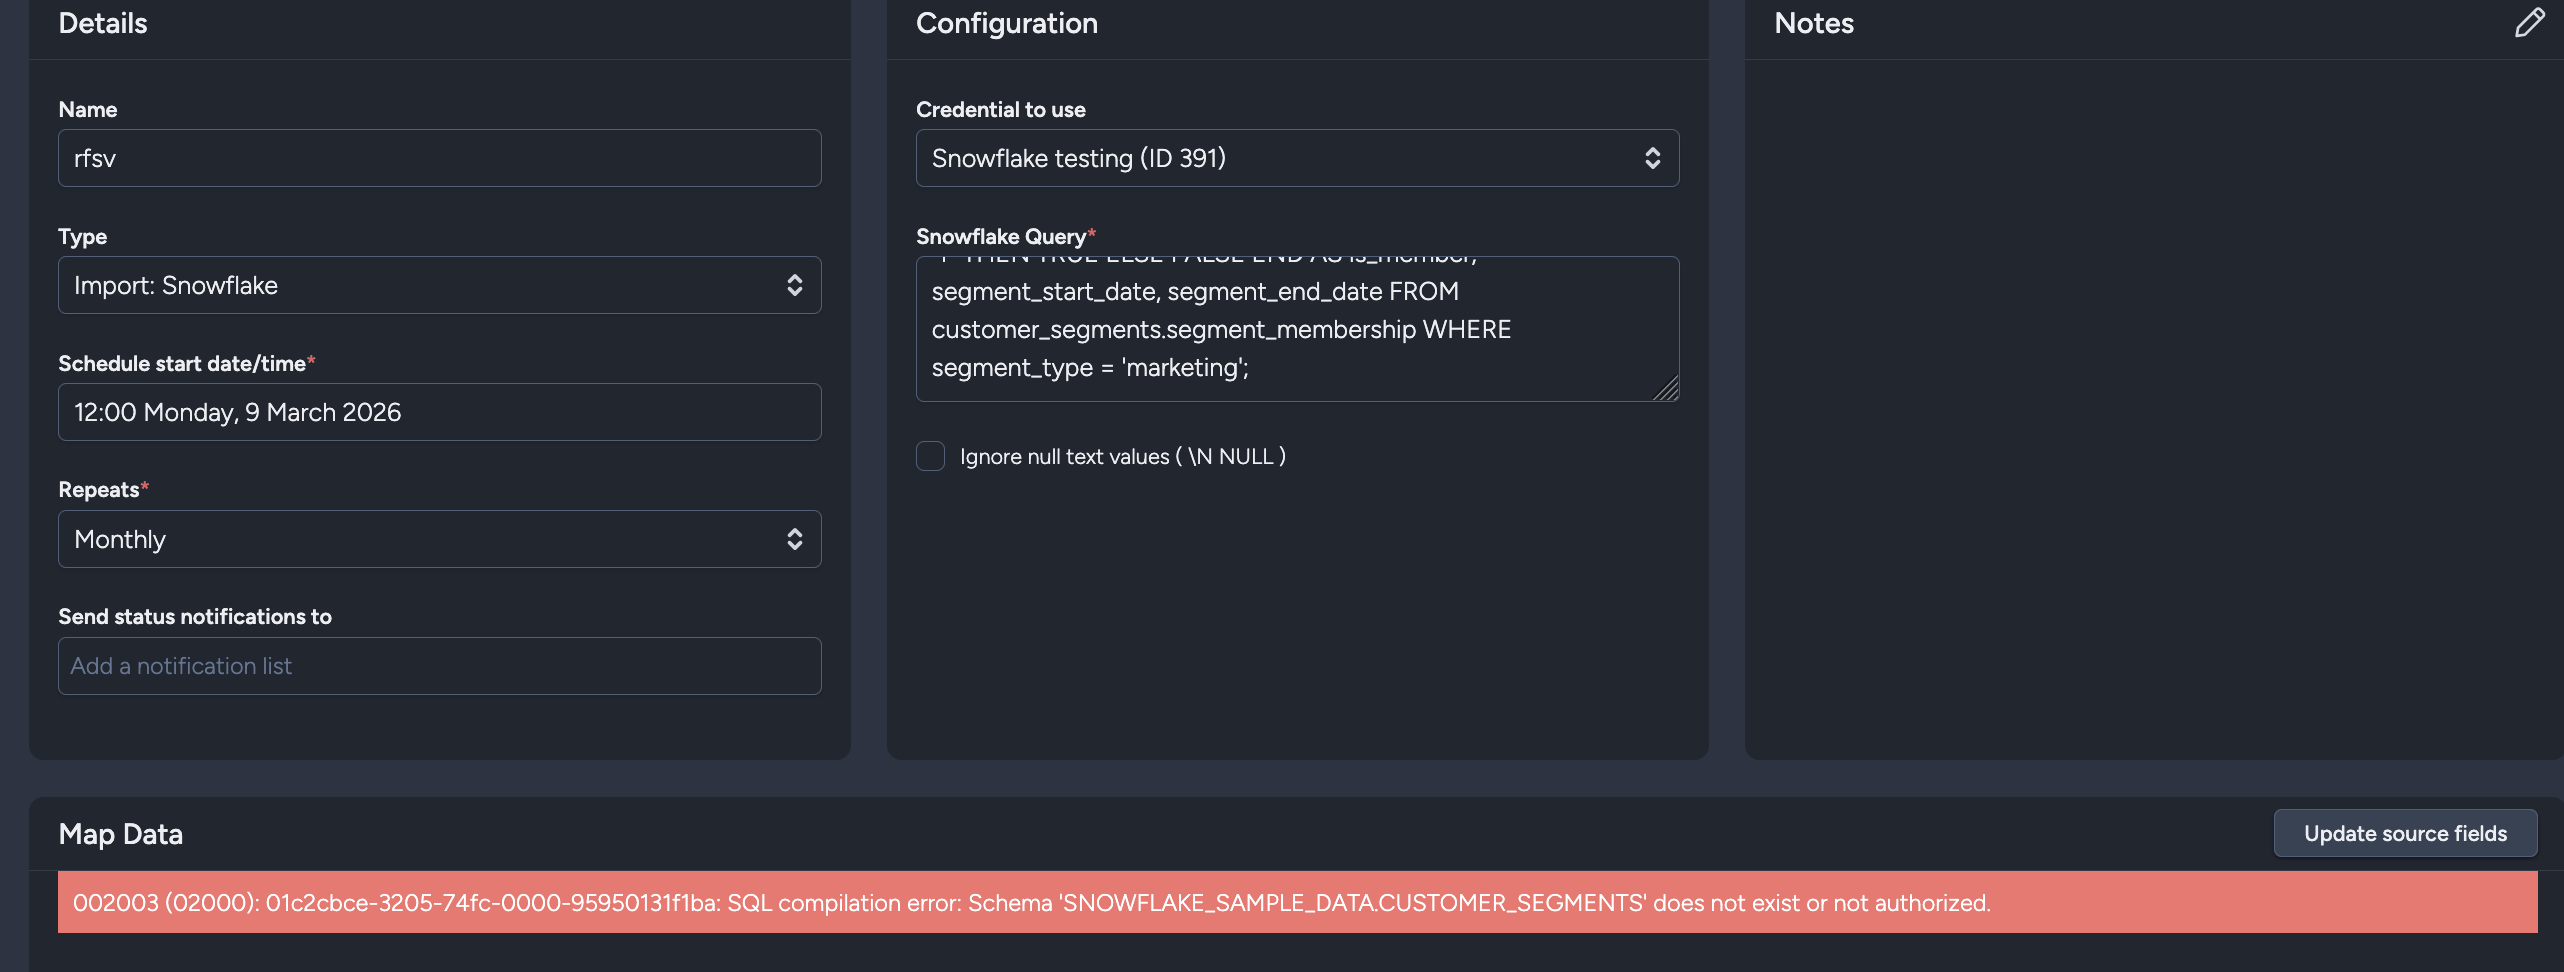
Configuration
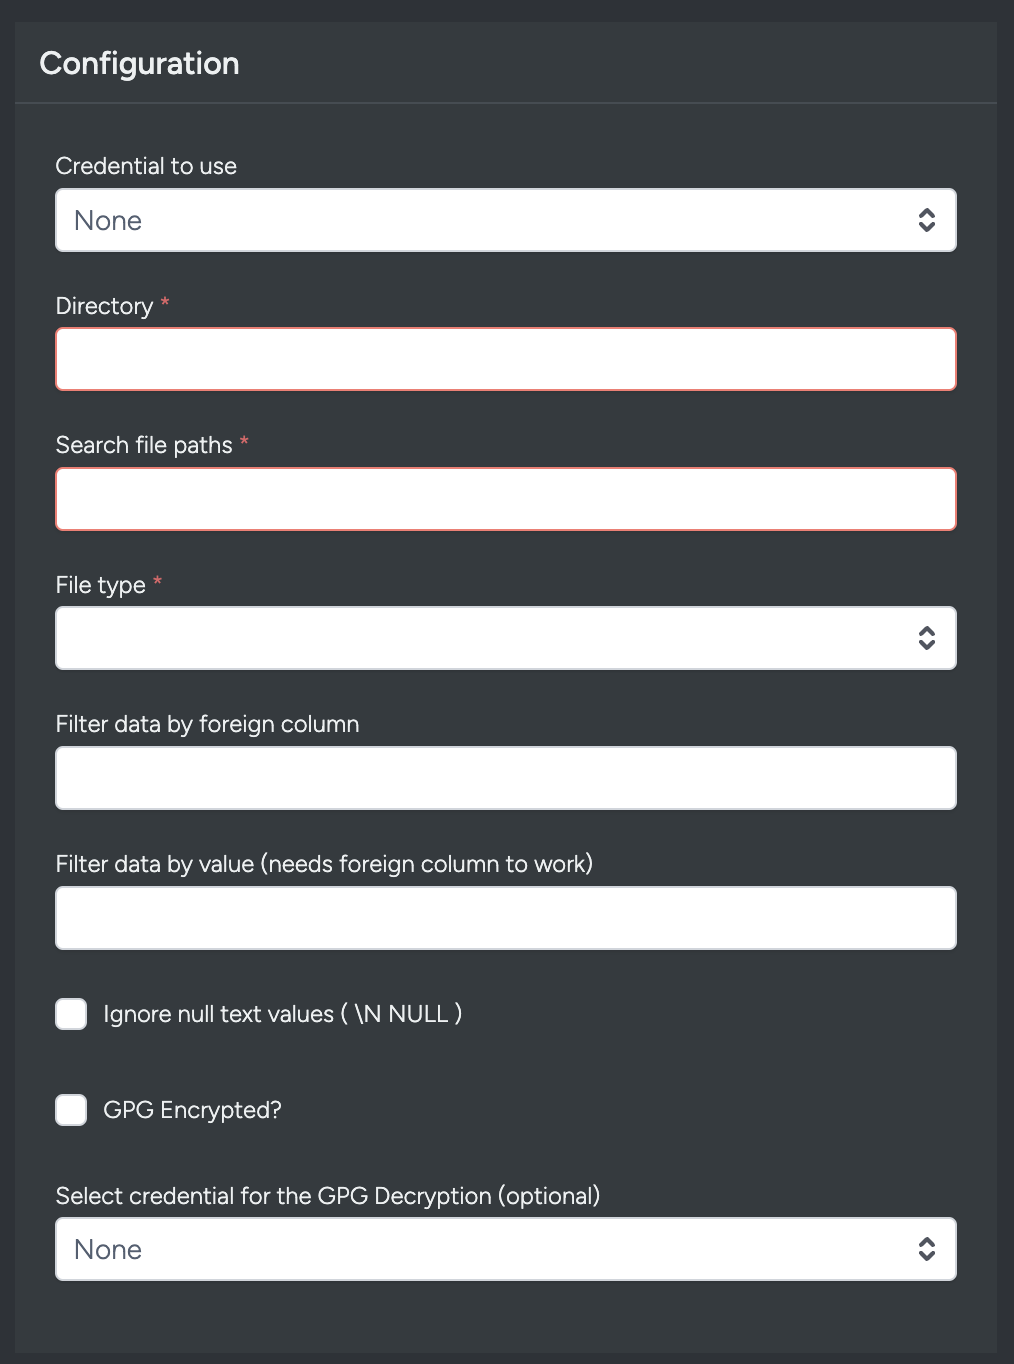
Credential to use: Choose the Snowflake credential you've set up in the Credentials page.
Snowflake Query: Enter your SQL query to retrieve data from Snowflake. The query can be as simple or complex as needed:
select * from SNOWFLAKE_SAMPLE_DATA.TPCDS_SF10TCL.CUSTOMER limit 100;Query Guidelines:
- Use standard SQL SELECT statements
- Include all fields you want to import
- Apply filtering and transformations within your query (WHERE, JOIN, etc.)
- Multi-line queries are supported for improved readability
- You can include LIMIT, ORDER BY, GROUP BY, and HAVING clauses as needed
- Queries are executed with your Snowflake account permissions
Ignore null text values: When enabled, treats representations like
\NorNULLas empty values rather than literal text. This is typically not needed for Snowflake, where null values should be represented as SQL NULLs.
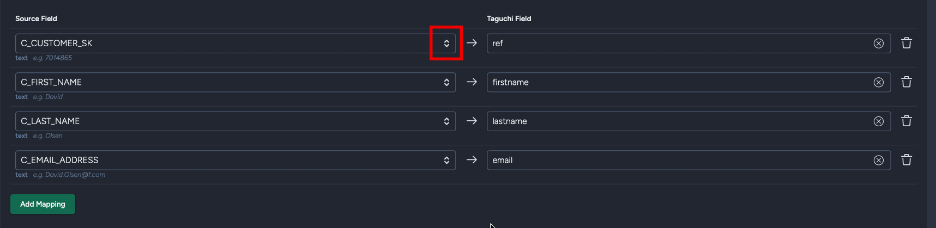
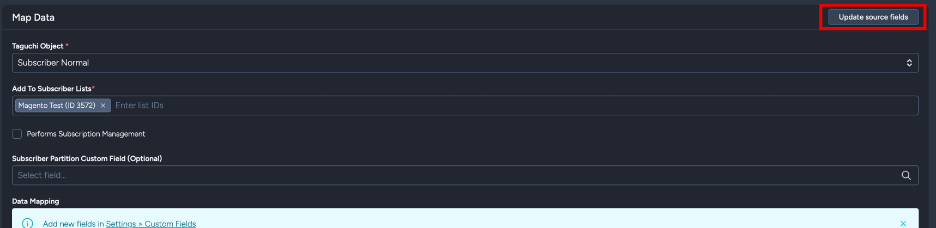
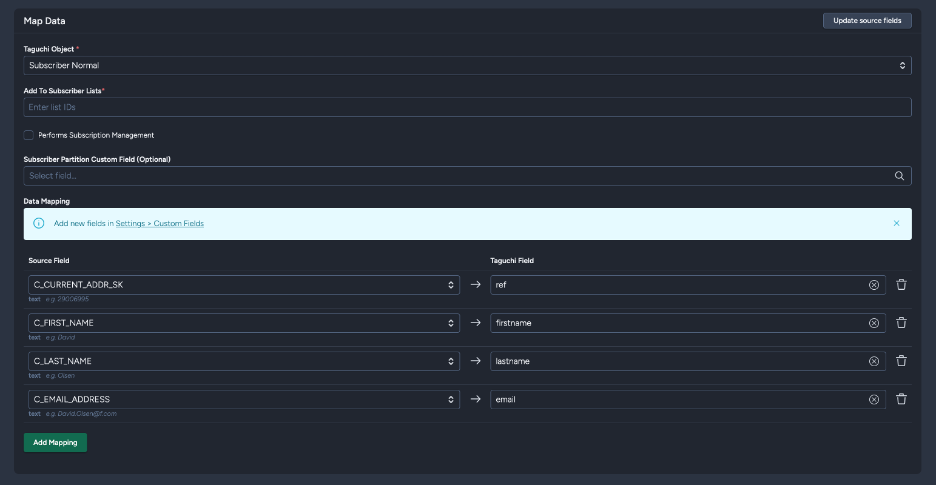
Map Data
After completing the first phase and clicking "Save and continue", you'll see the Map Data section with intelligent field detection.
Before clicking "Save and continue"
After clicking "Save and continue"
Foreign Field Selection
One of the key features of the Snowflake integration is automatic field detection. After your query runs, Taguchi:
- Detects all available fields from your query results
Displays field metadata including:
- Data type (shown in bold) - e.g., text, number, date
- Sample value (shown in italic) - e.g., "e.g. customer@example.com"
Provides dropdown menus populated with your detected fields
- Updates when you click "Update source fields"
Field metadata example:
- Below each field dropdown, you'll see metadata like: text e.g. customer@example.com
- Data type appears in bold, sample values in italic

Update Source Fields
For existing integrations, an "Update source fields" button appears in the Map Data section header. Use this to:
- Refresh the list of available fields if you've modified your query
- Detect new fields added to your query
- Update field metadata and sample values
When you click this button:
- Your current configuration is preserved
- The query is re-executed to fetch field information
- New fields are automatically added to the mapping section
- Existing mappings remain unchanged
Taguchi Object Types
The Snowflake integration supports multiple import types. Select the appropriate Taguchi Object based on what you want to import:
Subscriber Normal
Import subscriber profile data including email, reference, custom fields, and list assignments.
Key Fields:
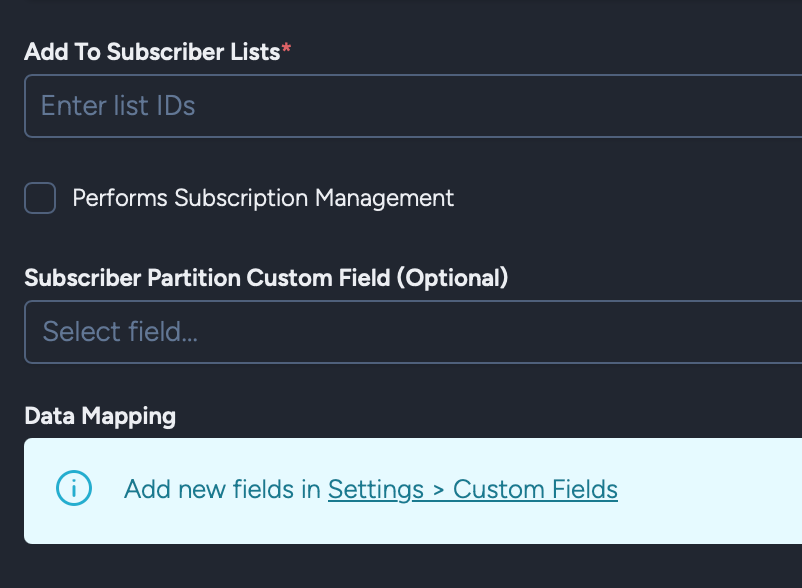
- Add to subscriber list: Subscriber list ID to add imported subscribers to
- Performs Subscription Management: Manage subscriptions and unsubscriptions
- Subscriber Partition Custom Field (Optional): Partition field for segmentation
- Data Mapping: Map Snowflake fields to Taguchi subscriber fields
Data Mapping:

- Map your Snowflake query fields (shown in dropdown menus) to Taguchi fields
- Each mapping row shows:
- Source Field: Snowflake column from your query (dropdown selection)
- Taguchi Field: Target field in Taguchi
- Field metadata (data type and sample value) appears below each dropdown
Subscriber Custom Field
Create or update custom fields for subscribers.
Key Fields:
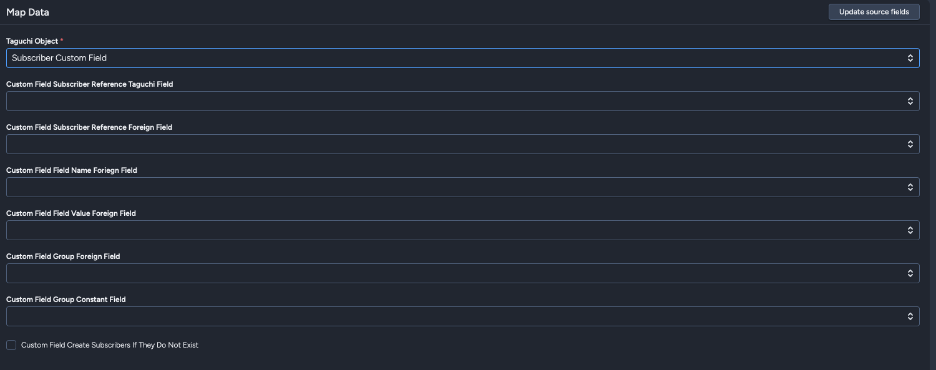
- Custom Field Subscriber Reference Taguchi Field: Match by email, ref (external ID), phone, or subscriber ID
- Custom Field Subscriber Reference Foreign Field: Snowflake field containing the reference value
- Custom Field Field Name Foreign Field: Snowflake field containing custom field names
- Custom Field Field Value Foreign Field: Snowflake field containing custom field values
- Custom Field Group Foreign Field (Optional): Field for custom field grouping
- Custom Field Create Subscribers If They Do Not Exist: Create new subscribers during import
Subscriber List
Manage list subscriptions for subscribers.
Key Fields:
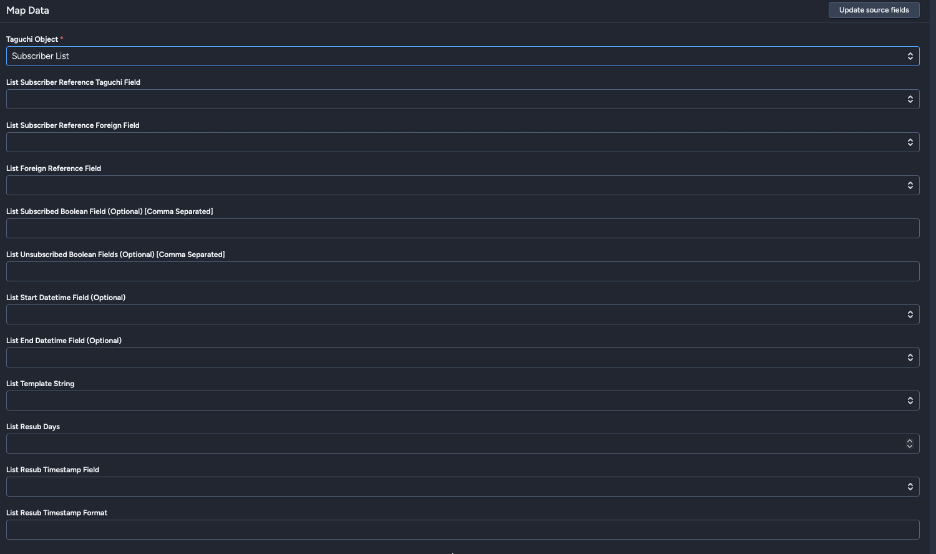
- List Subscriber Reference Taguchi Field: Match by email, ref (external ID), phone, or subscriber ID
- List Subscriber Reference Foreign Field: Snowflake field for subscriber reference
- List Reference Foreign Field: Field containing list identifiers
- List Subscribed Boolean Field (Optional): Field indicating subscription status
- List Unsubscribed Boolean Field (Optional): Field indicating unsubscription
- List Start Datetime Field (Optional): Subscription start date/time
- List End Datetime Field (Optional): Subscription end date/time
- List Template String: Template for list reference formatting
- List Resub Days: Days before re-subscription allowed
- List Resub Timestamp Field (Optional): Re-subscription timestamp field
- List Resub Timestamp Format: Format for timestamp parsing
Partition Custom Field
Import custom field data for partitions. One column must be designated as the partition reference, which will match against the partition external ID; all other fields will be imported as partition custom fields with names matching the column names.
Key Fields:

- Partition Reference Foreign Field: Snowflake field identifying the partition external ID
Subscriber Audience
Manage externally-managed audience memberships from Snowflake data.
Key Fields:
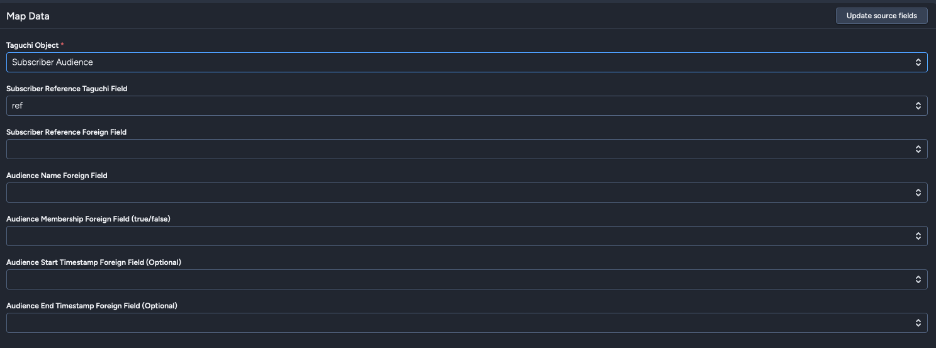
- Subscriber Reference Taguchi Field: Match by ref (external ID), email, phone, or subscriber ID
- Subscriber Reference Foreign Field: Snowflake field for subscriber reference
- Audience Name Foreign Field: Field containing audience names (audiences will be auto-created)
- Audience Membership Foreign Field: Boolean field for membership (true/false)
- Audience Start Timestamp Foreign Field (Optional): When membership begins
- Audience End Timestamp Foreign Field (Optional): When membership ends
Externally-Managed Audiences:
When using the Subscriber Audience import type, Taguchi creates externally-managed audiences. These audiences:
- Are populated entirely from your integration data
- Use a special target expression format:
__external:{audience_id} - Cannot be edited manually in the audience setup interface
- Are fully synchronized with each import (full sync - removes subscribers not in current dataset)
- Display a note in the audience setup modal indicating external management
When viewing an externally-managed audience in the audience setup modal:
- The target expression editor is hidden
- A note appears: "This audience is externally managed. Its membership is updated via an integration."
Note: Add optional notes about the integration for documentation purposes. Notes are visible to all users with access to integrations.
Activating Your Integration
Save Changes and Activate
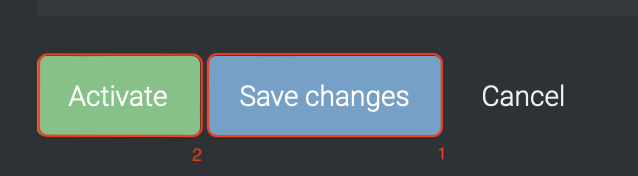
Once you have configured all required sections:
- Click "Save changes" to save your configuration (or "Save and continue" for new integrations)
- Click "Activate" to enable the integration
The integration will run according to your configured schedule starting from the specified start date/time.
Deactivate

To stop the integration, click "Deactivate". This will prevent Taguchi from importing data from Snowflake according to the schedule.
Active Integration Status
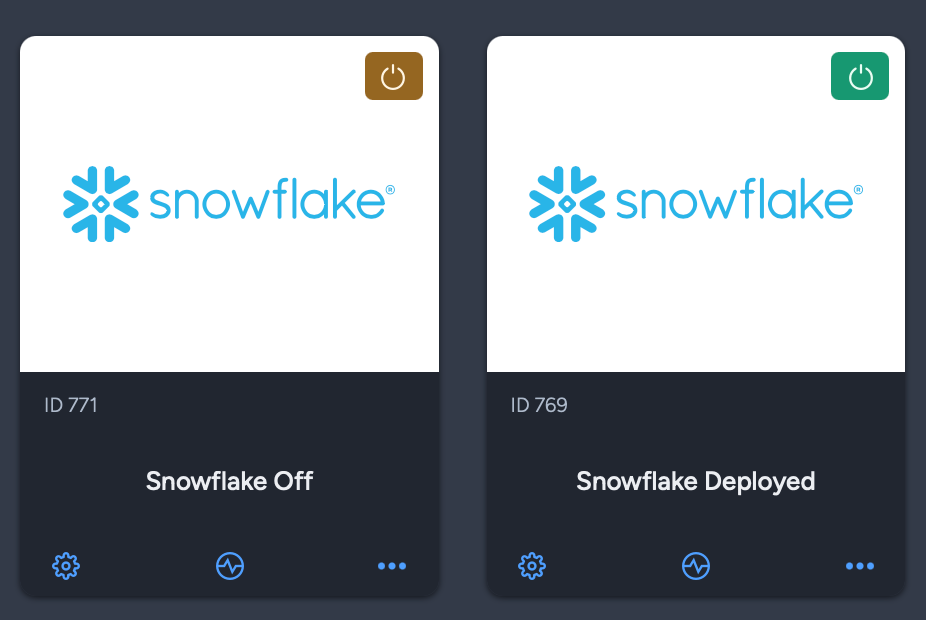
Once the integration has been saved and activated, the on/off icon of the integration card will change from yellow (Off) to green (On) indicating that it is now activated.
Updating an Existing Integration
Modifying Configuration


You can update your integration whether it is activated or deactivated:
- Make your desired changes (query, schedule, field mappings, etc.)
- Click "Save changes"
- The integration will be updated immediately
Important Notes:
- Changing your Snowflake Query does not automatically clear existing field mappings
- After modifying your query, click "Update source fields" to refresh available fields
- New fields from your query are automatically added to the mapping section
- Existing field mappings are preserved when updating source fields
Updating Source Fields
For existing integrations, you can refresh the detected fields from your query:
- Modify your Snowflake Query if needed
- Click "Save changes" to save the new query
- Click "Update source fields" in the Map Data section
- Taguchi will re-execute your query and update available fields
- New fields appear in the dropdown menus and are added to the mapping section
This workflow allows you to iteratively refine your query without losing your mapping configuration.
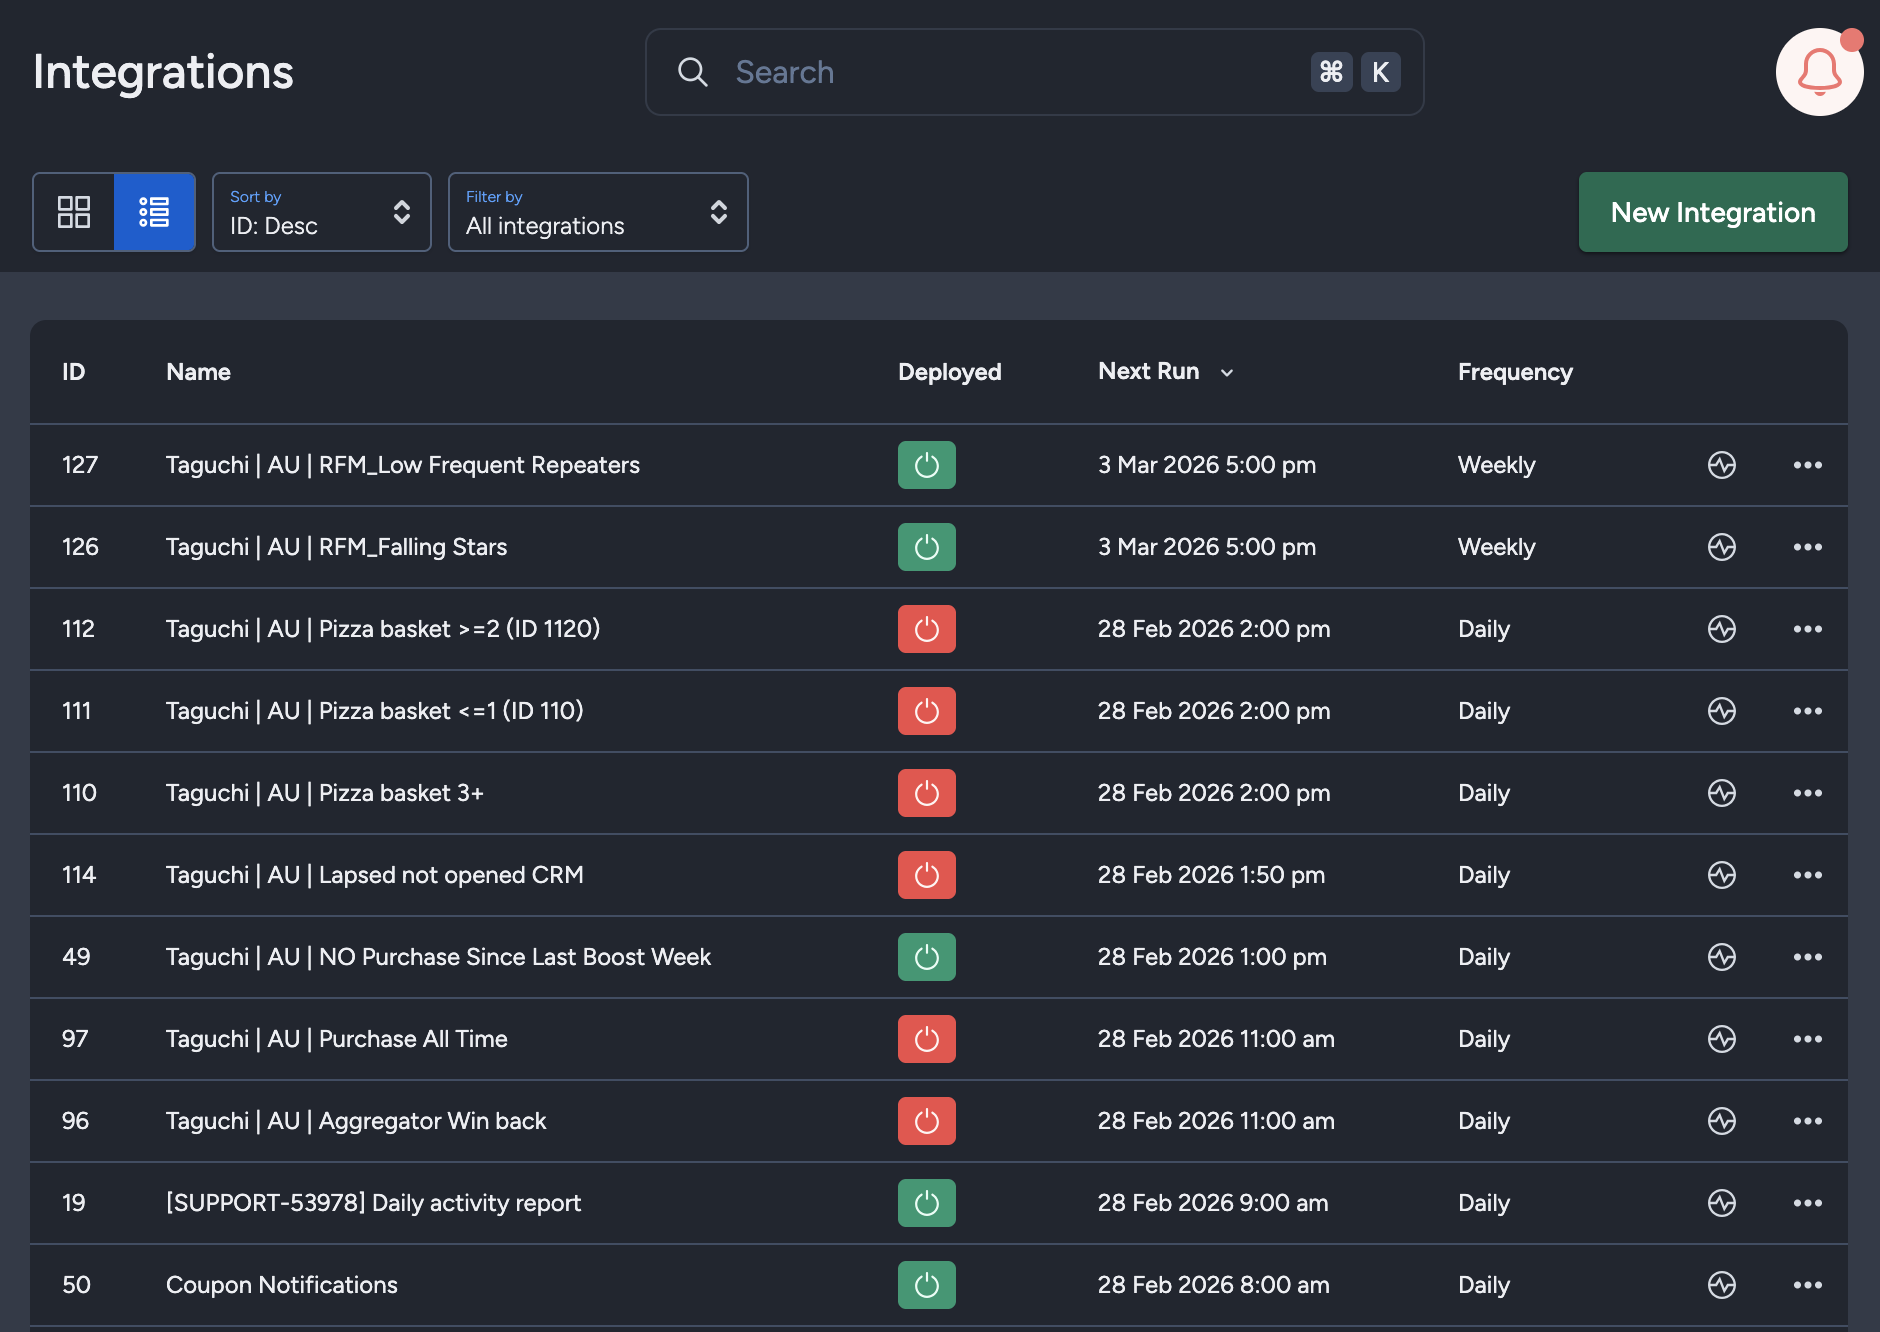
Integration Status & Logs
Users can determine the status of an integration by looking at the status symbol (On/Off icon) color within the integration tile.
- Green – Integration is active and has either been deployed or is awaiting deployment
- Yellow – Integration has been deactivated
- Red – Integration has failed to deploy
Viewing Logs in the UI
Users can view detailed integration logs directly in the Taguchi UI to troubleshoot issues.
To access logs:
- Navigate to Settings > Integrations
- Select the integration you want to review
- Click on "View Status" in the top right corner to see recent activity, including:
- Timestamps
- Status updates
- Error messages (if any)
- Records processed

If an integration fails, checking the logs can help identify issues such as incorrect credentials, invalid SQL queries, connection timeouts, or data mapping errors.
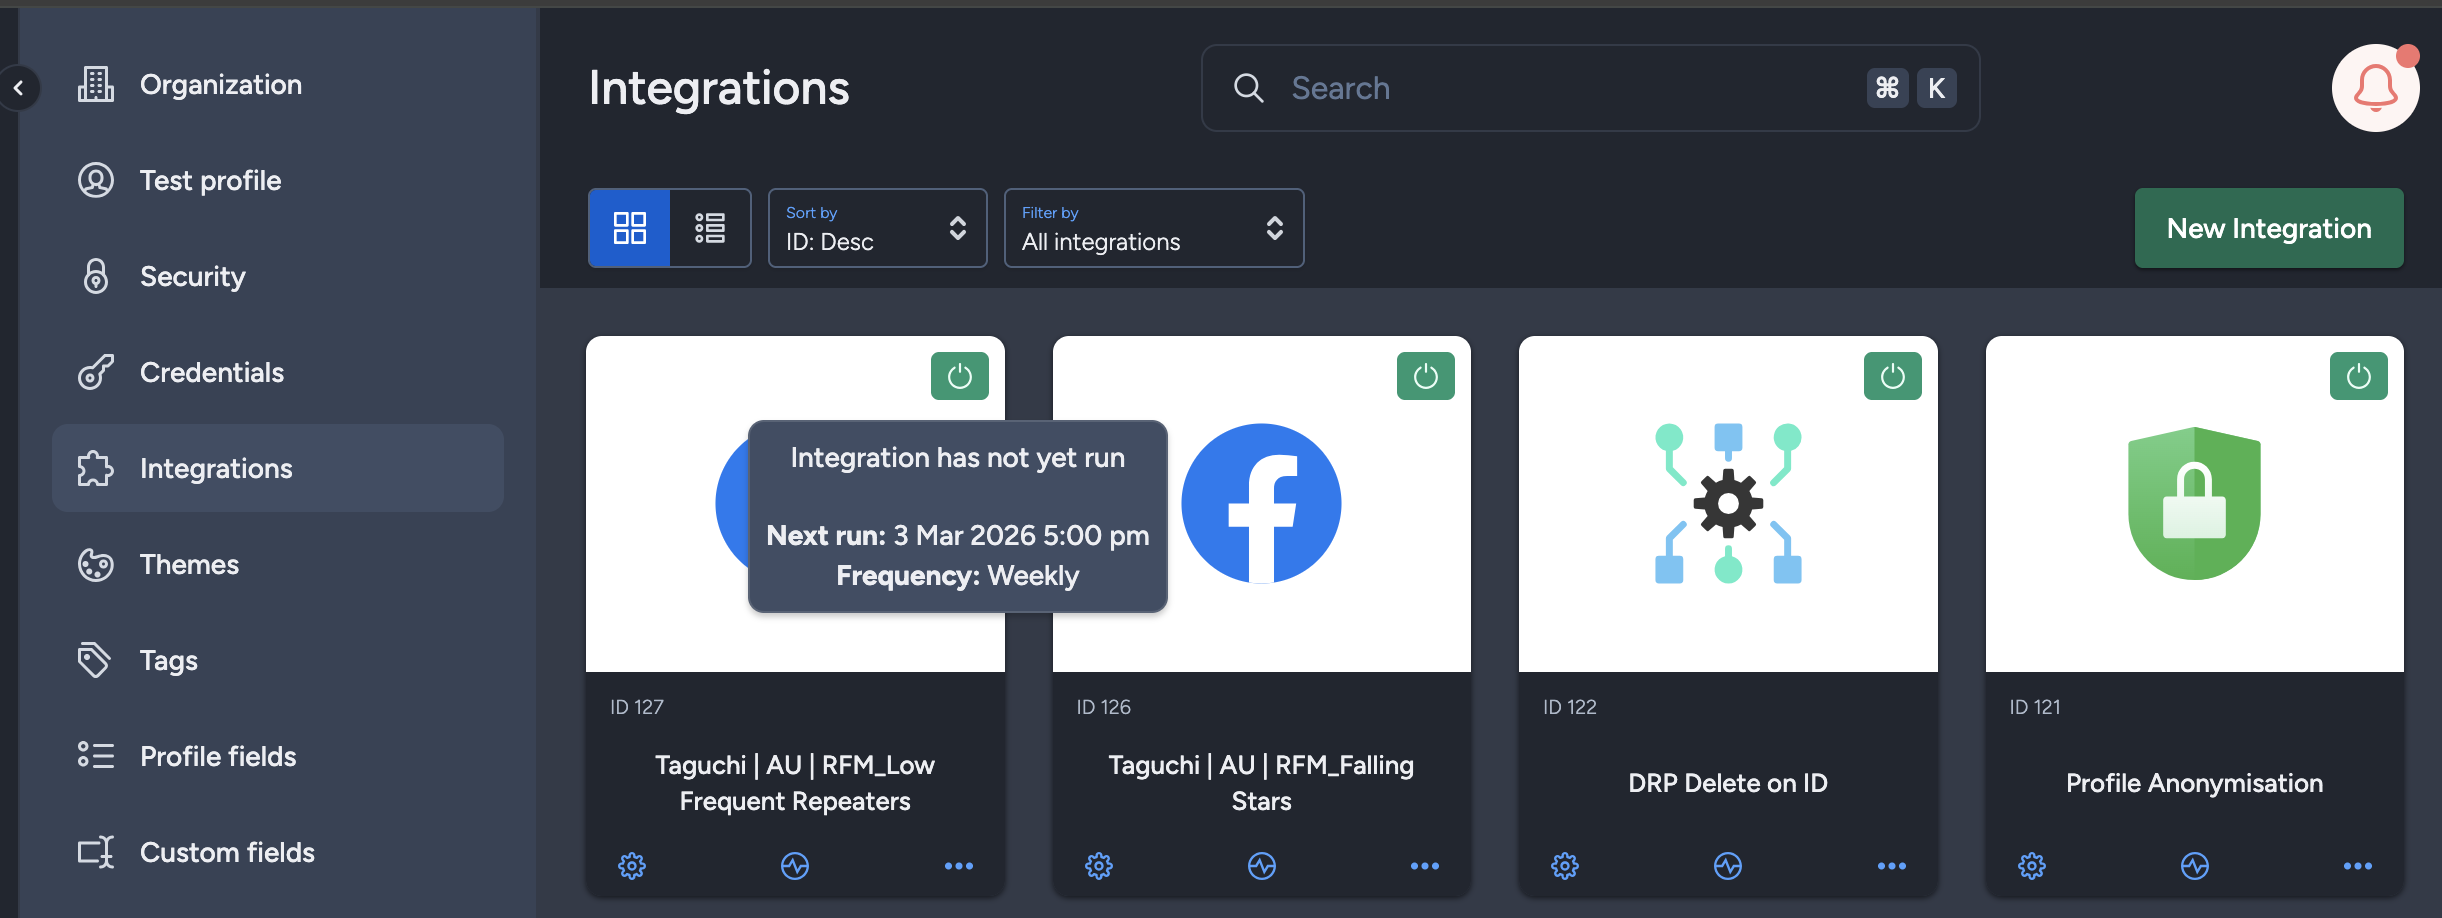
Integration Deployment Status
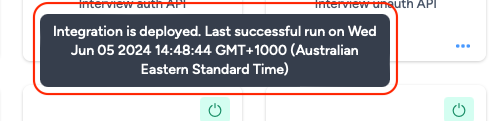
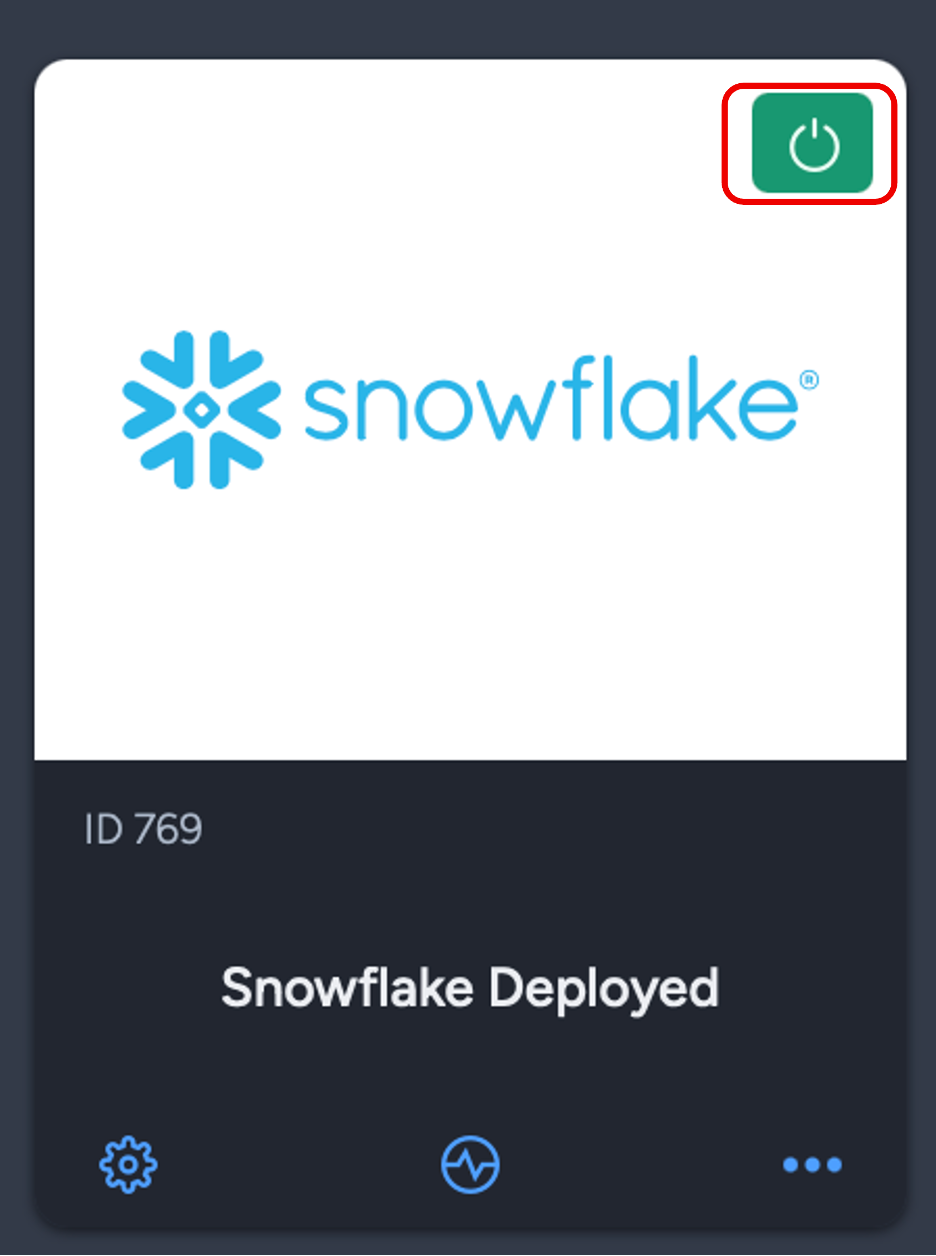
Hover your cursor over the status symbol (On/Off icon) to view the integration status message.
The messages will vary based on the deployment of the integration:
- Green – "Integration has not yet run (Start time/date have not occurred yet)" / "Integration is deployed. Last successful run on [date/time]"
- Yellow – "Integration is not deployed (Deactivated)"
- Red – "Integration Failed to run on [date/time]"
Viewing Integration Schedules and Next Run Details
The Integration UI provides visibility into integration schedules by displaying the scheduled frequency and the time of the next run when hovering over the status icon. Adding to that, the integration UI supports list view with sortable columns so you can see the next run timestamp and frequency there too.. This helps users quickly check when integrations are scheduled to execute and manage them more efficiently.
Best Practices
Query Optimization
Use selective queries: Only query the data you need to import
SELECT email, first_name, last_name
FROM customers
WHERE updated_date >= DATEADD(day, -7, CURRENT_DATE())
Apply filters in Snowflake: Use WHERE clauses to filter data at the source
- Limit result sets appropriately: For testing, use LIMIT to verify your query before full imports
- Use incremental imports: Query only changed/new records using timestamp filters
- Optimize execution time: Ensure queries complete within 15 minutes to avoid timeouts
Scheduling
- Consider data freshness requirements: How often does your source data change?
- Account for processing time: Give adequate time between runs for data processing
- Avoid peak hours: Schedule during off-peak hours if possible
- Start with lower frequency: Begin with daily or weekly, adjust based on needs
- Monitor execution times: Check logs to ensure queries complete successfully
Field Mapping
- Use "Update source fields": Refresh fields when you modify queries
- Review metadata: Check data types and sample values before mapping
- Test with small datasets: Use LIMIT in your query for initial testing
- Preserve mappings: Mappings are retained when updating source fields
- Document field purposes: Use the Notes section to document your mapping logic
Security
- Use least-privilege credentials: Grant only necessary Snowflake permissions
- Rotate credentials regularly: Update Snowflake passwords periodically
- Review query results: Ensure no sensitive data is exposed unintentionally
- Monitor access logs: Check Snowflake access logs for unusual activity
- Test in non-production first: Verify queries with test data before production use
Troubleshooting
Common Issues
Query Timeout Errors
If your integration fails with timeout errors:
- Optimize your SQL query for performance
- Add appropriate indexes to your Snowflake tables
- Reduce the result set size using WHERE clauses
- Consider partitioning large queries into multiple integrations
- Ensure your query completes within 15 minutes
Connection Errors
If you see connection errors:
- Verify your Snowflake credentials are correct
- Check that your Snowflake user has necessary permissions
- Confirm the database, warehouse, and schema names are correct
- Ensure your Snowflake account is active and accessible
- Verify network connectivity to Snowflake
Schema Does Not Exist or Not Authorized
If your query fails with errors like Schema ... does not exist or not authorized:
- Verify the database and schema names in your SQL query
- Confirm the table/view exists in Snowflake
- Ensure your Snowflake role has
USAGEon the database and schema, plusSELECTon the table/view
Field Mapping Issues
If fields aren't appearing or mapping incorrectly:
- Click "Update source fields" to refresh available fields
- Verify your SQL query returns the expected columns
- Check field metadata (data type and sample values) for accuracy
- Ensure column names don't contain special characters
- Confirm your query executes successfully in Snowflake directly
Data Not Importing
If the integration runs successfully but data doesn't appear:
- Check that your target expressions (if any) are correct
- Verify list IDs and subscriber references are valid
- Review the integration logs for warnings or errors
- Ensure data mapping fields match your Taguchi configuration
- Confirm subscribers exist (or enable "create if not exist" for custom fields)
Scheduled Execution Issues
If your integration doesn't run as scheduled:
- Verify the integration is activated (green status)
- Check that the start date/time is in the past
- Ensure the repeat frequency is configured correctly
- Review integration logs for execution history
- Confirm your timezone settings are correct
Getting Help
If you are having trouble with this integration, please contact Taguchi Support for assistance.
When contacting support, please provide:
- Integration name and ID
- Your SQL query (with sensitive data removed)
- Error messages from the logs
- Integration configuration details
- Expected vs. actual behavior
Example Use Cases
Basic Subscriber Import
Import subscriber profile data from Snowflake:
SELECT
  customer_id AS ref,
  email_address AS email,
  first_name,
  last_name,
  phone_number,
  subscription_date
FROM customer_database.customers
WHERE active_status = 'ACTIVE'
  AND email_address IS NOT NULL;
Map fields:
- ref → Subscriber external ID (ref)
- email → Email profile field
- first_name → First name profile field
- last_name → Last name profile field
- phone_number → Phone profile field
Audience Management from Segments
Automatically sync marketing segments as audiences:
SELECT
  email,
  segment_name,
  CASE WHEN segment_active = 'Y' THEN TRUE ELSE FALSE END AS is_member,
  segment_start_date,
  segment_end_date
FROM customer_segments.segment_membership
WHERE segment_type = 'marketing';
Use Subscriber Audience import type, and map:
- email → Subscriber reference column (email)
- segment_name → Audience Name
- is_member → Audience Membership
- segment_start_date → Audience Start Timestamp
- segment_end_date → Audience End Timestamp
Incremental Daily Updates
Import only records changed in the last 24 hours:
SELECT
  subscriber_ref,
  email,
  updated_field,
  updated_value,
  update_timestamp
FROM subscriber_updates.daily_changes
WHERE update_timestamp >= DATEADD(day, -1, CURRENT_DATE());
The examples in the documentation are just examples, you would need to adapt them to refer to whatever their own tables and fields are called
Schedule daily to capture incremental changes efficiently. To run an initial data load or re-synchronize the entire dataset, simply remove the WHERE clause temporarily and re-run the integration.