- Support Home
- Knowledge Base
- Getting Started
- How do I create a new SMS broadcast?
Related articles
Need some help?
If you have questions or can't find what you're looking for, we're here for you.
Taguchi Support is available Monday to Friday, 9am - 5:30pm AEDT.
Create New TicketTaguchi Certified Training
Join our free and live online training sessions. You'll benefit from a better understanding of the platform's features and functionality. Plus with Taguchi Certified Rewards, every session you attend, you're not just learning - you're earning your way to some fantastic rewards.
About Taguchi Certified RewardsAPI Version 5
Did you know Taguchi has an API that supports all of the functionality provided by the admin interface and more?
Explore API Documentation
Thanks for your feedback!
How do I create a new SMS broadcast?
You can easily create and send an SMS broadcast through Taguchi. This quick-start guide offers an overview and outlines the key steps to help you successfully send an SMS broadcast.
Before you begin
If this is your first SMS broadcast, please reach out to our Client Success or Support team to ensure that your SMS provider integration is properly set up and ready for use.
We also recommend reading our comprehensive SMS user guide. This will provide information on message delivery, content guidelines & best practive and legal compliance.
Step 1: Log in to Taguchi
Make sure you're logged into Taguchi. If you're unsure how to do this, please refer to the "How to log in" section in the V5 User Guide before proceeding with the next steps.
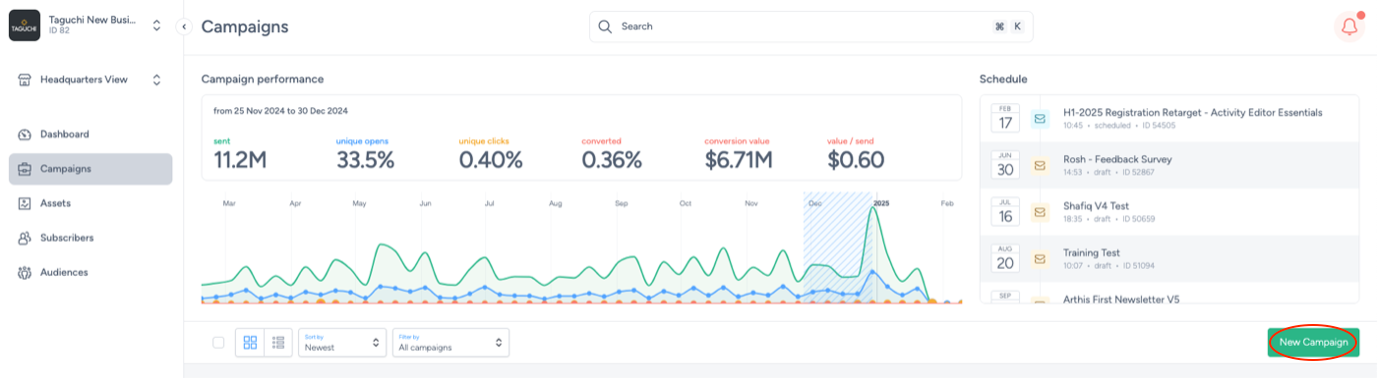
Step 2: Create a new campaign
If you have already created a campaign, skip to Step 3.
You can find the Campaigns section on the left-hand side menu. Click the "New Campaign" button located on the right-hand side, below the schedule list.
A pop-up will appear prompting you to enter the campaign details:
- Name: Choose a unique and descriptive campaign name. We recommend including a clear description along with any relevant marketing or reference codes (e.g., "Loyalty Launch Campaign 2025") to make future identification easier.
- Start date: This optional field allows you to specify the campaign's start date and time.
- End date: This optional field lets you set the campaign's end date and time.
- Notes: In this optional field, we suggest adding any relevant details that will help others understand the purpose and setup of the campaign.
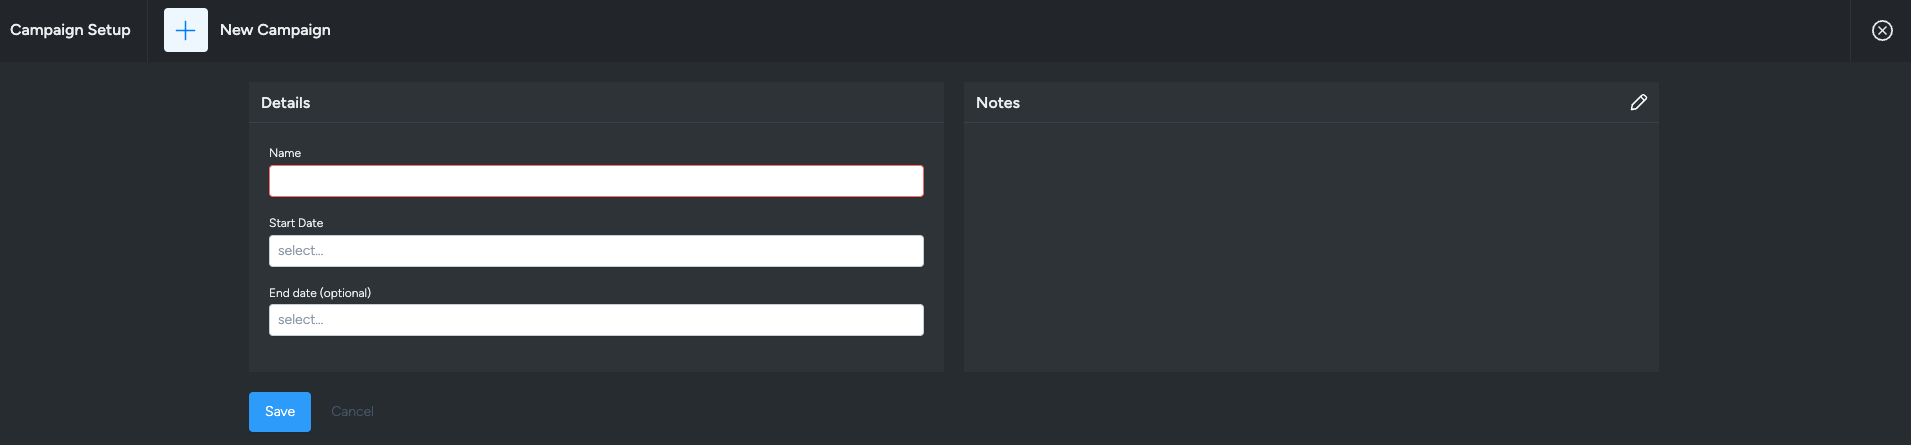
Once you’ve entered the campaign details, click the Save button. You will then be redirected to the campaigns page.
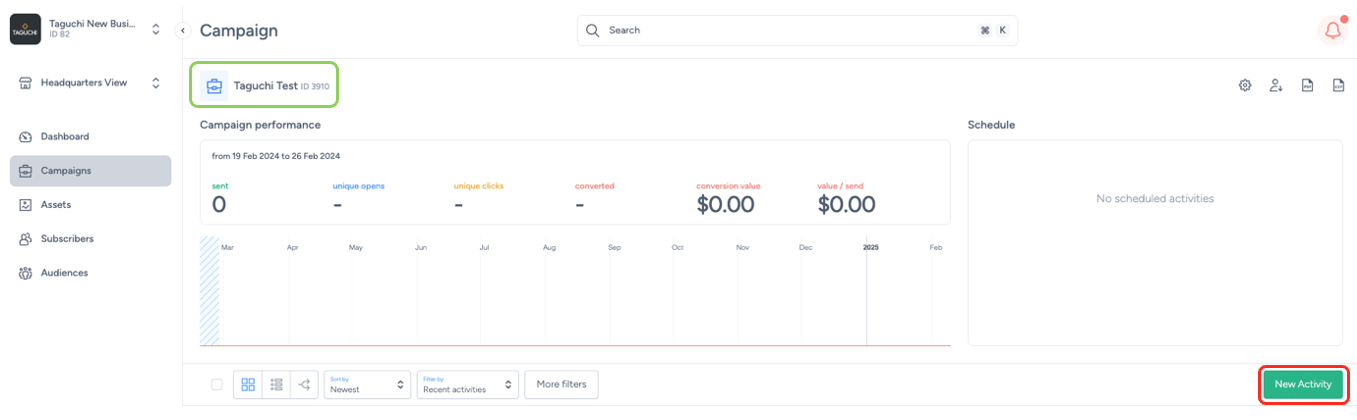
Step 3: Create a new activity
Once inside the campaign folder, click the New Activity button located in the right corner, below the schedule list.
A pop-up will appear promoting you to enter the activity details:
- Name: When selecting a name, we recommend using a logical description. This can be followed by the broadcast date or reference job number.
- Distribution channel: The distribution channel can be: Email, SMS and Web, Display Ad, etc. Select SMS.
- Campaign: Select the campaign where the activity will need to be added. You can search by name or ID. If you are creating a new activity via a campaign, this should be pre-filled with that campaign.
- Distribution type: Select the distribution type for your activity
- If Broadcast or API trigger is selected, add a schedule date and time for the activity to be deployed
- If Scheduled trigger is selected, add a start date and time for the activity to be deployed. Select a trigger interval; hourly, daily, weekly, or monthly and a subscriber send frequency.
- If Event-based trigger is selected, add a start date and time for the activity to be deployed. Select a trigger event e.g. being sent an activity, select the activity, and a time delay between event and send and a subscriber send frequency.
- Notes: In this optional field, we suggest adding any relevant details that will help others understand the purpose and setup of your.
- Target: See 'Activity Targeting'.
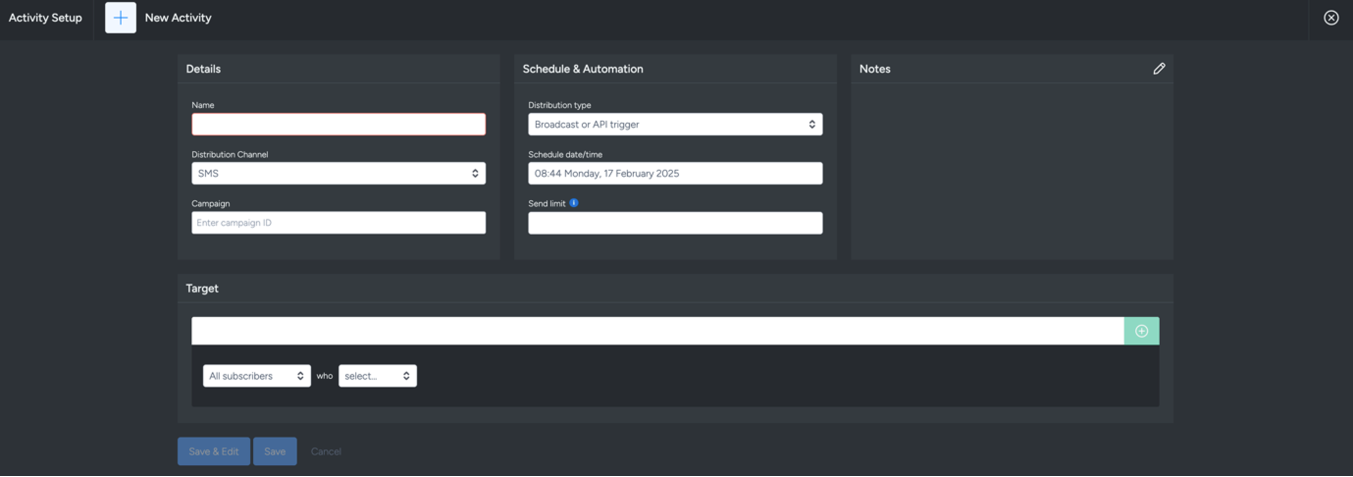
After you have entered the activity details, click the ‘Save & Edit’ button. You will then be directed to the newly created blank activity.
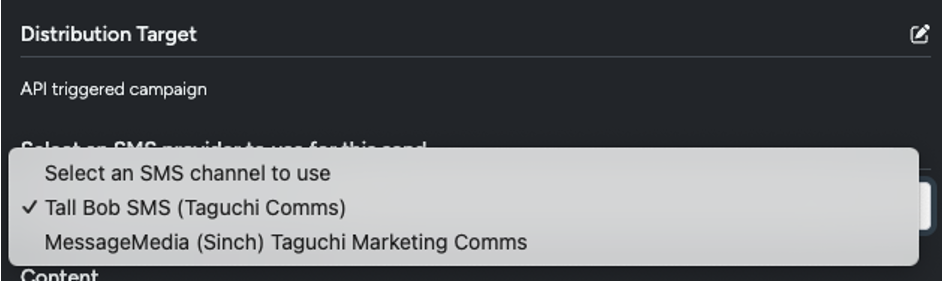
Step 4: Select the SMS provider integration
Click on ‘Select an SMS provider to use for this send’ and choose the desired provider.
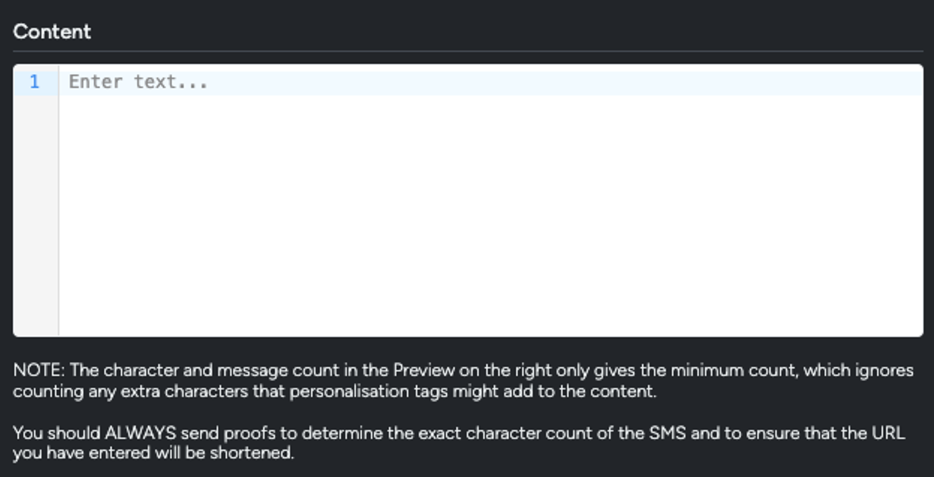
Step 5: Edit the activity content
- Add your content in plain text in the content section.
- You can add personalisation tags in the content such as first name. Take a look at our personalisation tag generator to generate personalisation tags for your SMS.
- You can add a call to action link.
- Consider your character count when using personalisation.
Guidelines and considerations:
- The maximum number of characters in an SMS is 160 and this includes all letters, spaces, and characters in any link URLs and unsubscribe messages.
- Ensure SMS URLs always start with https://www./ (e.g., https://www.example.com) - This is critical for URL shortening (which helps keep your SMS within the 160 character limit, especially with personalisation) and click tracking (without this prefix, you won't be able to track clicks or measure performance).
- Taguchi and SMS providers cannot track any open rates and can only measure activities via clicks. Therefore, it is recommended to add a link in the content which will be shortened. If you would like personalised URLs, please reach out to the Client Success team or Taguchi support team.
- If the activity is a marketing communication, ensure that the content contains the words "stop" or "unsub”. We recommend using one of these phrases to inform the recipient about how to unsubscribe / opt-out of future SMS communications from you.
Best practice:
- Don’t rely on the Taguchi user interface to count the number of characters in your SMS. Generate proofs to confirm how many characters will be sent.
- Use the keys on your standard keyboard to add your content.
- Avoid pasting from rich text editors (e.g. MS Word).
- Make sure all the mobile numbers are in an accurate format.
- Only send a message to subscribers who have opted-in.
- Ensure anyone who has opted-out previously is removed from the broadcast.
- Send yourself a proof message to check your message on different handsets if possible.
Step 6: Proof the activity
To proof the SMS activity, ensure you have an appropriate mobile phone number in your subscriber profile in the ‘phone’ field and then send a proof to yourself.
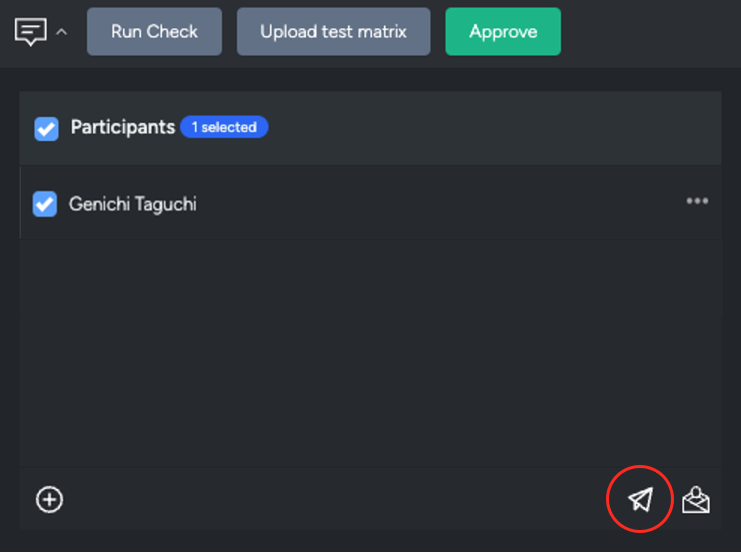
Step 7: Run an activity check
A 'activity check’ will allow you to check various aspects of an activity before broadcasting. To run an activity check, select the button 'Run Check' at the top of your activity. For more on activity checks, see this article
Step 8: Approve & deploy your SMS activity
When you're ready to broadcast your activity, click the green ‘Approve’ button at the top left of the activity log section. Review the activity setting before approving:
- Target
- Correct activity revision
- Correct distribution settings
After reviewing these, click Approve.
Once your activity is approved, proceed to deploy it by clicking the ‘Confirm deployment’ button at the top of the activity log section. Finally, confirm the activity details and desired send rate.
For more helpful guidance, please check out the following: