- Support Home
- Knowledge Base
- Triggers And Automation
- Introduction To Triggers
- Scheduled Trigger
Related articles
Need some help?
If you have questions or can't find what you're looking for, we're here to help.
Taguchi Support is available 24 hours a day, Monday to Friday.
Create New TicketTaguchi Certified Training
Join our free and live online training sessions. You'll benefit from a better understanding of the platform's features and functionality. Plus with Taguchi Certified Rewards, every session you attend, you're not just learning - you're earning your way to some fantastic rewards.
About Taguchi Certified RewardsAPI Version 5
Did you know Taguchi has an API that supports all of the functionality provided by the admin interface and more?
Explore API Documentation
Thanks for your feedback!
Scheduled Trigger
In this article, we will show you how to set up a scheduled trigger within Taguchi. These triggers enable you to automate the sending of an activity in cycles using the powerful target expression engine.
Set the schedule, timezone and repeat limit
A scheduled trigger evaluates its target expression at each occurrence in its repeat schedule. You can control when the schedule starts, which days it runs, the timezone used for the schedule and when new occurrences stop.
If you are setting up a new activity, click the 'New Activity' button in a campaign folder to set up a new activity. A setup screen will appear.
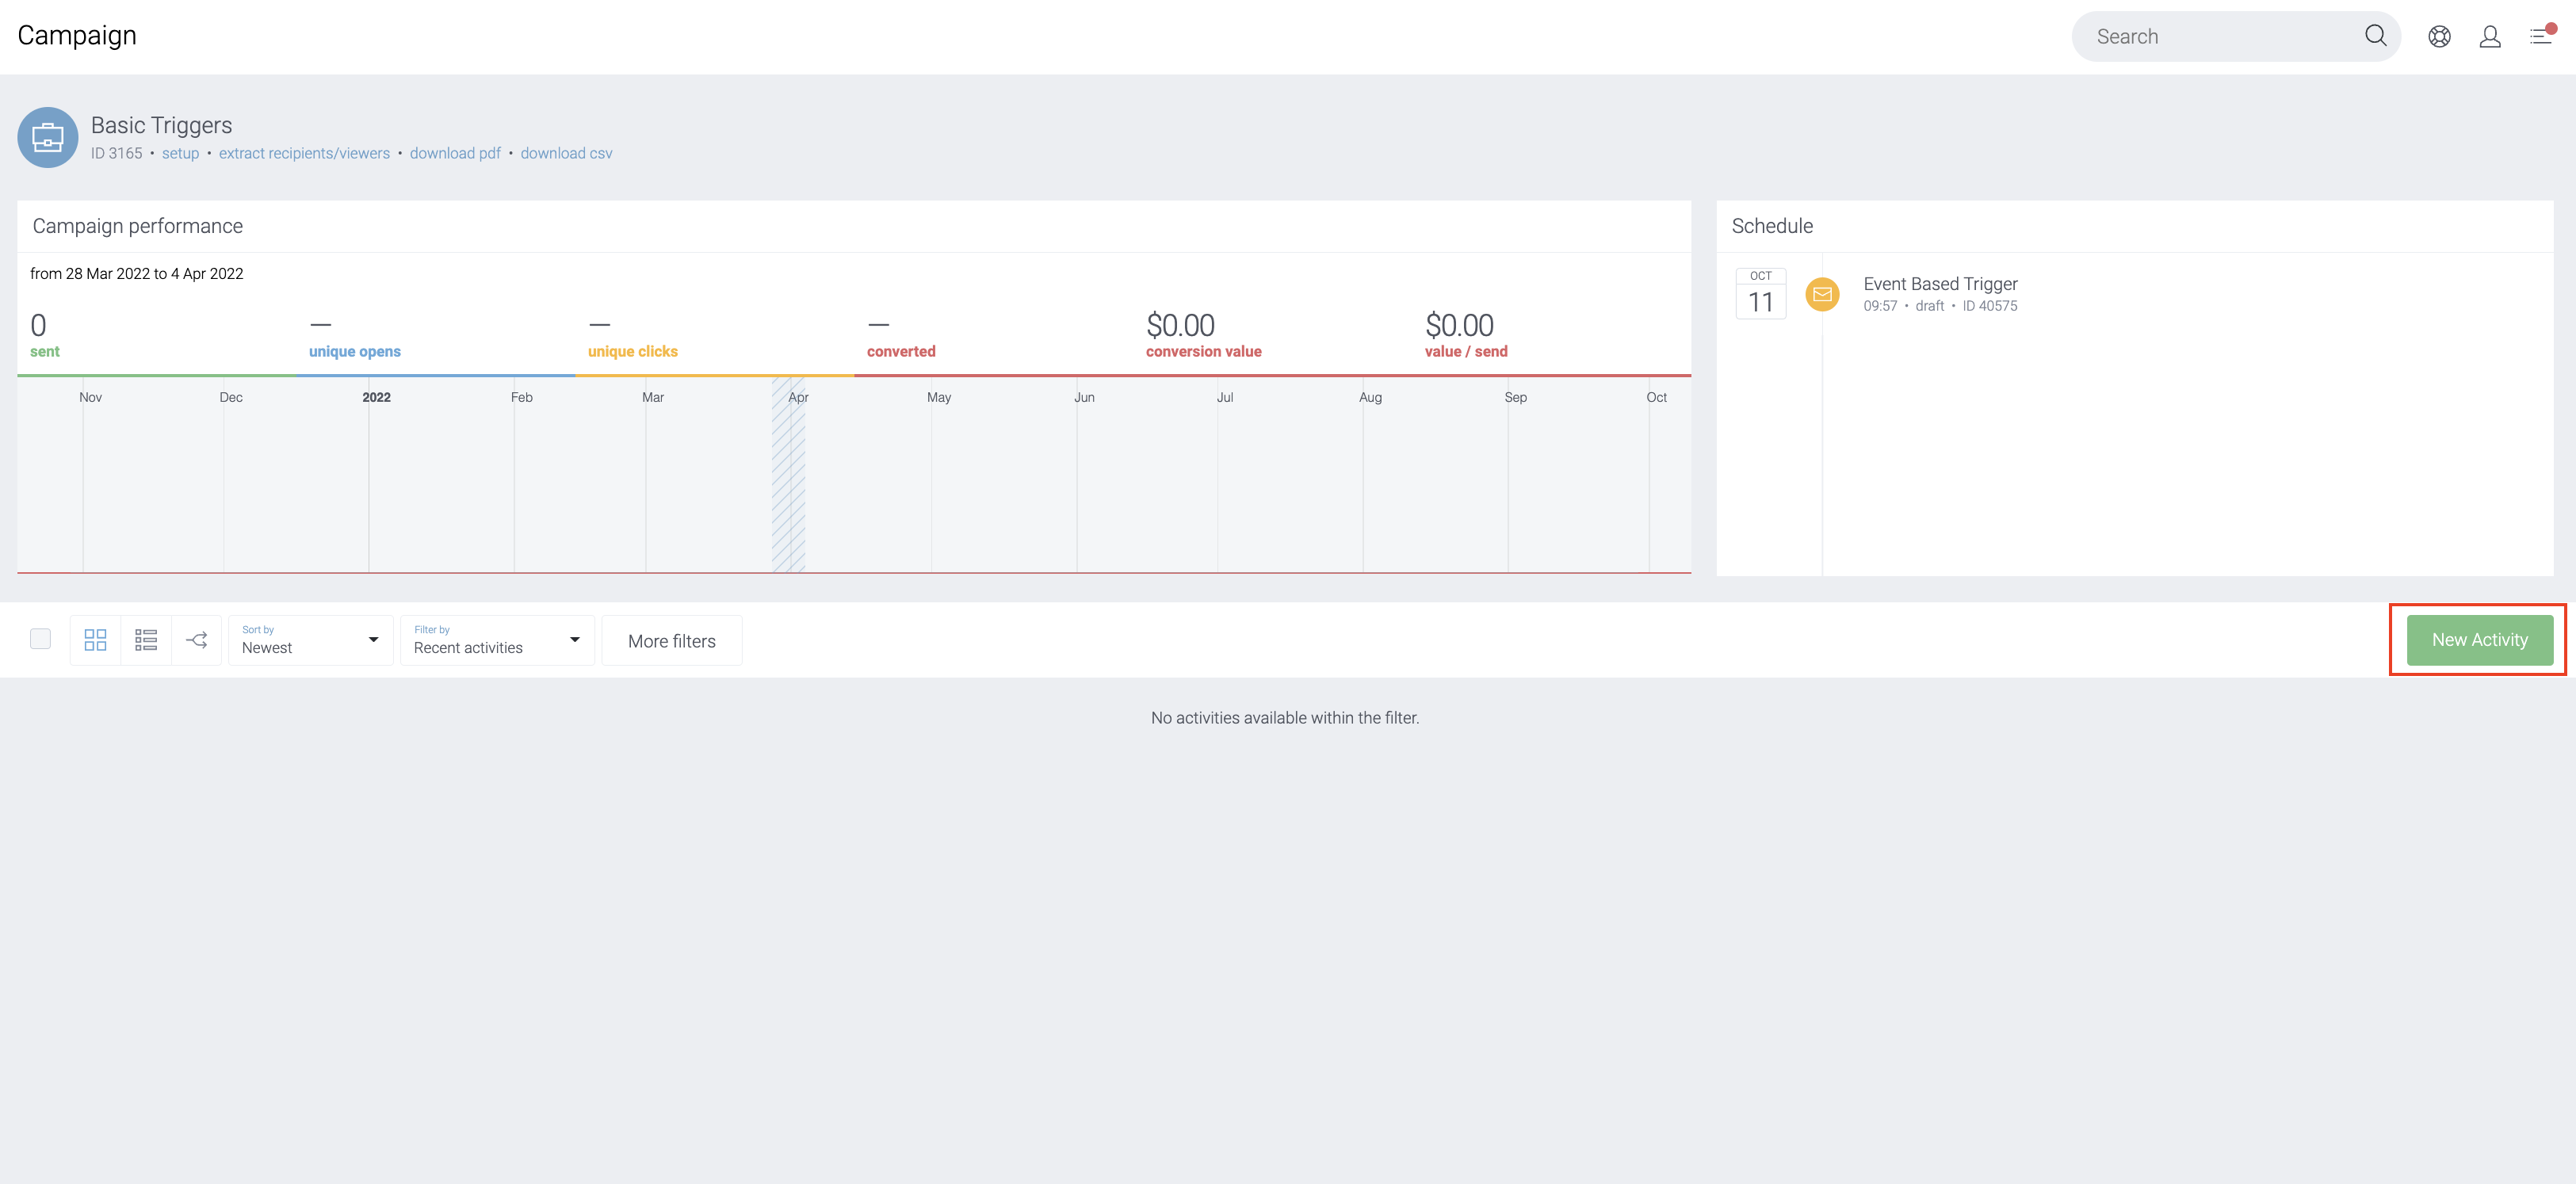
If you are editing an existing activity, simply navigate to the setup screen by either clicking the 'cog' icon in the activity card actions or within the activity header.

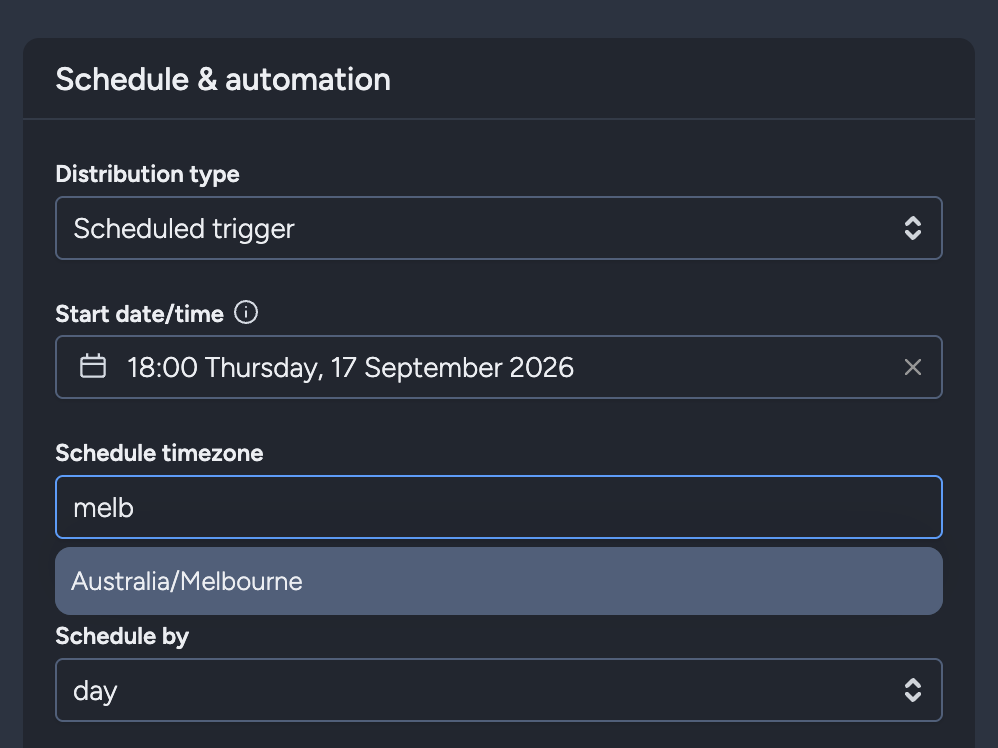
The setup screen will appear with activity options. Set Distribution Type to Scheduled trigger, then configure the following options.
Start date/time and schedule timezone
- Use Start date/time to select the first eligible occurrence.
- Use Schedule timezone to select the named timezone used by the start date/time and repeat schedule. You can search the timezone list by name.
- Configure the recurrence under Repeat schedule.
New activities default to the timezone detected from your browser. Once saved, the activity keeps its selected schedule timezone. Viewing Taguchi later from a browser in another timezone does not change the saved schedule.
Configure the repeat schedule
Use Schedule by to choose the base recurrence:
| Schedule by | Available scheduling options |
|---|---|
| hour | Repeat every set number of hours or at selected hours. |
| day | Repeat every set number of days, on selected days of the week, or on selected days of the month. |
| week | Repeat every set number of weeks or in selected weeks of the month. The weekday comes from the start date. |
| month | Repeat every set number of months or in selected months of the year. The calendar day and time come from the start date. |
| year | Repeat yearly from the start date. |
Use Schedule by: day when you need to select several arbitrary weekdays or calendar dates. Schedule by: week does not provide an arbitrary weekday selector.
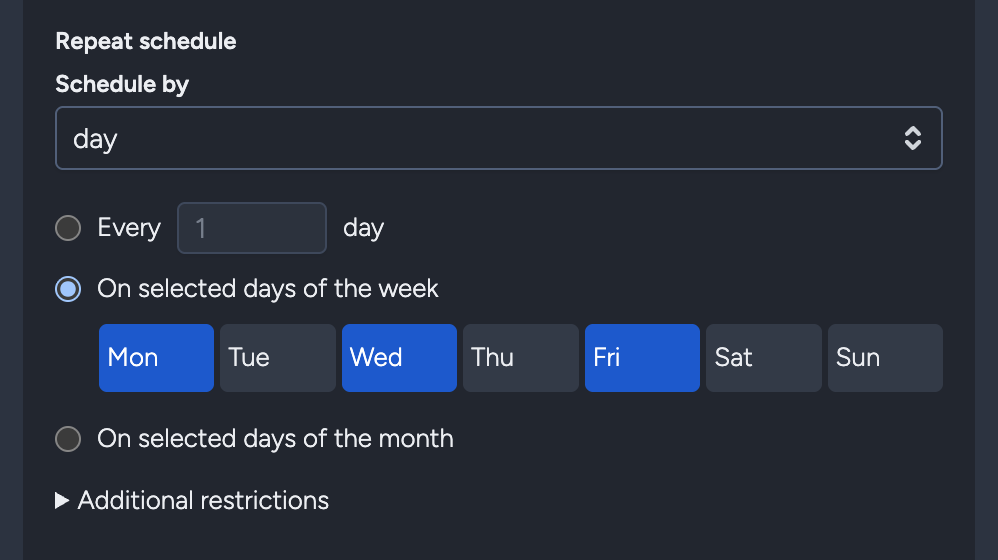
Run on selected days of the week
- Select Schedule by: day.
- Select On selected days of the week.
- Select each required weekday. Multiple weekdays can be selected, and at least one day must remain selected.
The trigger runs at the start time on each selected day. For example, select Monday, Wednesday and Friday with a start time of 9:00 AM to run the trigger at 9:00 AM on those three weekdays.
Run on selected days of the month
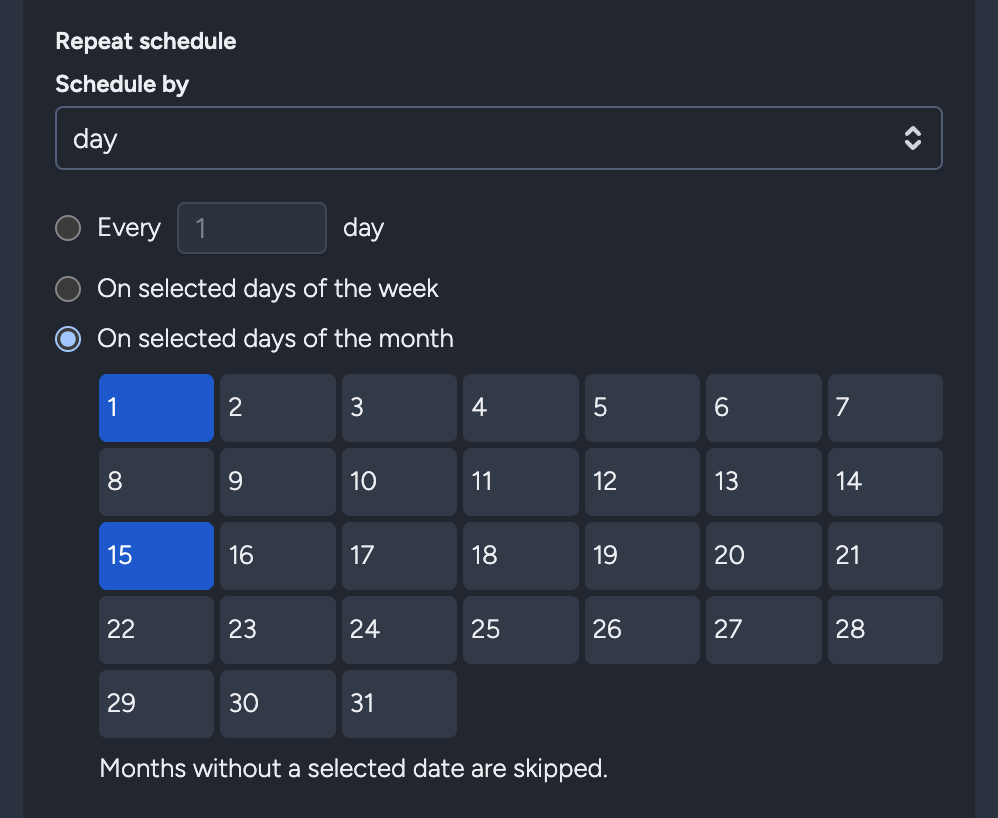
- Select Schedule by: day.
- Select On selected days of the month.
- Select one or more calendar dates from 1 to 31. At least one date must remain selected.
For example, selecting 1 and 15 runs the trigger at the start time on the 1st and 15th of each month. If a selected date does not exist in a month, that occurrence is skipped. A schedule for the 31st does not move to the last day of a shorter month.
Schedule by month
Use Schedule by: month to repeat every set number of months or to select months of the year. It uses the calendar day and time from Start date/time. This differs from Schedule by: day → On selected days of the month, which lets you select several numbered dates within each month.
If the start calendar date does not exist in a selected month, that occurrence is skipped. For example, a monthly schedule anchored to the 31st does not run in a month without a 31st.
End the repeat schedule
Use End repeat to control when the recurrence stops:
- Never: no repeat limit is applied.
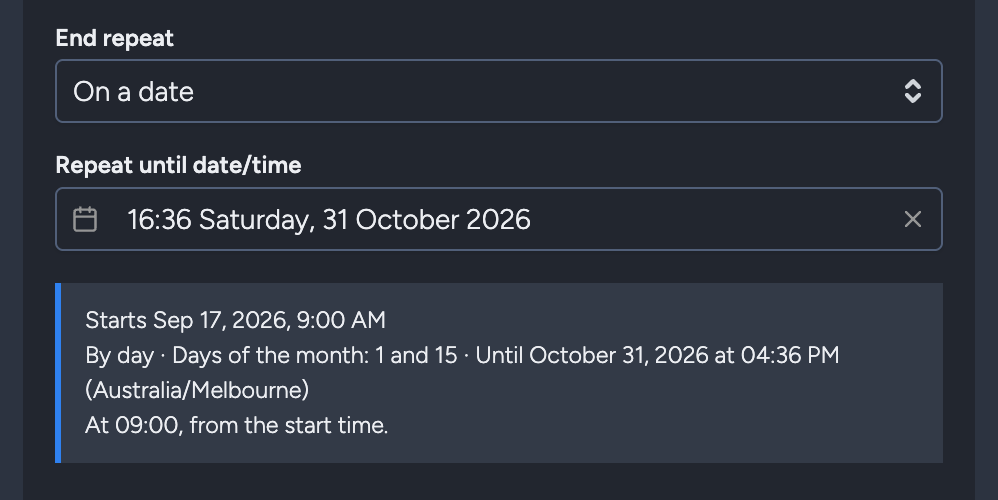
- On a date: select Repeat until date/time. Occurrences at or before this limit are eligible; later occurrences are not triggered.
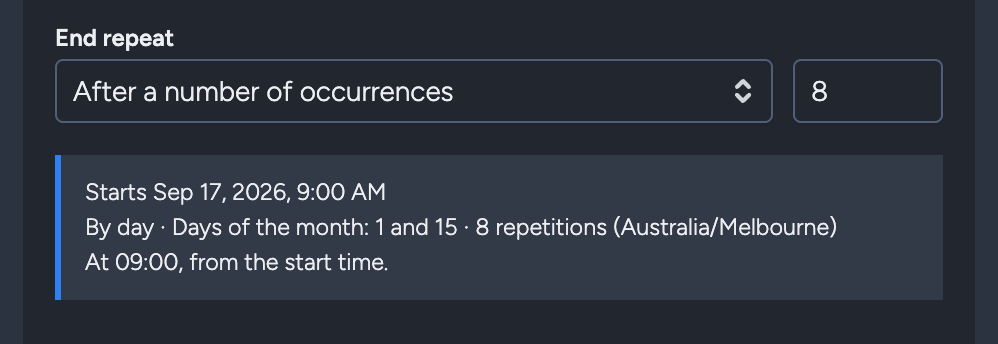
- After a number of occurrences: enter the maximum number of occurrences.
The repeat-until date/time is optional and uses the selected Schedule timezone. It cannot be earlier than Start date/time. A repeat count and a repeat-until date/time are alternatives: selecting one clears the other.
For example, to run every Monday until a specific date, choose Schedule by: day → On selected days of the week, select Monday, then choose End repeat → On a date and set Repeat until date/time.
Reaching the repeat limit stops new eligible trigger occurrences. It does not deactivate the activity and does not cancel messages that were already queued. Use the activity cancellation controls if queued messages must also be removed.
Timezones and daylight saving
The selected Schedule timezone controls the local time used by the start date/time and recurrence. A trigger scheduled for 9:00 AM in Australia/Melbourne, for example, remains scheduled for 9:00 AM Melbourne time even when it is viewed from another timezone.
For timezone-aware recurring schedules, the local or wall-clock time remains consistent when daylight saving starts or ends. The corresponding UTC offset may change. This means a 9:00 AM local schedule continues to run at 9:00 AM in the selected timezone rather than shifting by an hour.
Which activity types use these controls?
| Distribution type | Available scheduling controls |
|---|---|
| Scheduled trigger | Schedule timezone, repeat schedule and repeat/end controls. |
| Event-based trigger | Schedule timezone and a separate optional end date/time. It does not use the recurrence editor. |
| Broadcast or API trigger | Schedule date/time and schedule timezone. It does not use the recurrence editor or trigger end-date controls. |
| Web activity | Does not use this scheduling interface. |
For event-based trigger instructions, see Setting up an event based trigger.
Important limitations
- Selected calendar dates that do not exist in a month are skipped.
- Selected weekdays and dates define recurrence patterns; they do not exclude public holidays.
- This feature does not include a public-holiday calendar.
- Repeat limits do not cancel messages that have already been queued.
Subscriber frequency and send limit
Subscriber Send Frequency: Controls how often an individual subscriber can receive this activity.
- Not limited: Subscribers can receive the activity every time they qualify for the trigger.
- Send only once: Each subscriber will receive the activity only once, regardless of how many times they meet the trigger conditions in the future.
- Send once every...: Restricts how often a subscriber can receive the activity. Specify the frequency in days, weeks, months, or years. Once a subscriber has received the activity, they will not be eligible to receive it again until the configured time period has elapsed.
Example: If the frequency is set to Send once every 30 days, a subscriber who receives the activity today will not receive it again for the next 30 days, even if they meet the trigger conditions during that period. Once the 30-day window has passed, they will become eligible to receive the activity again if they still qualify.
- Send Limit: You can use this field if you know how many recipients an activity should be sent to each time and you don't want to send it if there are more recipients than expected. If you leave this field blank, then this send limit won't apply. For instance, if there are 500 in this field and it targets subscriber list X which includes 1000 subscribers, the activity will not be sent at all.
i.e. If you have a birthday trigger (send daily) and all "unspecified" birthdays are defaulted to i.e. 1/1/1900 in your database. You can set your send limit to double amount of the daily average (about 10% of the subscribers who have birthday on the 1st January), so the amount of subscribers targeted on the 1st January will exceed the send limit. This will result in an activity being not triggered on the 1st January, and you can prevent the trigger going out to those who have defaulted value 1/1/1900. Note: send limit should only be used for triggers and not immediate or scheduled broadcasts.
Save the changes you make by clicking the save button.
Edit Activity Content
You can then begin editing your activity content. View the Taguchi User Guide for tips on creating your activity content.
Set Target Expression
Click on the 'target' link within the activity header.
Select and refine your target audience using the target expression builder and save your changes. For more information on target expressions, please refer to the Target Expression Reference.
If you set a frequent repetition cycle, remember to exclude subscribers who have already received the activity, otherwise the trigger will continue to send to the same subscribers. You can do this by adding
not sent activity Xto the target expression (where X is the activity ID).
Approve and Deploy
Approve and deploy your activity to initiate the trigger. If you have scheduled a date/time in future, it will commence broadcasting the trigger on that date/time.
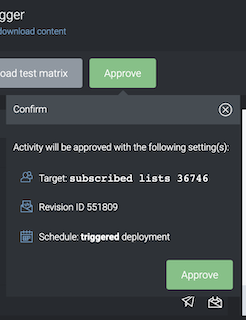
- Click on 'Approve' to approve the activity. A pop-up modal will appear showing your target expression, revision ID and your schedule.

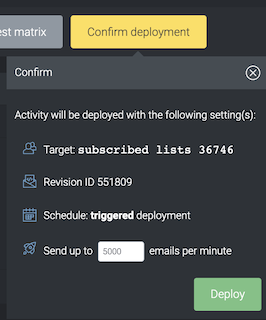
- Once approved, a 'Confirm Deployment' button should appear in the activity panel. Click on the button to confirm your target expression, revision ID, schedule and the throttle limit.

- After it's been deployed, two red buttons showing 'Cancel Deployment' and 'Suspend' should appear. The throttle rate will be displayed together with the number sends that have yet to be broadcasted.
