- Support Home
- Knowledge Base
- Lifecycles
- Getting Started with Lifecycles
Related articles
Need some help?
If you have questions or can't find what you're looking for, we're here to help.
Taguchi Support is available 24 hours a day, Monday to Friday.
Create New TicketTaguchi Certified Training
Join our free and live online training sessions. You'll benefit from a better understanding of the platform's features and functionality. Plus with Taguchi Certified Rewards, every session you attend, you're not just learning - you're earning your way to some fantastic rewards.
About Taguchi Certified RewardsAPI Version 5
Did you know Taguchi has an API that supports all of the functionality provided by the admin interface and more?
Explore API Documentation
Thanks for your feedback!
Getting Started with Lifecycles
What are Lifecycles?
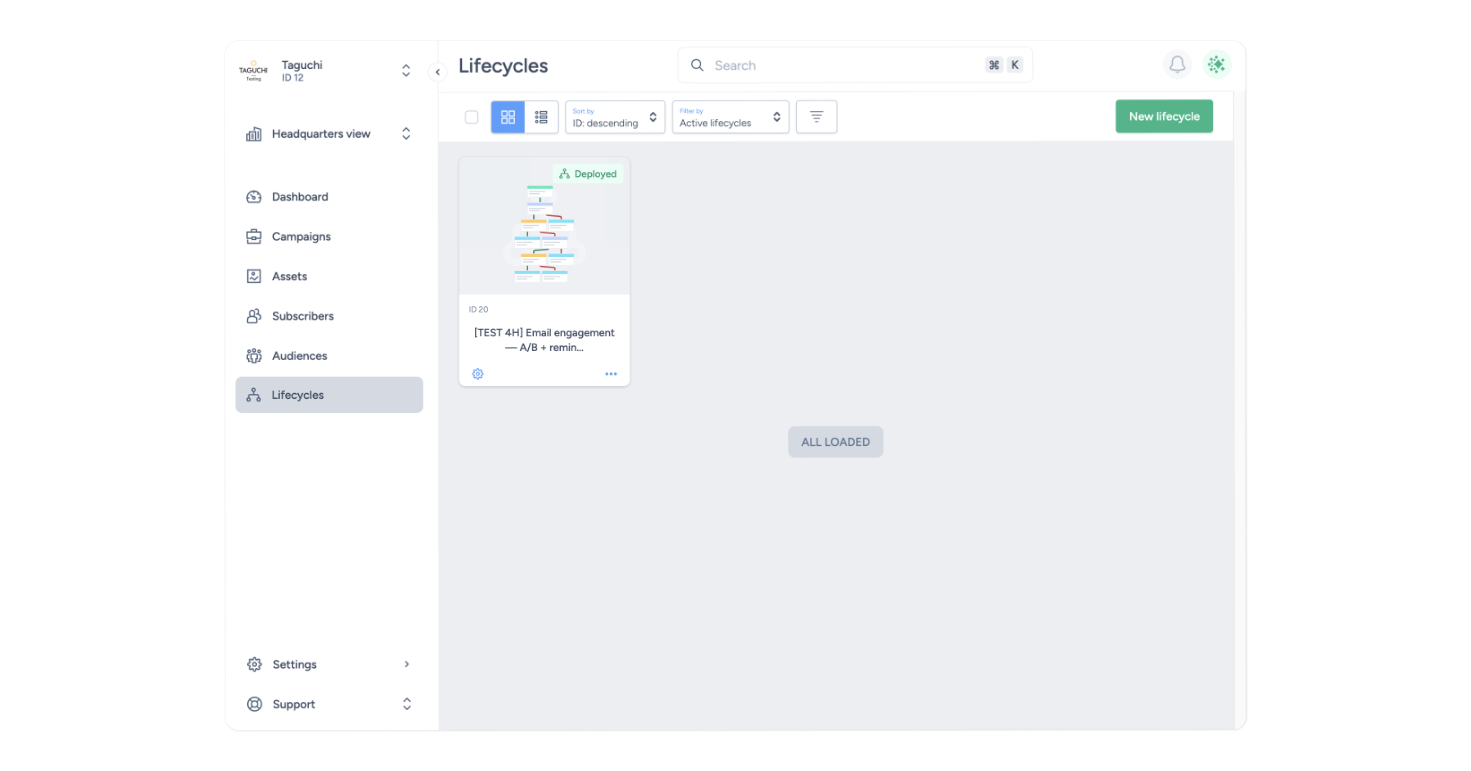
Lifecycles let you build multi-step customer journeys in Taguchi. A lifecycle can start for a subscriber when an event occurs, when they join or leave an audience, or at a scheduled time. It can then send activities, wait for another event, update subscriber data, direct subscribers along different paths, connect to another system and more.
Each subscriber moves through the lifecycle independently. Taguchi records their current stage and relevant journey history, so the lifecycle can respond to future events and continue from the correct point.
Common use cases include:
- Welcome and onboarding journeys.
- Post-purchase follow-up programs.
- Loyalty, renewal and anniversary journeys.
- Abandoned-cart and re-engagement programs.
- Multi-channel journeys that combine email, SMS, push notifications and webhooks.
- Experiments that compare different journey revisions against a shared business goal.
This article covers:
- Access and permissions
- Ways to create a lifecycle
- Create a lifecycle in the visual editor
- Configure entry, participation and exit rules
- Define goals
- Build the visual workflow
- Test, approve and deploy
- Test different revisions
- Understand lifecycle results
- Stop or move active subscriber journeys
- Manage existing lifecycles
- Recommended pre-deployment checklist
Access and permissions
The Lifecycles option appears in the left navigation when your user has organisation-wide access and a role that includes Lifecycles. Lifecycles are organisation-wide, so they are not available to users whose access is restricted to one or more partitions.
Access is separated so that editing and deployment can be managed independently:
| Access or permission | What it allows |
|---|---|
| Base user | View lifecycle setup, revisions, reporting and logs. |
| Edit Lifecycles | Create and edit lifecycles and draft revisions, copy revisions, manage tags, archive, restore and delete. |
| Deploy Lifecycles | Approve revisions, return them to draft and deploy them, pause or resume new entries, and stop or move active journeys with Remediation. |
Power users and administrators have edit and deployment access. Once any revision of a lifecycle has been deployed, changing its shared Setup or Goals & testing settings requires both Edit Lifecycles and Deploy Lifecycles.
If your organisation has enabled Require two-factor authentication for content deploy and database users, users who have not set up two-factor authentication (2FA) or single sign-on lose deployment access, and power users and administrators lose their elevated access, until they enable 2FA. See user management guidance for more about user roles.
If you cannot see Lifecycles, ask your organisation's administrator to check that your user has the required role and organisation-wide access.
Ways to create a lifecycle
You can create a lifecycle directly in the visual editor, with an AI agent connected to the Taguchi MCP Server, or with Genichi Chat.
Whichever method you use, begin with a clear brief. For example:
| What to include | Example |
|---|---|
| The business goal. | Increase the number of first-time ice-cream buyers who make a second purchase within 30 days. |
| Who should enter the lifecycle and what should trigger their entry. | Customers who buy a tub of ice cream for the first time enter when their completed purchase is recorded. |
| Whether subscribers can enter more than once. | Let a customer re-enter only after their previous journey has ended, with at least 90 days between entries. |
| The messages, waits, decisions and actions required. | Wait three days, then send a flavour-pairing email. If the customer clicks a recipe, wait two days and send the matching sundae recipe. Otherwise, wait a week and send a best-sellers offer. |
| The conditions that should end the lifecycle. | End the journey when the customer makes another purchase or unsubscribes from marketing, and after a maximum of 30 days. |
| The outcome that should be measured. | Measure whether the customer makes a second ice-cream purchase within 30 days of entering the lifecycle. |
| Any activities, audiences, lists, fields or integrations that must be used. | Use the “Summer Flavours” email activity, the “Ice Cream Customers” audience, the “Marketing Email” subscription list, the last_purchase_category profile field, and the Shopify purchase-event integration. |
AI-generated work must always be reviewed. Confirm that the correct Taguchi organisation and resources are being used, and never include passwords, access tokens or other secrets in your request.
Create a lifecycle using the Taguchi MCP Server
The Taguchi MCP Server lets an external AI agent work with supported resources in your Taguchi organisation. The agent can find the correct resource IDs, prepare a visual workflow, validate it, test its paths and create a draft lifecycle.
Before connecting an AI agent, check your Taguchi user role under Settings → Access. The connected agent never has more access than your user, and you can restrict its access further when you approve the connection. Make sure the access you grant includes the permissions needed to work with the lifecycle and its resources.
To connect an AI agent to your Taguchi organisation, follow the Taguchi MCP connection guide.
For a safer workflow, ask the agent to plan and check the lifecycle before creating it.
Example planning prompt
Using [Taguchi MCP connection name], prepare a visual lifecycle for [business purpose]. Subscribers should enter when [entry trigger] and only when [entry conditions]. The journey should [describe the messages, waits, decisions and actions in order]. Subscribers should exit when [exit condition], and success should be measured by [goal] within [observation window]. Use only resources that already exist in this Taguchi organisation. Find and confirm the required activities, audiences, lists, fields and integrations. Do not create or change anything yet. Show me the proposed workflow, participation settings, dependencies, failure paths and test plan.
Review the plan and correct any missing or incorrect details. When you are ready, ask the agent to create the draft.
Example creation prompt
Create the proposed lifecycle as a visual-editor-compatible draft. Before saving it, validate the lifecycle and test the entry, each branch, action failure, deadline and completion path using example data. Do not approve or deploy it. Show me the exact change before you save it so I can approve it. After saving the draft, validate and test the saved revision using its revision ID. Report the lifecycle and revision IDs, both sets of test results, and anything that still needs to be configured.
Example: welcome lifecycle prompt
Set up a visual-editor-compatible lifecycle named “New subscriber welcome”.

Goal:
Welcome newly subscribed customers and encourage a first purchase within 14 days.

Entry:
- Start when a subscriber joins the [WELCOME AUDIENCE OR LIST].
- Only admit subscribers who have a valid email address and have not unsubscribed.
- Do not allow re-entry.
- Limit to one active journey per subscriber.

Journey:
1. Send the welcome email [WELCOME ACTIVITY].
2. Wait 3 days.
3. Check whether the subscriber has made a purchase.
   - If yes, end the journey.
   - If no, send [FOLLOW-UP ACTIVITY].
4. End the journey.

Exit:
- Exit immediately if the subscriber unsubscribes or makes a purchase.
- Set a 14-day maximum journey duration.

Before saving:
- Find the actual audience/list, activity, and field IDs; do not invent IDs.
- Bind those resources by name in the lifecycle revision.
- Validate the lifecycle and test each path, including purchase, no purchase, and action failure.
- Save it as a draft only. Then validate and test the saved revision using its revision ID. Return the lifecycle and revision IDs, validation results, test results for both the proposed workflow and saved revision, and any unresolved placeholders or dependencies.
Your MCP client may show an approval prompt before it runs the write; this depends on the client and its settings. Before approving, check the organisation, lifecycle name, entry rules, resources, goals and workflow. If you cannot review the exact proposed change, do not approve the write.
After the draft is created:
- Open Lifecycles in Taguchi.
- Open the new lifecycle and review Setup, Goals & testing and Workflow.
- Confirm that every activity, audience, list, field and integration is correct.
- Validate and test the saved revision using its revision ID. Test the important paths on the saved revision, not only on the proposed workflow.
- Follow your normal approval and deployment process when the lifecycle is ready.
Creating the lifecycle through MCP saves a draft only. It does not approve or deploy the revision.
Create a lifecycle using Genichi Chat
Genichi Chat can help build a lifecycle when you give it a clear, specific brief and ask for a focused journey. Include the exact entry and exit rules, journey steps, goal, and the names of the Taguchi resources to use. Genichi can then find and confirm the resources, validate and test the workflow, and save a draft for your review.
For broader or more complex requests, such as developing a lifecycle strategy or building a large journey, Genichi may require the advanced model tier, Genichi AI Chat Pro. Pro access also requires available AI usage allowance. Genichi AI Chat Pro is a separate role: power users and administrators do not receive it automatically. Creating a draft still requires Edit Lifecycles permission, regardless of model tier.
For more information about opening and using Genichi, see Genichi Chat.
- Open Genichi Chat while signed in to the correct Taguchi organisation.
- Give Genichi a specific, bounded request. Include the lifecycle name, entry trigger and audience, subscriber eligibility, journey steps, re-entry rules, exit condition and measurable goal.
- Review the proposed workflow and answer any questions Genichi asks about missing activities, audiences, fields, integrations or business rules.
- Ask Genichi to build a visual-editor-compatible lifecycle, validate it and test every important path before saving.
- Review the exact proposed change when Genichi requests approval. Confirm the lifecycle name, resources and settings before approving it.
- Open the saved draft from Lifecycles and complete your normal review, approval and deployment process.
You can adapt the MCP example prompts above for Genichi. For example:
Help me create a visual lifecycle for [business purpose]. First inspect the available Taguchi resources and prepare a plan without making changes. Use [entry trigger and conditions], then [journey steps]. Set [re-entry rules], exit subscribers when [exit condition], and measure [goal] within [observation window]. After I approve the plan, validate and test every path, then ask for approval before creating the draft. Do not approve or deploy the lifecycle.
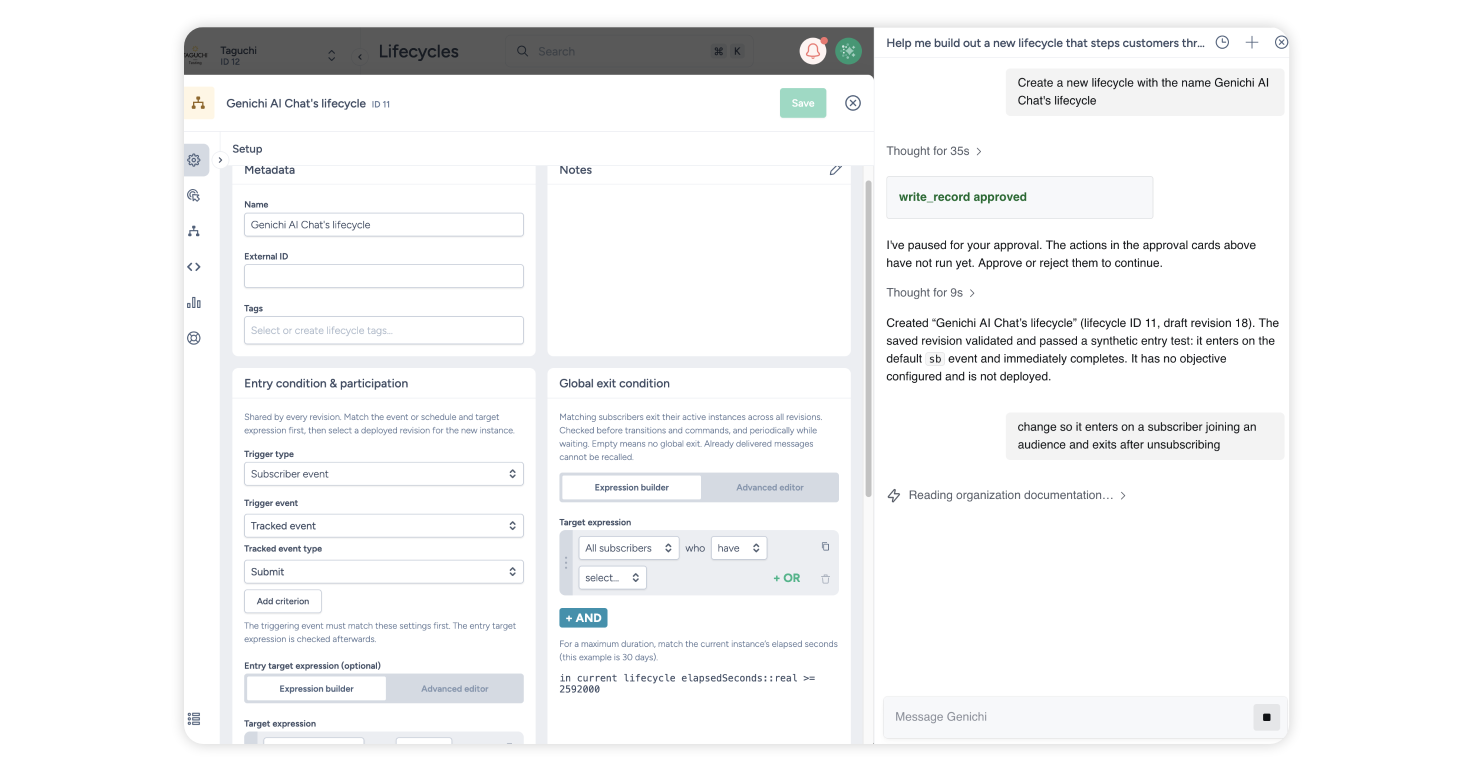
If Genichi says your request needs the advanced model tier, try narrowing the request or splitting the planning and authoring into smaller steps. If it still requires advanced models, ask your administrator about Genichi AI Chat Pro. You can also build the lifecycle in the visual editor or use an AI agent connected to the Taguchi MCP Server.
Create a lifecycle in the visual editor
- Select Lifecycles from the left navigation.
- Select New lifecycle.
- On the Setup tab, enter a clear Name.
- Optionally add an External ID, Tags and Notes. Use Notes to record the purpose of the journey, important dependencies and any operational guidance for other users.
- Configure the entry and participation settings described below.
- Select Save.
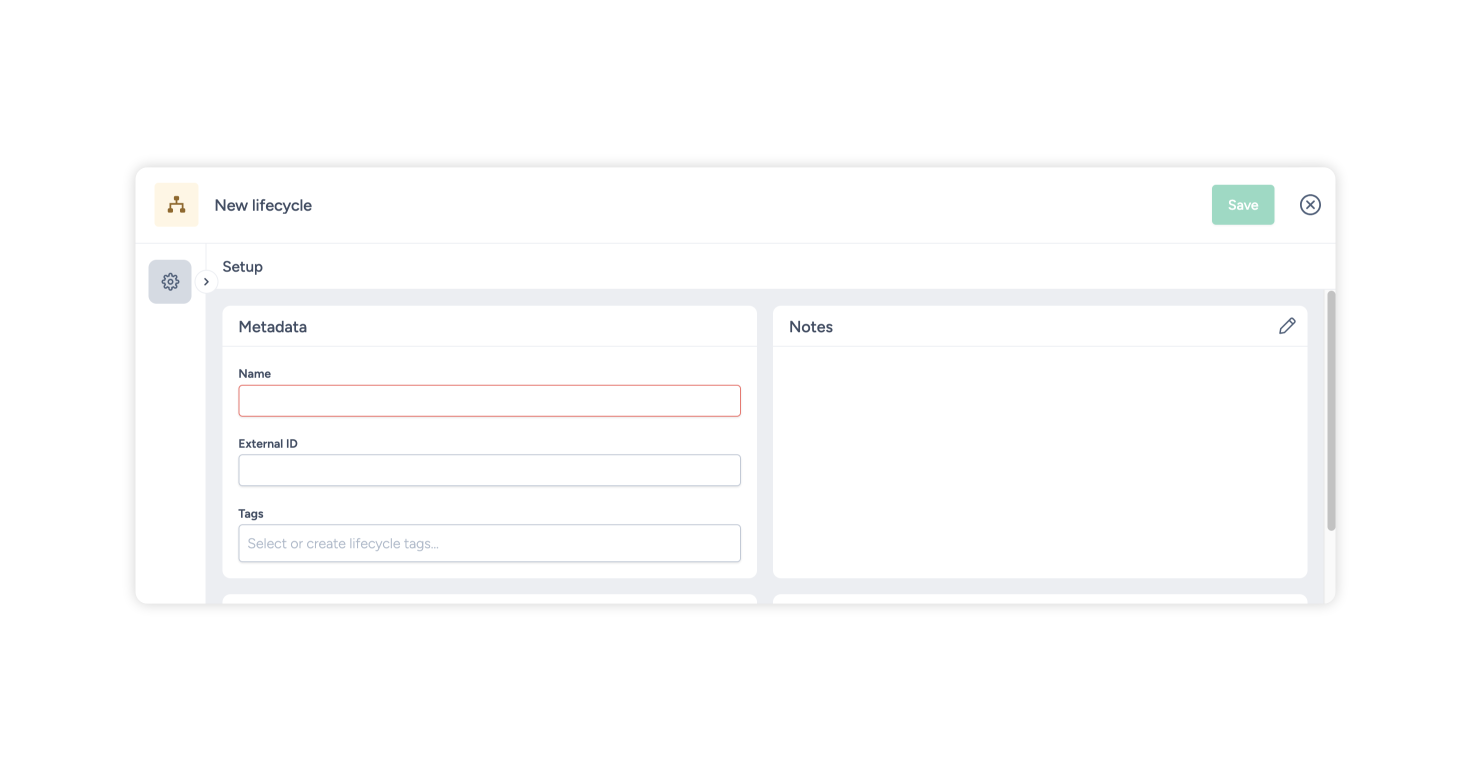
A new lifecycle begins with a simple visual draft containing an Entry step followed by a final Complete step. You can expand this draft on the Workflow tab.
Configure entry, participation and exit rules
The settings on the Setup tab apply to the whole lifecycle and are shared by every revision. Changes to these settings apply to the live lifecycle once they are saved; they do not need a new revision to be deployed.
Choose an entry trigger
Under Entry condition & participation, choose how subscribers can enter:
- Subscriber event: Enter when a selected subscriber event occurs. You can use standard events such as sends, opens, clicks, form submissions, list subscriptions, purchases, abandoned carts, page visits and other tracked events.
- Membership change: Enter when a subscriber joins a selected audience (Joined audience) or leaves it (Left audience). Changes to expression-based audiences are detected when the audience refreshes, so they may not be immediate. Subscribers who are already in the audience when the lifecycle is deployed do not enter; only changes after deployment admit subscribers.
- Schedule: Evaluate subscribers at a selected date and time. You can run the schedule once or repeat it using the available recurrence settings.
You can also add an Entry target expression (optional). A subscriber must match both the trigger and this target expression to enter. Leave the expression blank if no additional filtering is required.
For a scheduled entry, the target expression is evaluated at each occurrence. Calendar schedules use the selected named timezone and account for daylight saving time.
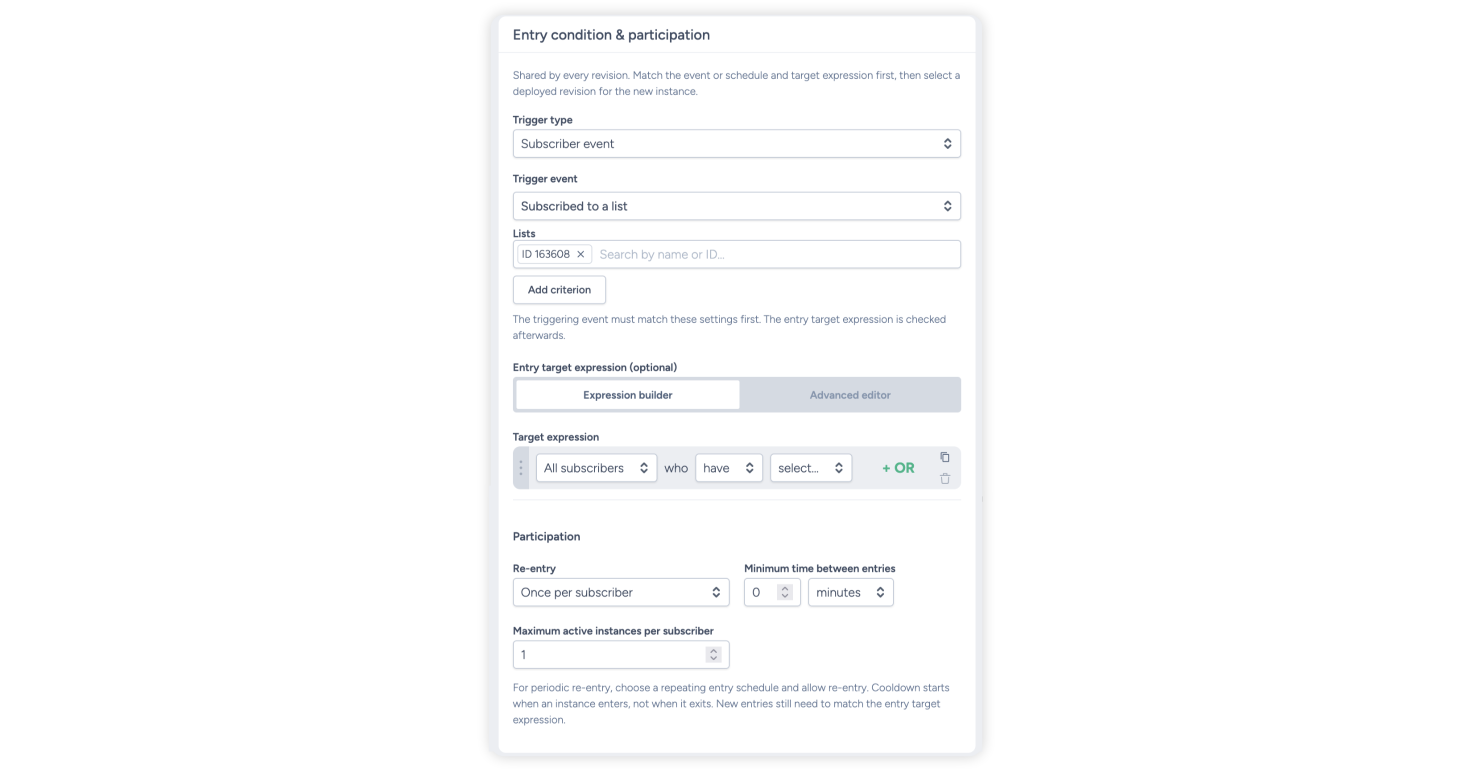
Taguchi first checks the event that has just occurred, then checks the entry target expression against the subscriber's current data.
Set participation rules
Participation controls whether the same subscriber can enter the lifecycle more than once. Each time a subscriber enters, Taguchi starts a separate journey for that subscriber. The Taguchi interface calls each journey an instance.
Choose a Re-entry option:
- Once per subscriber: The subscriber can enter this lifecycle only once.
- After the previous instance has exited: The subscriber can re-enter after their current journey has finished or exited.
- Allow overlapping instances: The subscriber can have more than one active journey at the same time, up to the Maximum active instances per subscriber limit.
You can also set:
- Minimum time between entries: A cooldown measured from the time the subscriber last entered, not from when their journey ended.
- Maximum active instances per subscriber: Limits how many journeys the subscriber can have running at the same time. New lifecycles start with a limit of 1. Clear the field to allow unlimited journeys.
If you choose Allow overlapping instances, also raise or clear Maximum active instances per subscriber. With the default limit of 1, subscribers can still have only one active journey at a time.
For a repeating journey, use a repeating entry schedule together with an appropriate re-entry option and cooldown. A subscriber must still match the entry target expression at each occurrence.
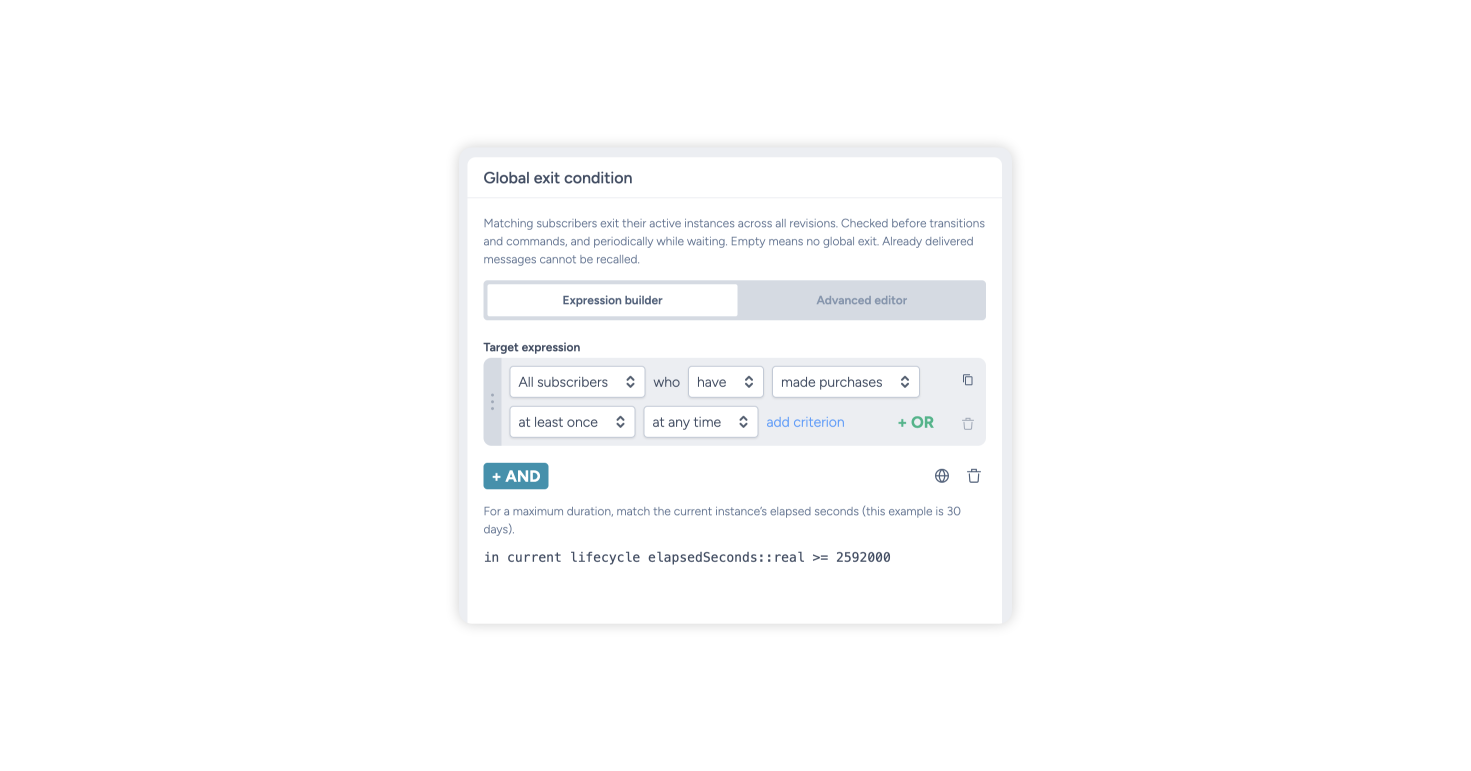
Add a global exit condition
The Global exit condition is a target expression that can stop active journeys across every revision. It is checked before each lifecycle action, and regularly for all active journeys, including those that are waiting. Because of this, an exit may take a short time to apply after a subscriber's data changes.
For example, you might exit subscribers when they unsubscribe, no longer qualify for the journey, or have remained in it for a maximum period.
When a subscriber matches the exit condition, pending lifecycle work is cancelled. Actions that have already completed, such as messages already sent, cannot be recalled.
Leave the exit condition blank if the lifecycle does not need a global exit rule.
Define goals
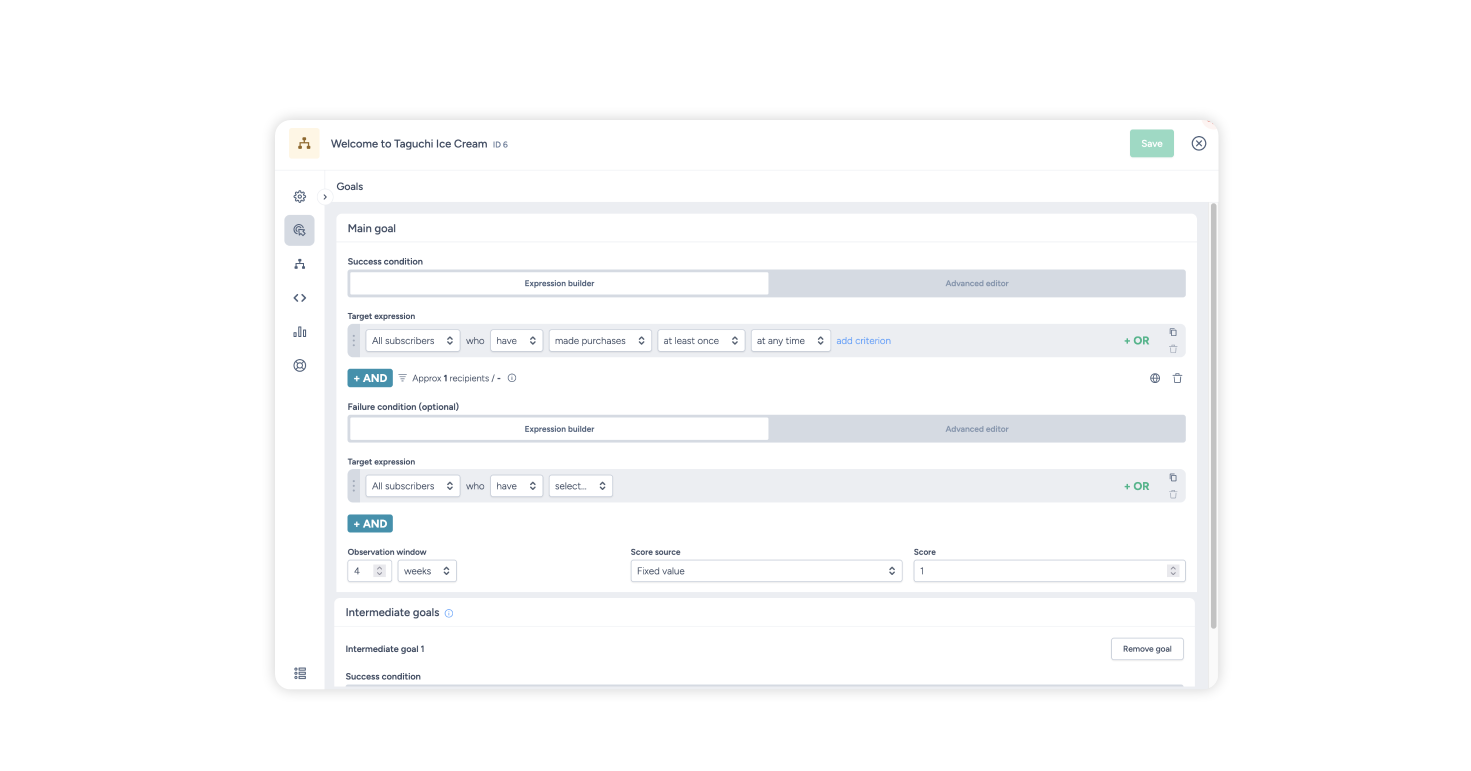
Use the Goals & testing tab to measure whether a lifecycle achieves a subscriber or business outcome. Goal measurement is optional; leaving the goal conditions empty creates an unmeasured lifecycle.
For the main goal, configure:
- Success condition: The target expression that represents conversion or the desired outcome.
- Failure condition (optional): An explicit undesired outcome.
- Observation window: How long Taguchi should look for the outcome after the subscriber first enters the lifecycle. The default is 14 days and the maximum is 365 days. The window also limits how long each journey can run (see below).
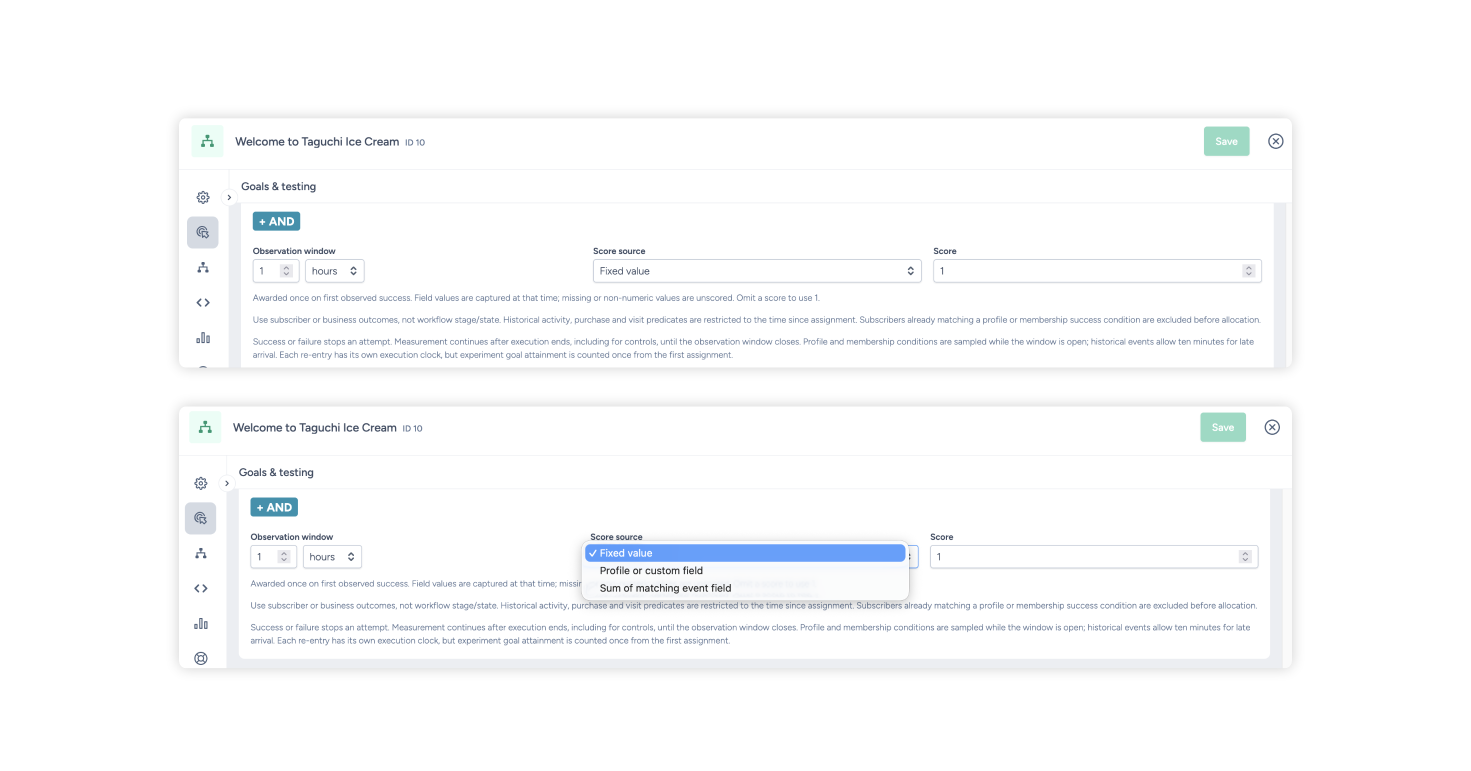
- Score source: Choose Fixed value, Profile or custom field, or Sum of matching event field. If you don't set a score, each success scores 1. A profile or custom field score is the value of a numeric field captured when success is first observed.
- Sum of matching event field: For a success condition based on a single purchase, activity, visit or tracked event, you can add up a Numeric event field recorded on matching events. The value must be a field on the event itself, not a profile or product field. Success conditions that combine rules with AND, OR or NOT are not supported. This is useful when comparing revenue or another event-level amount. Check that the selected event field contains the amount you intend to measure and that values use a consistent currency or unit.
Choose durable business outcomes, such as a purchase or another tracked event, wherever possible. Workflow stages and lifecycle state are operational information and cannot be used as measured goals.
You can add up to 16 Intermediate goals to measure early indicators, such as opening a welcome message or viewing a product page. Intermediate goals have their own observation windows and do not stop the lifecycle. Their windows begin at the same assignment time as the main goal, so they do not need to occur in a set order.
Important points about goal measurement:
- A subscriber who already matches the main success condition when they would enter is not admitted to the lifecycle and is excluded from goal measurement and revision testing.
- Success or failure can stop the subscriber's current journey, but measurement continues until the observation window closes.
- When a success condition is set, the observation window also limits how long each journey can run, counted from each entry. If neither outcome occurs before the window ends, the journey stops and pending work is cancelled. Make sure the window is longer than the total of the waits in your workflow.
- A subscriber may be counted in both failure and success if the failure occurs first and they later convert within the window.
- The global exit condition is a neutral operational stop, not a success or failure.
- Completing the workflow does not automatically mean the business goal succeeded.
- A profile-field score is captured when success is first observed; it is not a calculation of the change since the subscriber entered. Event totals are calculated from matching events during the observation window. Missing or invalid values are shown as unscored, not as zero.
Build the visual workflow
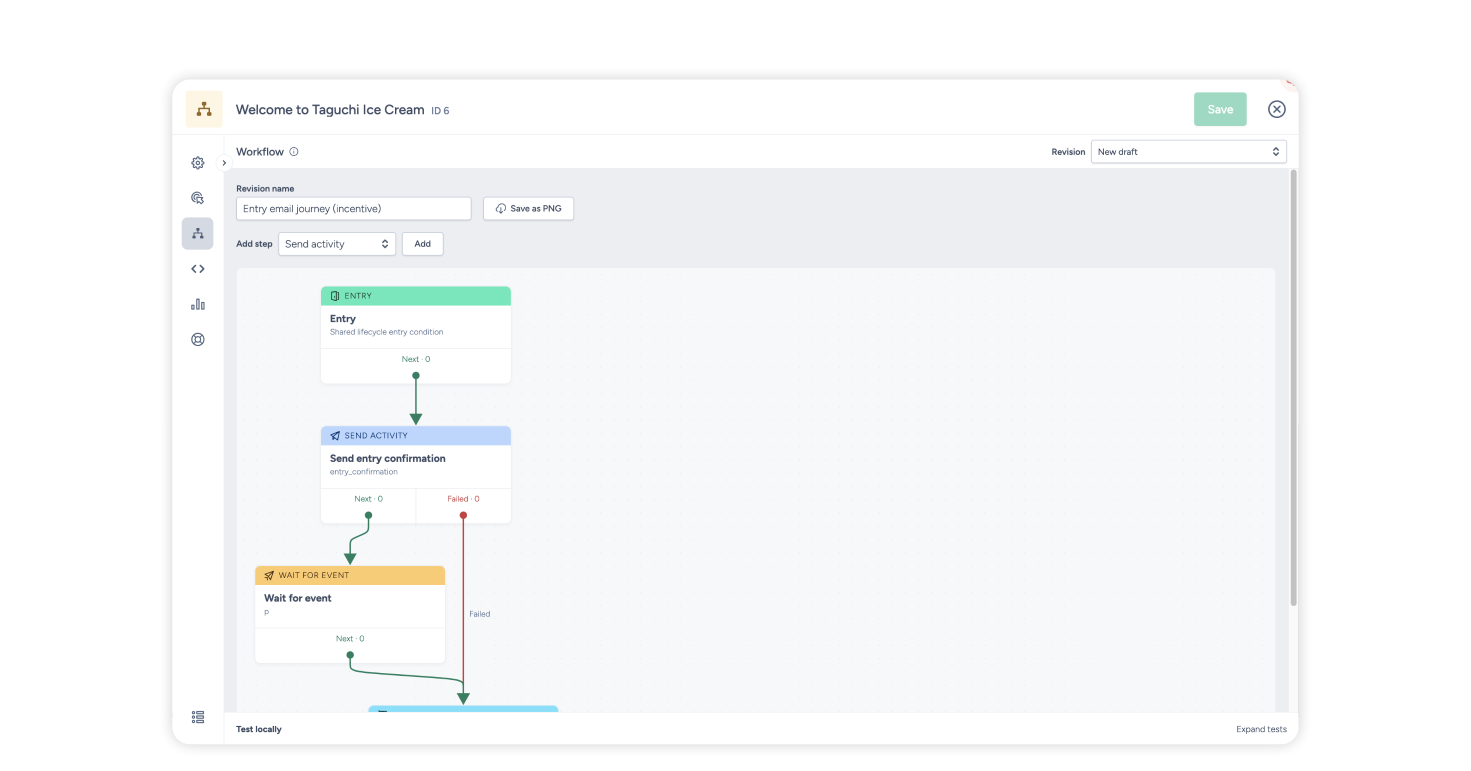
Open the Workflow tab to design the journey. The flow runs from top to bottom.
- Select Add step and choose a step type.
- Select a step in the flowchart to edit its settings.
- Give each step a clear, unique label. These labels become the journey stages shown in Reporting.
- Connect each outlet (a path leading out of a step) to another step by dragging it onto the destination, or by choosing the destination under Connections.
- Select Save regularly while working.
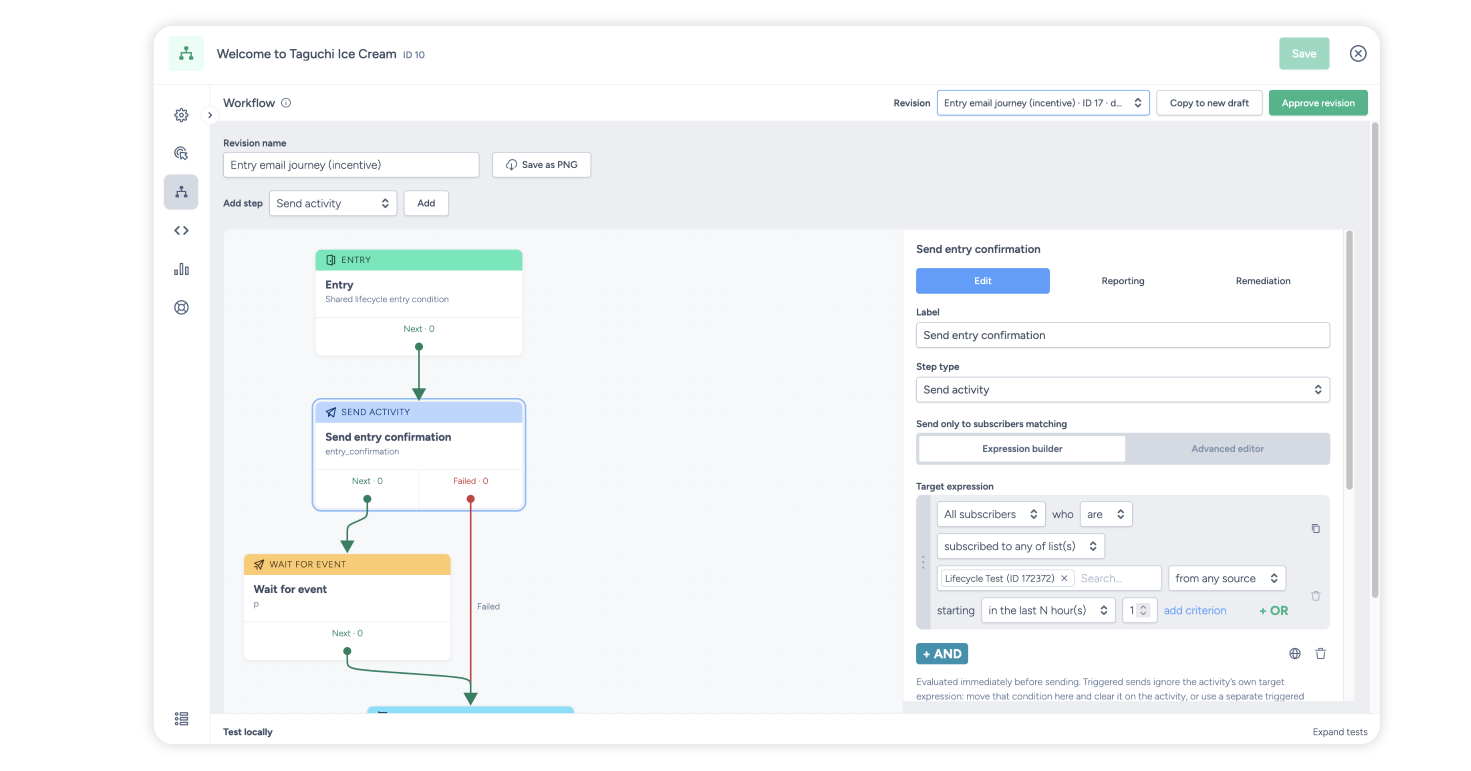
If an outlet is left unconnected, the subscriber leaves the lifecycle at that point and the journey is recorded as completed. This also applies to an unconnected Failed path, so connect Failed paths wherever a failure needs to be handled. A completed journey does not mean the goal was achieved.
You can also select Save as PNG to save an image of the visual workflow.
Available visual steps
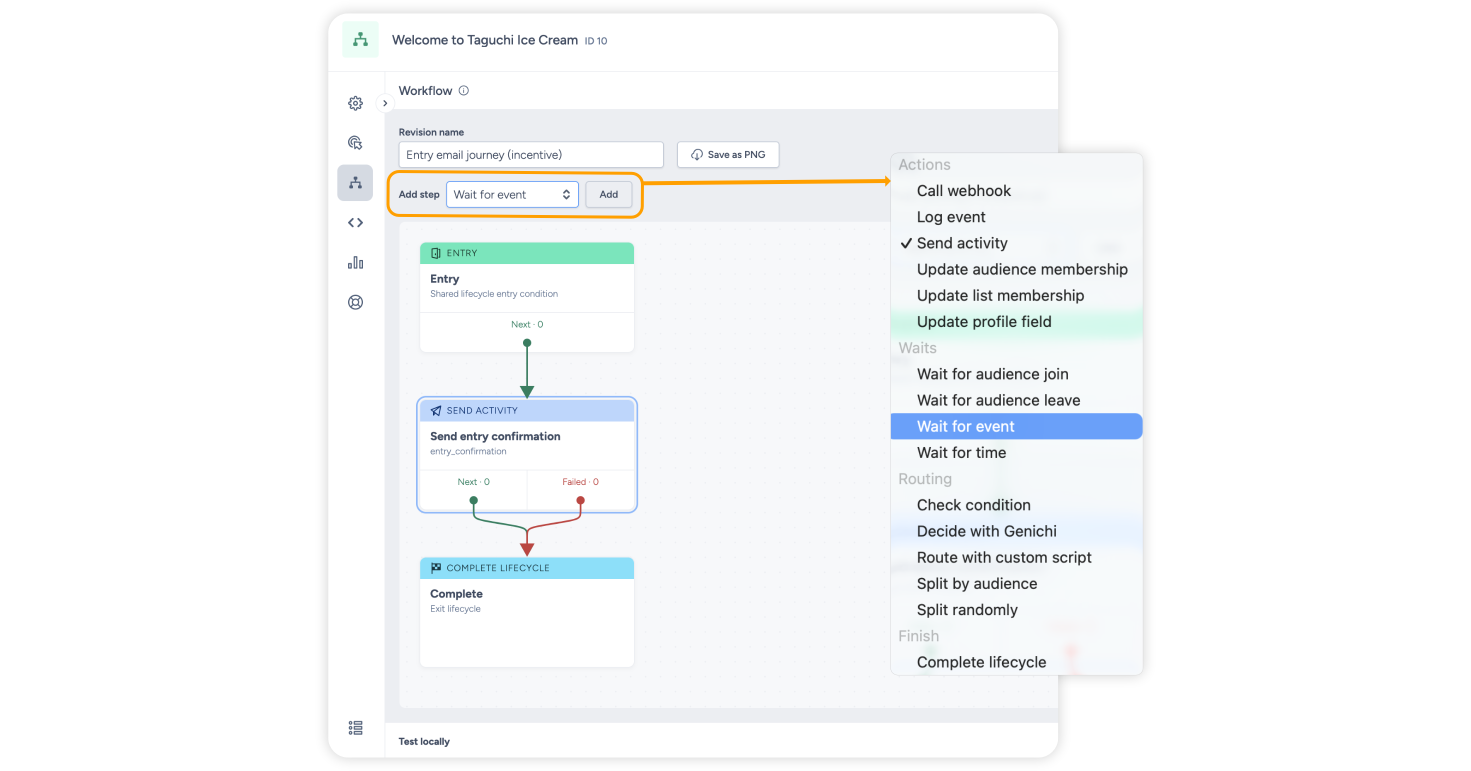
| Group | Step | Purpose |
|---|---|---|
| Actions | Send activity | Send the latest deployed revision of an email, SMS, push notification or another supported activity. |
| Actions | Update profile field | Write a value to a standard or custom subscriber field. |
| Actions | Update list membership | Join or leave a list. Leaving a list records an unsubscribe for that list; global consent is unchanged. |
| Actions | Update audience membership | Add or remove the subscriber from an audience configured as Managed via lifecycle. |
| Actions | Call webhook | Send information to another system through a webhook integration. |
| Actions | Log event | Record a subscriber event through normal event processing. |
| Waits | Wait for time | Pause for an elapsed or calendar-based period. |
| Waits | Wait for event | Continue when a matching subscriber event occurs. |
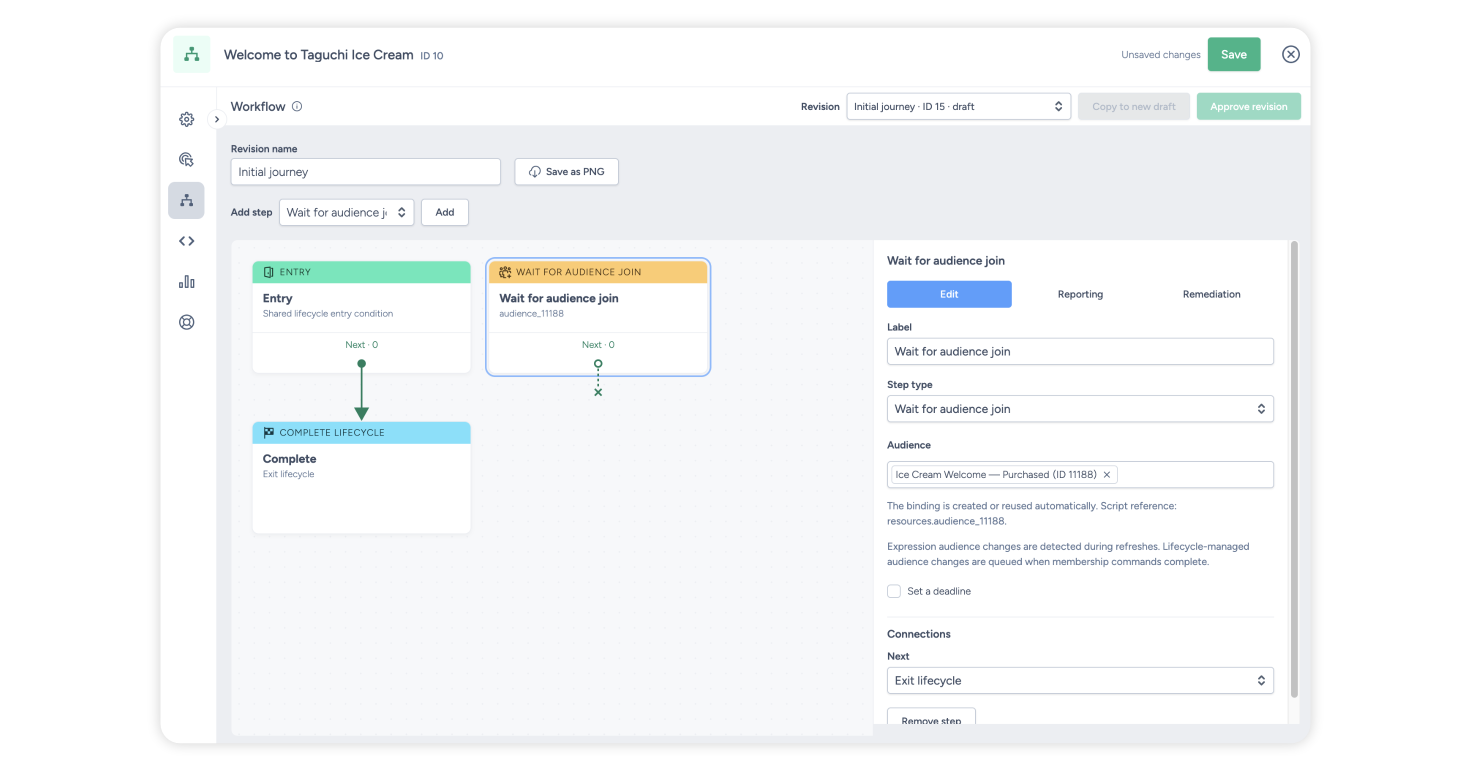
| Waits | Wait for audience join / Wait for audience leave | Continue after the subscriber joins or leaves the selected audience. |
| Routing | Check condition | Branch using a profile, trigger or lifecycle state value. |
| Routing | Split by audience | Check audiences in priority order; the first match wins, otherwise the fallback path is used. |
| Routing | Split randomly | Choose a weighted path independently each time a subscriber reaches the step. Weights are relative and do not need to total 100. This does not create a persistent experiment assignment. |
| Routing | Decide with Genichi | Send selected profile fields to an available decisioning model and route using its returned outcome. |
| Routing | Route with custom script | Use synchronous JavaScript for routing logic that is not available in the standard condition step. |
| Finish | Complete lifecycle | End the lifecycle at a named final stage. |
Action and failure paths
Steps that perform an action, as well as Decide with Genichi and Route with custom script, include a Failed path. Taguchi retries temporary problems first. If the step still cannot be completed, the subscriber follows the Failed path.
For Send activity:
- The selected activity must have a deployed revision when the step runs. If it does not, the step fails and the subscriber follows the Failed path. The editor warns you about an activity that has not been deployed, but this does not prevent approval, so deploy the activity before you deploy the lifecycle.
- The lifecycle always uses the latest deployed revision of that activity when the step runs.
- Triggered sends ignore the activity's own target expression, and a lifecycle revision that uses an activity with its own target expression cannot be approved. Put send-time filtering in Send only to subscribers matching on the lifecycle step, and remove the activity-level target expression or use a separate activity.
- Subscribers who do not match Send only to subscribers matching follow the Failed path.
- A successful step means at least one recipient was accepted into the sending process. It does not mean the message was delivered or opened. Consent and frequency caps still apply.
For Call webhook, the success path waits for actual webhook delivery. A request follows the Failed path after retries are exhausted or the request expires.
Audience membership changes are separate from list subscriptions and consent. Only audiences configured as Managed via lifecycle can be changed by a workflow step. Audience membership changes can also be used as entry or wait conditions. Changes to expression-based audiences are detected when the audience refreshes and may not be immediate. Changes to audiences managed via lifecycle do not wait for an audience refresh, so they are usually detected sooner.
Waits and deadlines
Time waits support minutes, hours, days, weeks, months and years. Each wait uses a named timezone, such as Australia/Melbourne. Minutes and hours are measured as elapsed time; days and longer periods follow the calendar in the selected timezone.
Event and audience waits can include Set a deadline. This creates separate Matched and Deadline exceeded paths. Events received before the subscriber reaches the wait step are not replayed.
Advanced mode
The Advanced tab is intended for specialised journeys that cannot be created in the visual editor. It exposes technical settings and code used to run the lifecycle.
Changes made in Advanced mode may prevent the revision from being edited visually. If you are unsure whether Advanced mode is required, contact Taguchi Support before making changes.
Test, approve and deploy
Test locally
Both Visual and Advanced modes include Test locally.
- Choose the transition or step to test.
- Review and edit the example test data.
- Select Run and validate.
- Confirm the returned stage, path and proposed actions.
- Repeat the test for success, failure, alternative outcomes and deadlines where relevant.
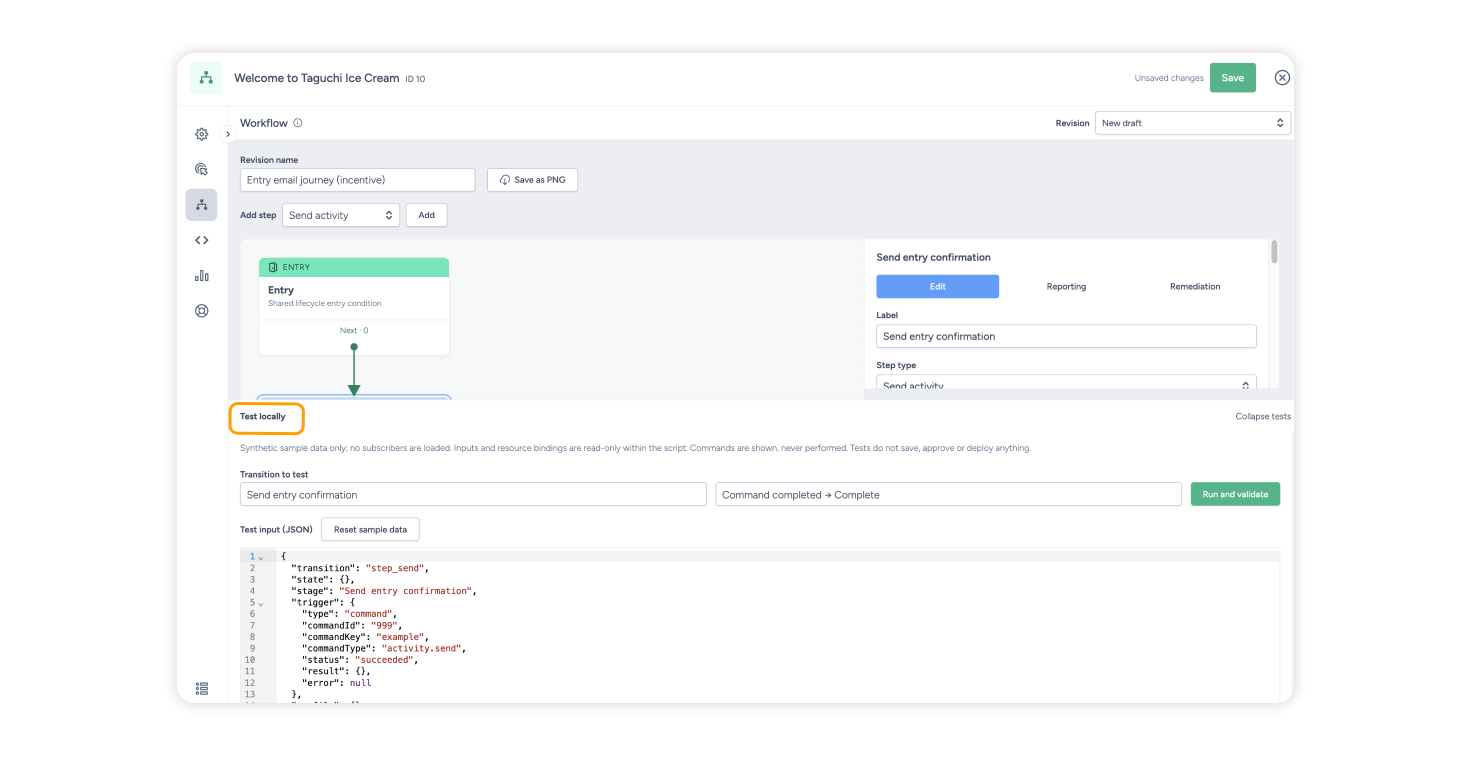
Local tests use example data that you can edit. They do not load a real subscriber, send a message, update a profile, call a webhook, save changes, approve a revision or deploy anything. Proposed actions are displayed but never performed.
Local testing validates workflow logic, but it does not simulate consent, frequency caps, message delivery, live integrations, audience refreshes or actual goal outcomes. Check every referenced activity and integration separately before deployment.
Work with revisions
As with activities, a lifecycle can contain multiple revisions. Draft revisions can be edited. Once a revision is approved or deployed, its workflow settings and logic are locked.
To change an approved or deployed revision:
- Open the revision selector.
- Select the revision you want to use as a starting point.
- Select Copy to new draft.
- Rename and edit the new draft, then save it.
If no revision test is set up, new subscribers use the latest deployed revision. If a revision test is set up, new subscribers are allocated according to it, and a newly deployed revision is not added to the test automatically. See Test different revisions.
Subscribers who are already moving through the lifecycle remain on the deployed revision they started with, even after another revision is deployed.
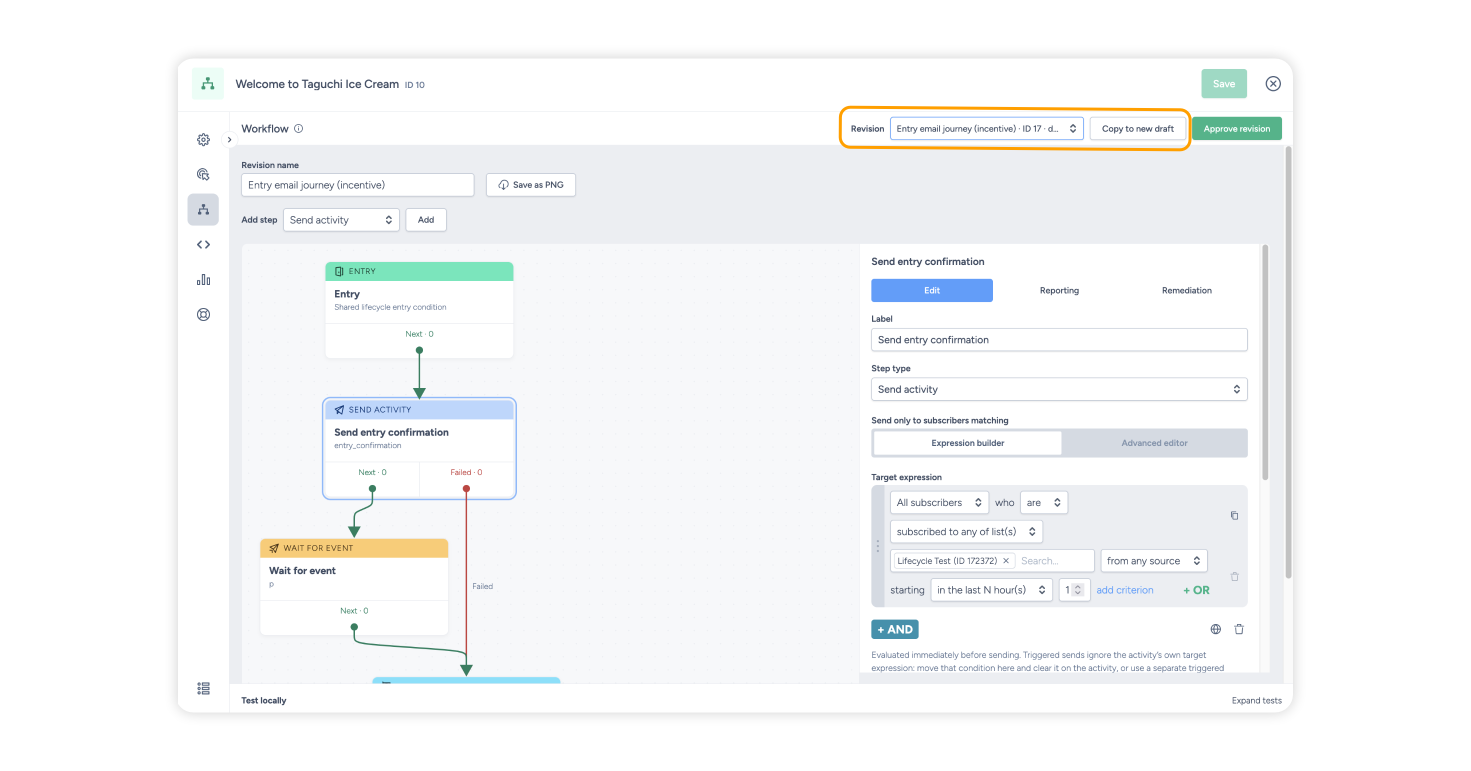
Approve and deploy a revision
- Save the draft and resolve all validation messages.
- Confirm every Send activity step has an activity selected, and that each activity is deployed and has no activity-level target expression.
- Test the important paths with Test locally.
- If you have Deploy Lifecycles permission, select Approve revision. Approval locks the workflow settings and logic.
- Select Deploy revision and confirm the deployment.
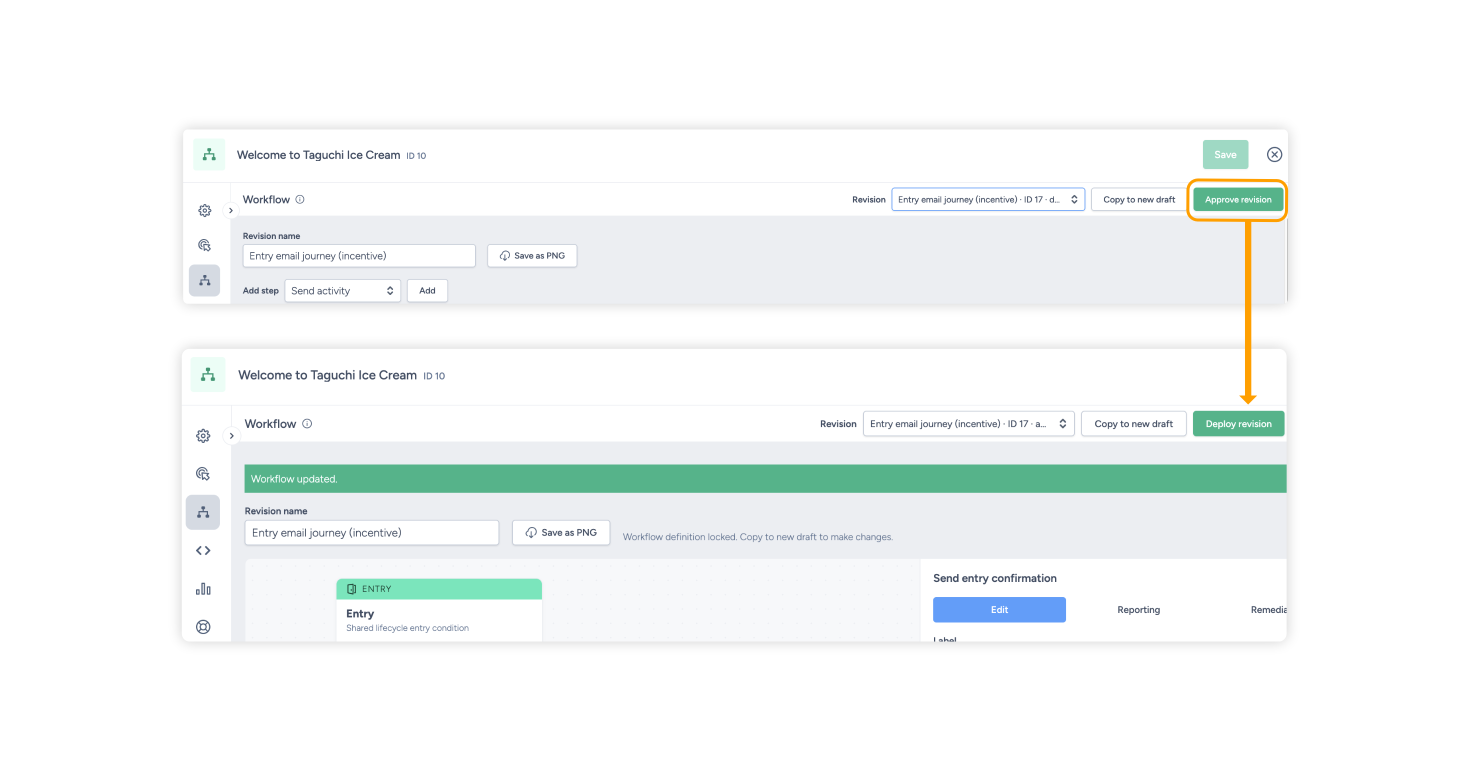
If an approved revision needs more changes before it is deployed, select Return to draft. A deployed revision cannot be returned to draft; copy it to a new draft instead.
Use the Logs tab to review lifecycle creation, changes, approvals, returns to draft, deployments, changes to new entries and remediation.
After any revision has been deployed, changing the shared entry, exit, participation, goal or revision-testing settings requires both Edit Lifecycles and Deploy Lifecycles permission. These changes apply to the live lifecycle without a new deployment and affect the whole lifecycle, so review them carefully.
Test different revisions
Use Revision testing on the Goals & testing tab to control which deployed revision receives each new entry.
Under Test allocation, you can choose:
- No test — use the latest deployed revision: All new entries use the most recently deployed revision.
- Random split (weighted revisions): Distribute new entries across deployed revisions using whole-number relative weights.
- Alternate revisions (round robin): Rotate through the selected revisions in order.
Users with Deploy Lifecycles permission can pause or resume new entries for an individual deployed revision from that revision's controls. Pausing new entries does not stop subscribers already on that revision, but it does stop them from re-entering on it. If the paused revision is the latest revision used for entry, Taguchi does not automatically switch new subscribers to an older revision. A scheduled entry that falls due while every eligible revision is paused is skipped, not run later. If the revision is part of a revision test, pausing or resuming it starts a new reporting epoch. Review the entry allocation before pausing a revision.
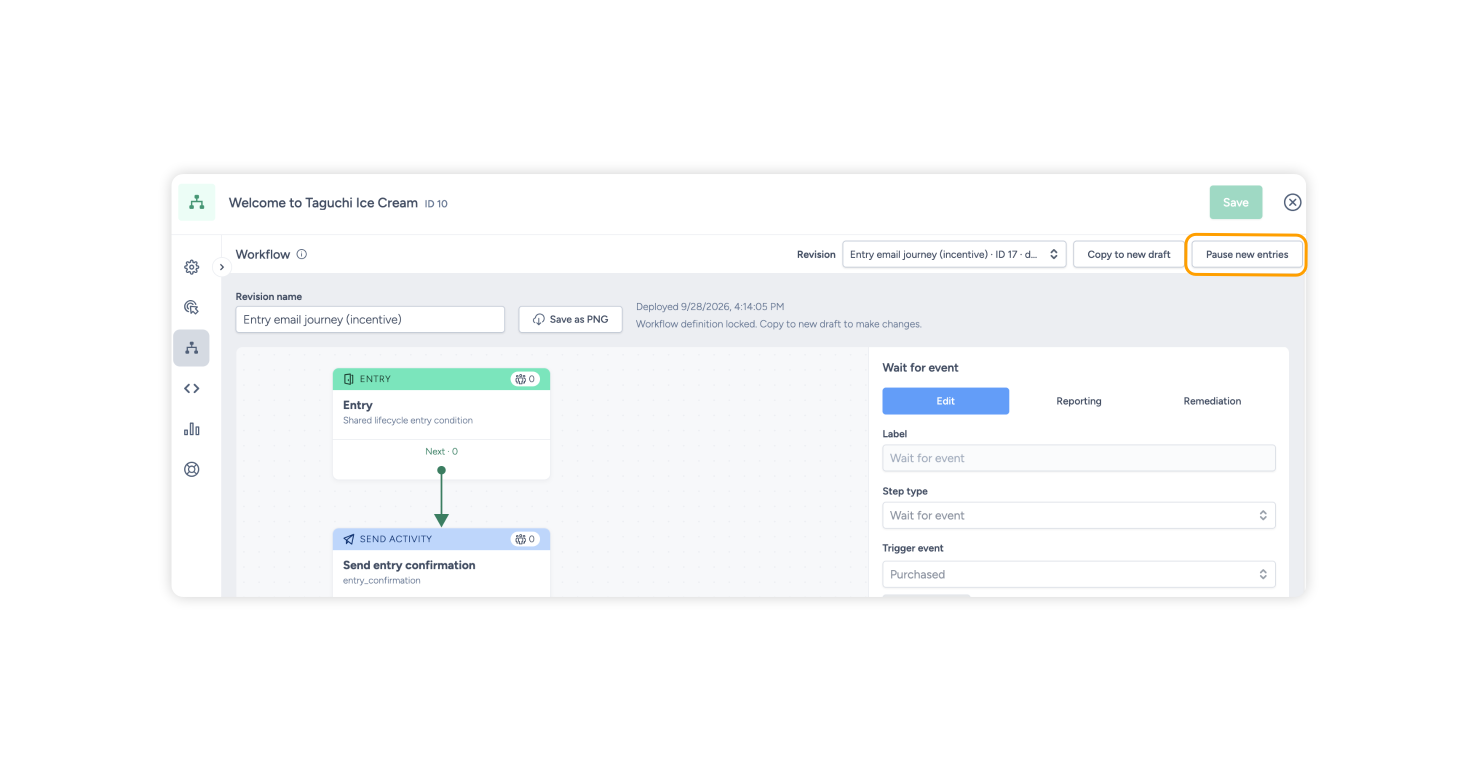
Weighted values do not need to add up to 100. For example, weights of 3 and 1 create an expected 75% and 25% split. A weight of zero disables that revision.
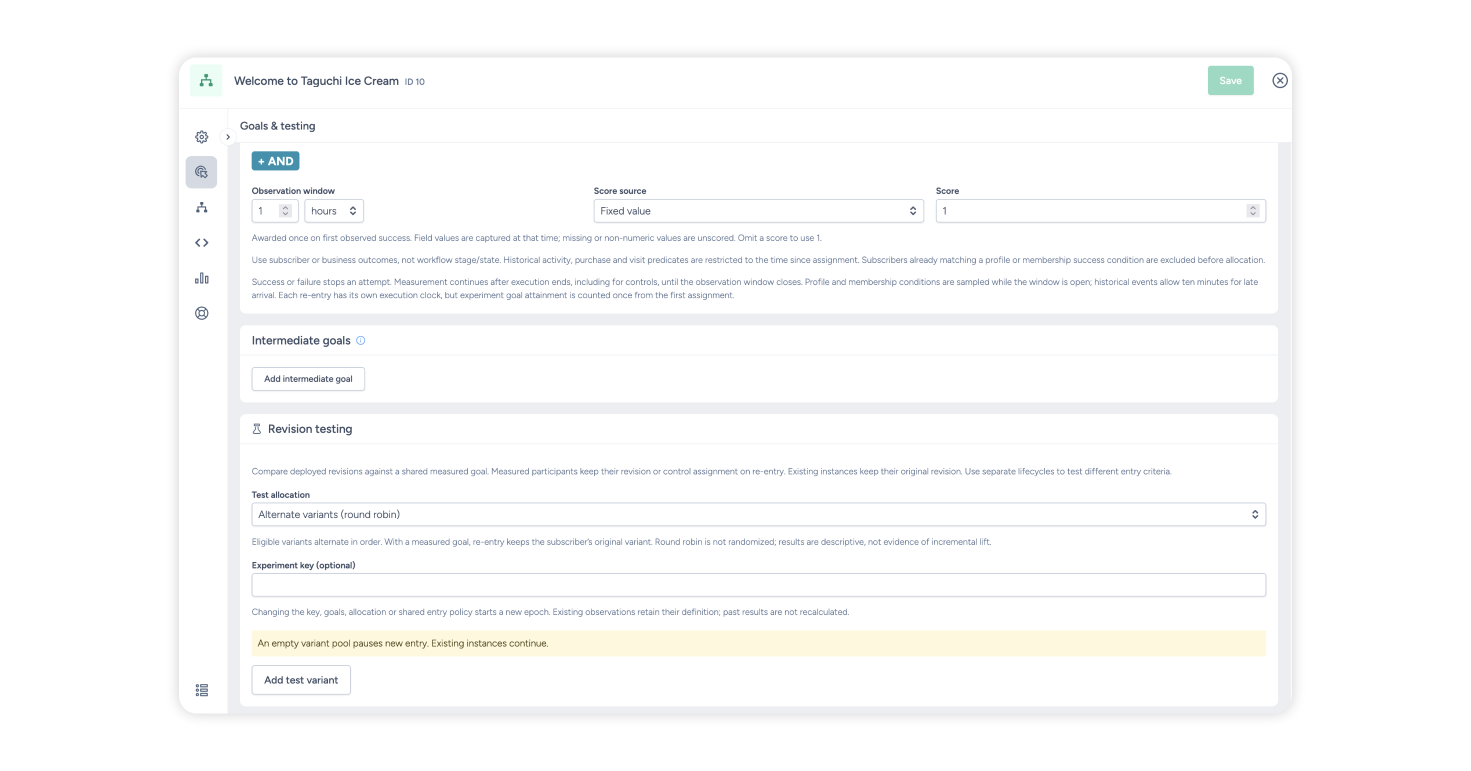
When a measured goal is configured, a weighted test can include a Control group weight. Control subscribers receive no actions from this lifecycle: no messages, rewards, profile or membership changes, or webhooks. Other campaigns and communications continue as normal.
Subscribers keep their measured revision or control assignment if they re-enter. Round robin is not randomised, so its comparisons are descriptive rather than evidence of incremental lift.
Changing the goal, shared settings, revision split or optional experiment key starts a new epoch, which is a separate reporting period that you can select in Reporting. Existing subscribers complete their original observation window using the settings they were assigned, and past results are not recalculated.
Understand lifecycle results
Open Reporting from the lifecycle or its … menu. Reporting has two views: Goals & testing for goal measurement and Workflow for execution statistics.
Goal and experiment results can include:
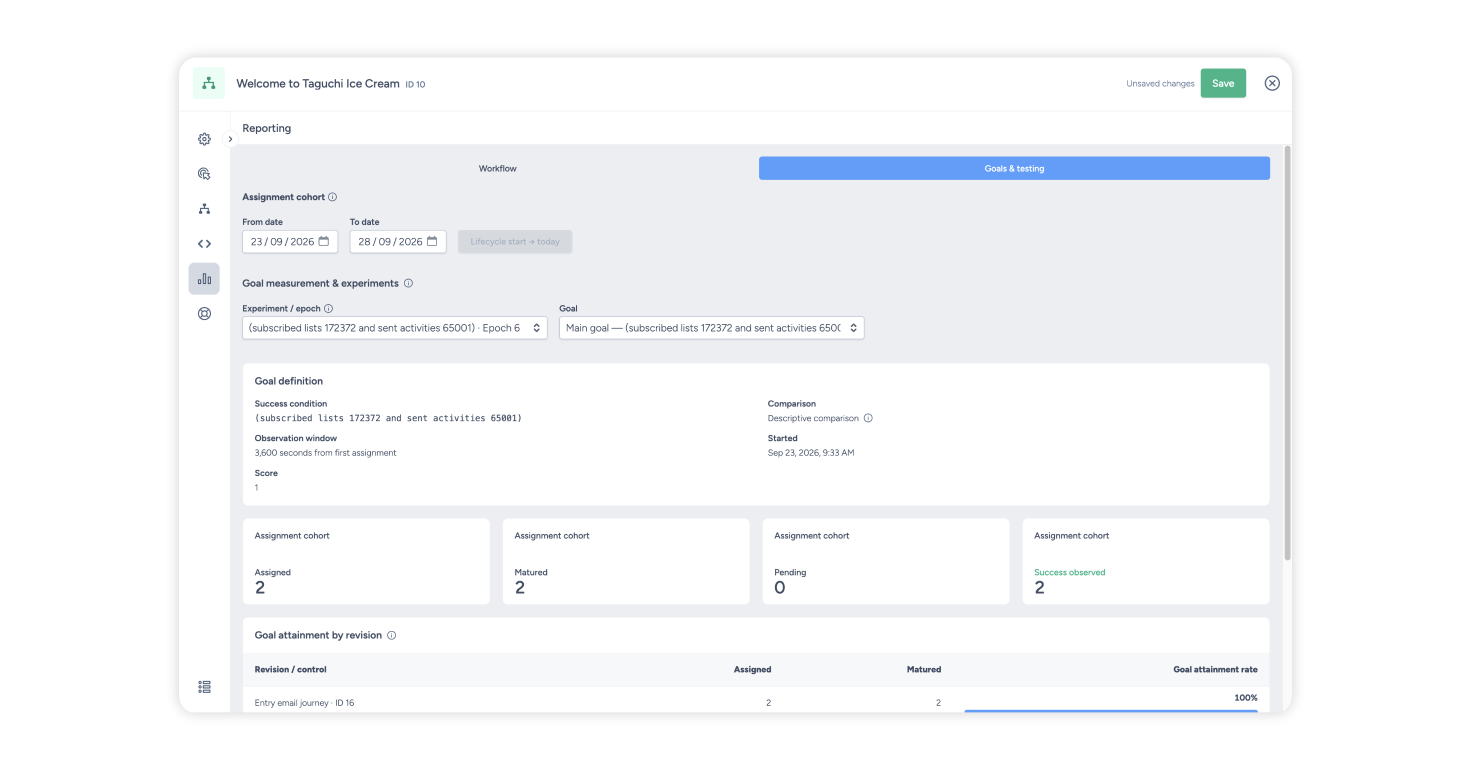
- Assigned subscribers who were included in the test.
- Pending subscribers whose observation window is still open.
- Matured subscribers whose observation window has ended.
- Success and failure observations.
- Goal attainment rate for subscribers whose observation window has ended.
- A 95% interval for the attainment rate and lift, shown only for randomised comparisons.
- Observed score totals, mature mean scores and unscored successes.
- Distribution or measurement warnings that should be investigated before comparing results.
Execution results include:
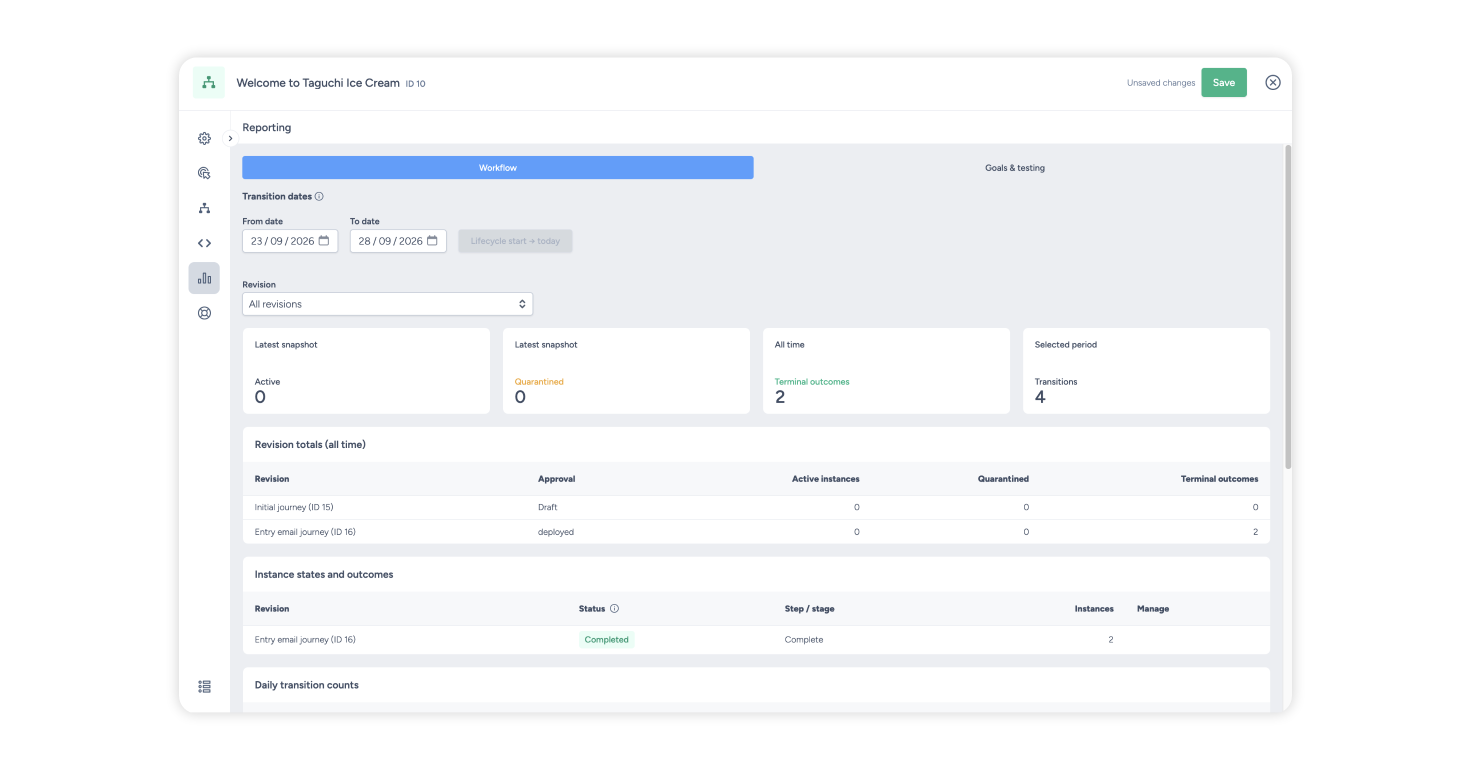
- Active subscriber journeys and completed or ended journeys by revision.
- Instance stages and statuses.
- Daily transition counts.
- Counts showing how often subscribers followed each path from a workflow step.
Use the date filters carefully. For goal measurement, dates select subscribers according to when they were assigned. For daily transitions and path counts, dates select when the journey activity occurred. Revision totals remain all-time.
Results are refreshed periodically, so recent activity can take up to an hour to appear. Transition and outlet counts show how many times subscribers passed along a path, not how many unique subscribers did.
The Participant path tracing section lets you search by subscriber ID and review the path they followed. Journey history is kept for a limited time, and a trace shows the subscriber's most recent journeys. Control-group subscribers do not have a journey path because the lifecycle performs no actions for them.
Do not select a winning revision while results are still pending or when Taguchi displays distribution or measurement warnings.
Stop or move active subscriber journeys
If a lifecycle needs an operational correction, users with Deploy Lifecycles permission can use the Remediation tab to stop selected active journeys, or to move active or quarantined journeys to a step in a deployed visual revision of the same lifecycle. A quarantined journey is one that Taguchi has paused after an execution error; it can be moved but not stopped. Remediation is intended for correcting in-progress journeys, not for routine editing.
- Open the lifecycle and select the Remediation tab.
- Under Action, choose Move selected instances or Stop selected instances, then choose the Source revision, Source step and Source status.
- Optionally add a Target expression to filter subscribers, and set Maximum instances to limit how many journeys are included.
- For a move, choose the Destination revision and the step under Enter at step. Fill in any missing values that the destination step requires.
- Enter a Reason for remediation. This is required and is shown in the operation history.
- Select Preview selection and review the number of journeys and subscribers, outstanding actions, and any items that cannot be processed.
- Only after reviewing the preview, select Confirm and run to apply the operation.
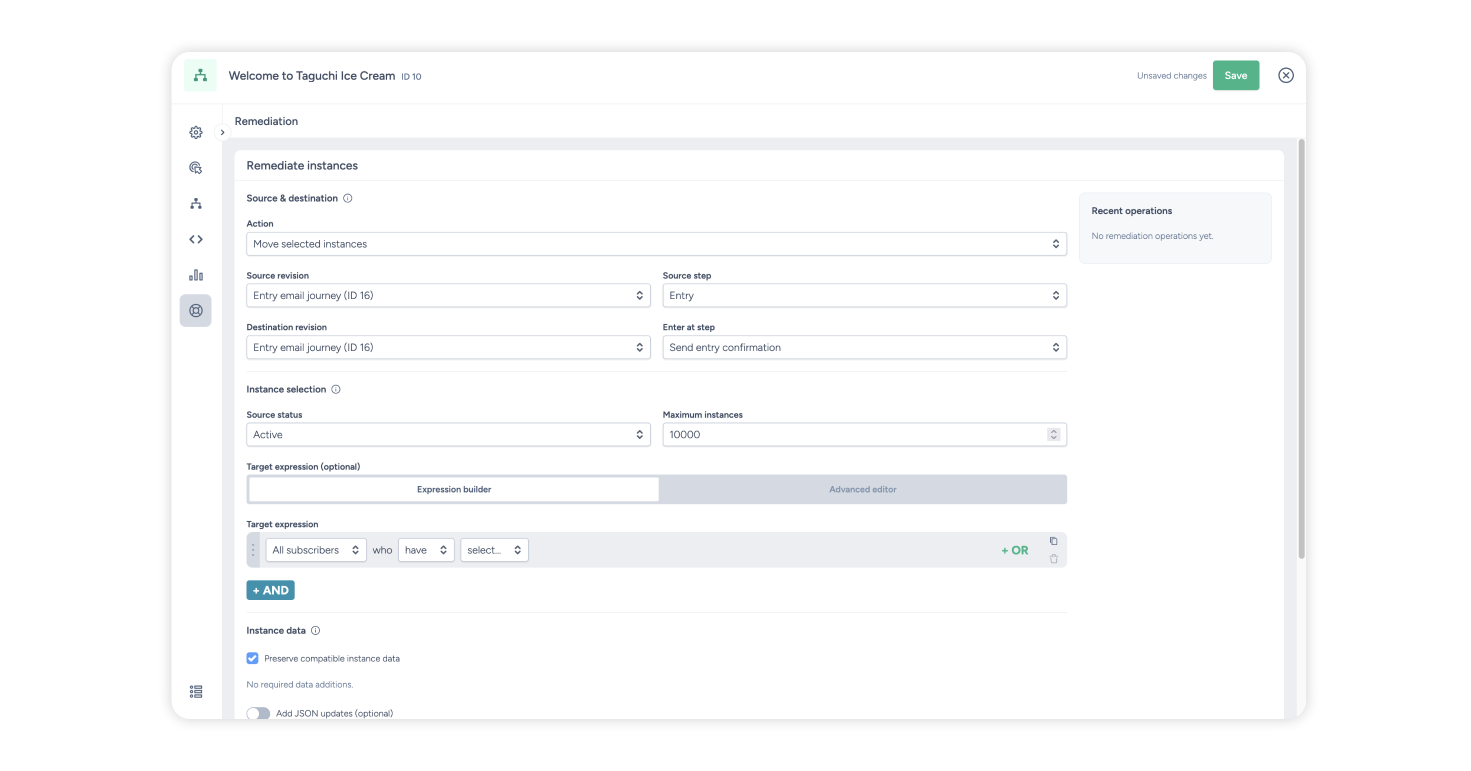
A move stops the original journey and starts a linked continuation at the selected destination. It does not rewrite the original journey's history. Messages or external requests that are already in progress cannot be recalled. A preview is a point-in-time selection: journeys that change before the operation starts are left unchanged. Completed moves and stops cannot be undone.
Use the Logs tab to review lifecycle changes, approvals and deployments, and Recent operations on the Remediation tab to review remediation operations. If you are unsure which subscribers to affect or where to move them, contact your organisation's administrator or Taguchi Support before starting a remediation.
Manage existing lifecycles
The Lifecycles page supports card and table views, search, sorting, pinned filters, tags and bulk actions.
Use a lifecycle's … menu to open Setup or Reporting. Users with Edit Lifecycles permission can also archive, restore or delete the lifecycle.
- Archive hides the lifecycle from the active list. It does not stop active journeys, new entries or scheduled runs.
- Restore returns an archived lifecycle to the active list.
- Delete stops the lifecycle completely: no new subscribers can enter, active journeys are ended shortly afterwards, and pending lifecycle work is cancelled. Messages and external requests that are already in progress cannot be recalled. A deleted lifecycle cannot be restored.
Before deleting a lifecycle, review its active journeys and any queued external actions, because deleting ends them. Archiving does not stop anything. To stop subscriber processing without deleting the lifecycle, pause new entries and use Remediation to stop active journeys.
Recommended pre-deployment checklist
Before deploying a lifecycle revision, confirm that:
- The entry trigger and target expression identify the intended subscribers.
- Re-entry, cooldown and maximum active instance settings prevent unwanted duplicate journeys.
- A global exit condition is configured where operationally required.
- Every activity and integration is deployed and belongs to the correct organisation.
- Activity-level target expressions have been removed from triggered send activities, with any required filtering added to the lifecycle send step.
- Every Failed path is connected, or is intentionally left to end the journey.
- Every event or audience wait has an appropriate deadline where the journey must not wait indefinitely.
- Goal conditions and observation windows represent genuine business outcomes, and the main goal's observation window is longer than the total of the workflow's waits.
- The main, alternate, failure and deadline paths have been tested with example data.
- Revision split and control-group weights are correct.
- Lifecycle notes explain dependencies, ownership and any follow-up actions.
If you have questions or need help setting up Lifecycles, please contact Taguchi Support for assistance.