- Support Home
- Knowledge Base
- Triggers And Automation
- Introduction To Triggers
- Custom Automated Triggers via Integration
Related articles
Need some help?
If you have questions or can't find what you're looking for, we're here to help.
Taguchi Support is available 24 hours a day, Monday to Friday.
Create New TicketTaguchi Certified Training
Join our free and live online training sessions. You'll benefit from a better understanding of the platform's features and functionality. Plus with Taguchi Certified Rewards, every session you attend, you're not just learning - you're earning your way to some fantastic rewards.
About Taguchi Certified RewardsAPI Version 5
Did you know Taguchi has an API that supports all of the functionality provided by the admin interface and more?
Explore API Documentation
Thanks for your feedback!
Custom Automated Triggers via Integration
Custom automated triggers let you run custom logic automatically based on your preferred subscriber activity (event).
For example, when a subscriber refers a friend, you can automatically apply a reward to the referrer.
For step-by-step setup, see Event - Trigger (JavaScript).
How custom automated triggers work
Through integrations, custom automated triggers listen for subscriber activity and execute your configured logic when matching events occur.
This gives you flexibility for advanced use cases where standard trigger options are not enough.
For a list of events(actions) that can be used as custom triggers, please see Event Types.
Security and permission boundaries
Custom automated triggers run in a secure, locked-down environment designed for safe automation.
To protect your data and contacts:
- Custom automated triggers can only affect existing subscribers.
- Each trigger is permission-controlled, so it can only perform the actions it has been explicitly allowed to perform.
If you need broader functionality, speak with Taguchi Support about the safest implementation approach for your use case.
Instructions
Create or edit an integration: Navigate to Settings, select Integrations, and create a new integration or edit an existing one.
Setup the Details section:
- Name: Provide a descriptive and unique name for your integration.
- Type: Select "Event: Trigger (JavaScript)" to run a custon login whenever a subscriber event occurs. If your goal is to send a Taguchi subscriber's event to another system, select "Event: Outgoing Webhook". For instructions, refer to Event - Outgoing Webhook.
- Tags: Provide a descriptive and unique tag for your integration.
- Inbound Webhook URL: The Inbound Webhook URL is a unique address generated for the integration. It may be used by a supported external system to send information into Taguchi. Setup your Webhook URL and place it here.
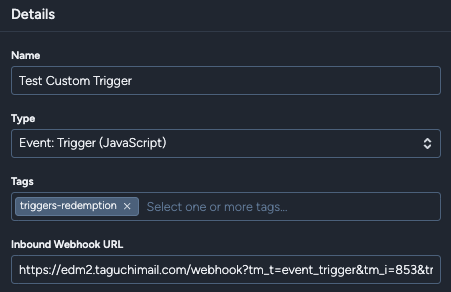
Setup the Configuration section:
- Event type: Use the dropdown to select an event that will run the trigger. For a list of events available, refer to Event Types.
- Target Expression: Applying a target expression will allow the trigger to only run for subscribers who meed the applied conditions. Leaving it blank will allow it to run for all subscribers who triggered the integration based on your Event Type.
- Trigger code: Enter JavaScript that defines main(subscriber, event, taguchi). This function contains the custom logic that will run when the selected event occurs.
- Trigger timeout: The trigger will stop if it exceeds the selected duration.
- Permissions: Select the actions required by the trigger.
- Update the current subscriber’s profile: Allows the trigger to update the subscriber associated with the event.
- Update other subscribers’ profiles: Allows the trigger to update another existing subscriber.
- Trigger an activity to the current subscriber: Allows the trigger to send a specified activity to the subscriber associated with the event.
- Trigger an activity to other subscribers: Allows the trigger to send a specified activity to another existing subscriber.
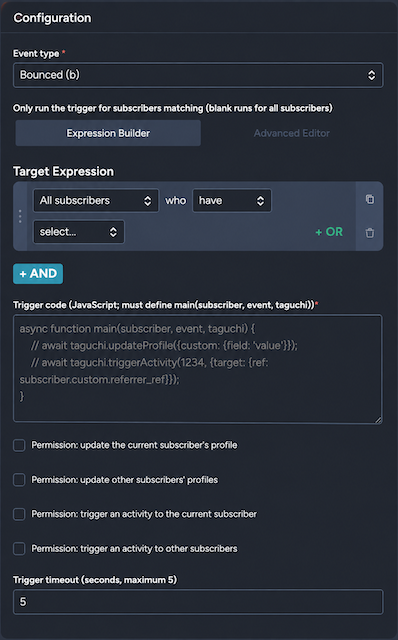
Review your setup and save afterwards. For testing, we recommend limiting the target expression to an existing test subscribers. Once satisfied with the test results, update the target expression to your preferred audience/subscribers afterwards.
If you are having trouble with this integration, please contact Taguchi Support for assistance.