- Support Home
- Knowledge Base
- Triggers And Automation
- Transaction And Operational
- Order Confirmation Trigger
Related articles
Need some help?
If you have questions or can't find what you're looking for, we're here for you.
Taguchi Support is available Monday to Friday, 9am - 5:30pm AEDT.
Create New TicketTaguchi Certified Training
Join our free and live online training sessions. You'll benefit from a better understanding of the platform's features and functionality. Plus with Taguchi Certified Rewards, every session you attend, you're not just learning - you're earning your way to some fantastic rewards.
About Taguchi Certified RewardsAPI Version 5
Did you know Taguchi has an API that supports all of the functionality provided by the admin interface and more?
Explore API Documentation
Thanks for your feedback!
Order Confirmation Trigger
Order confirmation triggers are designed to automatically send confirmation emails to customers after they complete a purchase. These triggers can be configured to include order details, purchased products, and personalized content to enhance the customer experience.
An order confirmation email is typically sent immediately after a customer successfully completes a purchase on your website or completes the checkout process. This article covers multiple methods of setting up order confirmation triggers in Taguchi.
Overview
There are several ways to trigger order confirmation emails in Taguchi:
- API Trigger - Use the Taguchi API to trigger emails in real-time after a purchase is completed
- Scheduled Trigger - Set up automated triggers based on time intervals and target expressions
- Event-Based Trigger - Trigger emails based on specific events such as list subscriptions or other activities
Choose the method that best fits your technical requirements and integration needs.
API Trigger
API triggers are ideal when you need real-time order confirmation emails that are tightly integrated with your e-commerce platform or checkout process.
Requirements
- Taguchi API (or optional wrapper)
- A website with shopping cart/e-commerce software
- Access to the Taguchi UI through acceptable user permissions OR an access token (contact Taguchi Support for token access)
Instructions
First, you need to pair the customer on your website with a subscriber profile within Taguchi. Usually the email address is the best primary key, so we will use it in this example. You can use other fields such as a phone number or external ID if you wish.
Step 1: Lookup a Subscriber
Using the subscriber resource, perform a GET (using the _method querystring) lookup for a subscriber matching the customer's email address.
https://<client-name>.taguchimail.com/admin/api/<organization-id>/subscriber/?auth=<username>|<password>&_accept=application/json&_content_type=application/json&_method=GET&query=email-eq-<email>
Replace the following variables within the URL above with appropriate data:
| Variable | Description |
|---|---|
<client-name> |
Your Taguchi client name (e.g. edm2). If you are unsure of your client name, contact Taguchi Support. |
<organization-id> |
A numerical organization ID. If you are unsure of your organization ID, contact Taguchi Support. |
<username><password> |
Replace these with a Taguchi user account details (with restricted permissions for API use), alternatively you can use a token to authenticate. |
<email> |
The customer email address to look up. |
If an email matches with a subscriber record, the subscribers profile fields will be returned:
[
   {
      "import_id": null,
      "cluster_id": null,
      "firstname": "Example",
      "extra": null,
      "lastname": "Person",
      "address2": null,
      "address3": null,
      "campaign_id": null,
      "lists": [
         {
            "import_id": null,
            "option": null,
            "timestamp": "2010-04-11T00:00:00",
            "campaign_id": null,
            "unsubscribed": null,
            "list_id": 5
         },
         {
            "import_id": null,
            "option": null,
            "timestamp": "2010-04-11T00:00:00",
            "campaign_id": null,
            "unsubscribed": "2010-04-12T00:00:00",
            "list_id": 6
         }
      ],
      "organization_id": 1,
      "phone": "0400312312",
      "suburb": null,
      "postcode": "3000",
      "address": null,
      "data": null,
      "id": 2,
      "custom_fields": [
         {
            "field": "examplekey",
            "data": "val"
         }
      ],
      "bounced": null,
      "title": "Mr",
      "dob": "1970-04-01",
      "user_class_id": 1,
      "state": null,
      "unsubscribed": null,
      "gender": "M",
      "country": "AU",
      "ref": null,
      "email": "person@example.org",
      "notifications": null
   }
]
With the response data, you have now identified that the customer is a valid subscriber within Taguchi. You can now use the id field to conduct the next step.
Step 2: Update Subscriber with Order Confirmation Data
Next, we will need to update the subscriber's profile with the order confirmation details (so we can automatically populate the email with the products within the customer's purchased order). We do this by adding/updating a custom field with some JSON data.
https://<client-name>.taguchimail.com/admin/api/<organization-id>/subscriber/<subscriber-id>?auth=<username>|<password>&_accept=application/json&_content_type=application/json&_method=PUT
Replace the following variables within the URL above with appropriate data:
| Variable | Description |
|---|---|
<client-name> |
Your Taguchi client name (e.g. edm2). If you are unsure of your client name, contact Taguchi Support. |
<organization-id> |
A numerical organization ID. If you are unsure of your organization ID, contact Taguchi Support. |
<username><password> |
Replace these with a Taguchi user account details (with restricted permissions for API use), alternatively you can use a token to authenticate. |
<subscriber-id> |
The subscriber ID obtained in Step 1: Lookup A Subscriber step above. |
The request data should contain the JSON data within a custom field:
[
  {
    "custom_fields": [
      {
        "field": "order_confirmation_data",
        "data": "{\"cart_url\":\"http://www.samplestore.com.au/cart\",\"products\":[{\"name\":\"Test Item #1\",\"image\":\"https://www.samplestore.com.au/images/products/ti1.jpg\",\"url\":\"https://www.samplestore.com.au/test-item-1\",\"price\":\"22.00\",\"ean\":\"600\"},{\"name\":\"Test Item #2\",\"image\":\"https://www.samplestore.com.au/images/products/ti2.jpg\",\"url\":\"https://www.samplestore.com.au/test-item-2\",\"price\":\"5.00\",\"ean\":\"500\"}]}"
      }
    ]
  }
]
This code will enable us to create or update a custom field named 'order_confirmation_data'.
If the subscriber record has been updated successfully, the subscribers profile fields will be returned with the newly updated values:
Note: The order_confirmation_data field contains nested JSON stored as an escaped string. While this appears as a long single-line value in the API response, you can format it with line breaks when constructing it in your code for better readability.
[
   {
      "import_id": null,
      "cluster_id": null,
      "firstname": "Example",
      "extra": null,
      "lastname": "Person",
      "address2": null,
      "address3": null,
      "campaign_id": null,
      "lists": [
         {
            "import_id": null,
            "option": null,
            "timestamp": "2010-04-11T00:00:00",
            "campaign_id": null,
            "unsubscribed": null,
            "list_id": 5
         },
         {
            "import_id": null,
            "option": null,
            "timestamp": "2010-04-11T00:00:00",
            "campaign_id": null,
            "unsubscribed": "2010-04-12T00:00:00",
            "list_id": 6
         }
      ],
      "organization_id": 1,
      "phone": "0400312312",
      "suburb": null,
      "postcode": "3000",
      "address": null,
      "data": null,
      "id": 2,
      "custom_fields": [
         {
            "field": "examplekey",
            "data": "val"
         },
         {
            "field": "order_confirmation_data",
            "data": "{\"cart_url\":\"http://www.samplestore.com.au/cart\",\"products\":[{\"name\":\"Test Item #1\",\"image\":\"https://www.samplestore.com.au/images/products/ti1.jpg\",\"url\":\"https://www.samplestore.com.au/test-item-1\",\"price\":\"22.00\",\"ean\":\"600\"},{\"name\":\"Test Item #2\",\"image\":\"https://www.samplestore.com.au/images/products/ti2.jpg\",\"url\":\"https://www.samplestore.com.au/test-item-2\",\"price\":\"5.00\",\"ean\":\"500\"}]}"
         }
      ],
      "bounced": null,
      "title": "Mr",
      "dob": "1970-04-01",
      "user_class_id": 1,
      "state": null,
      "unsubscribed": null,
      "gender": "M",
      "country": "AU",
      "ref": null,
      "email": "person@example.org",
      "notifications": null
   }
]
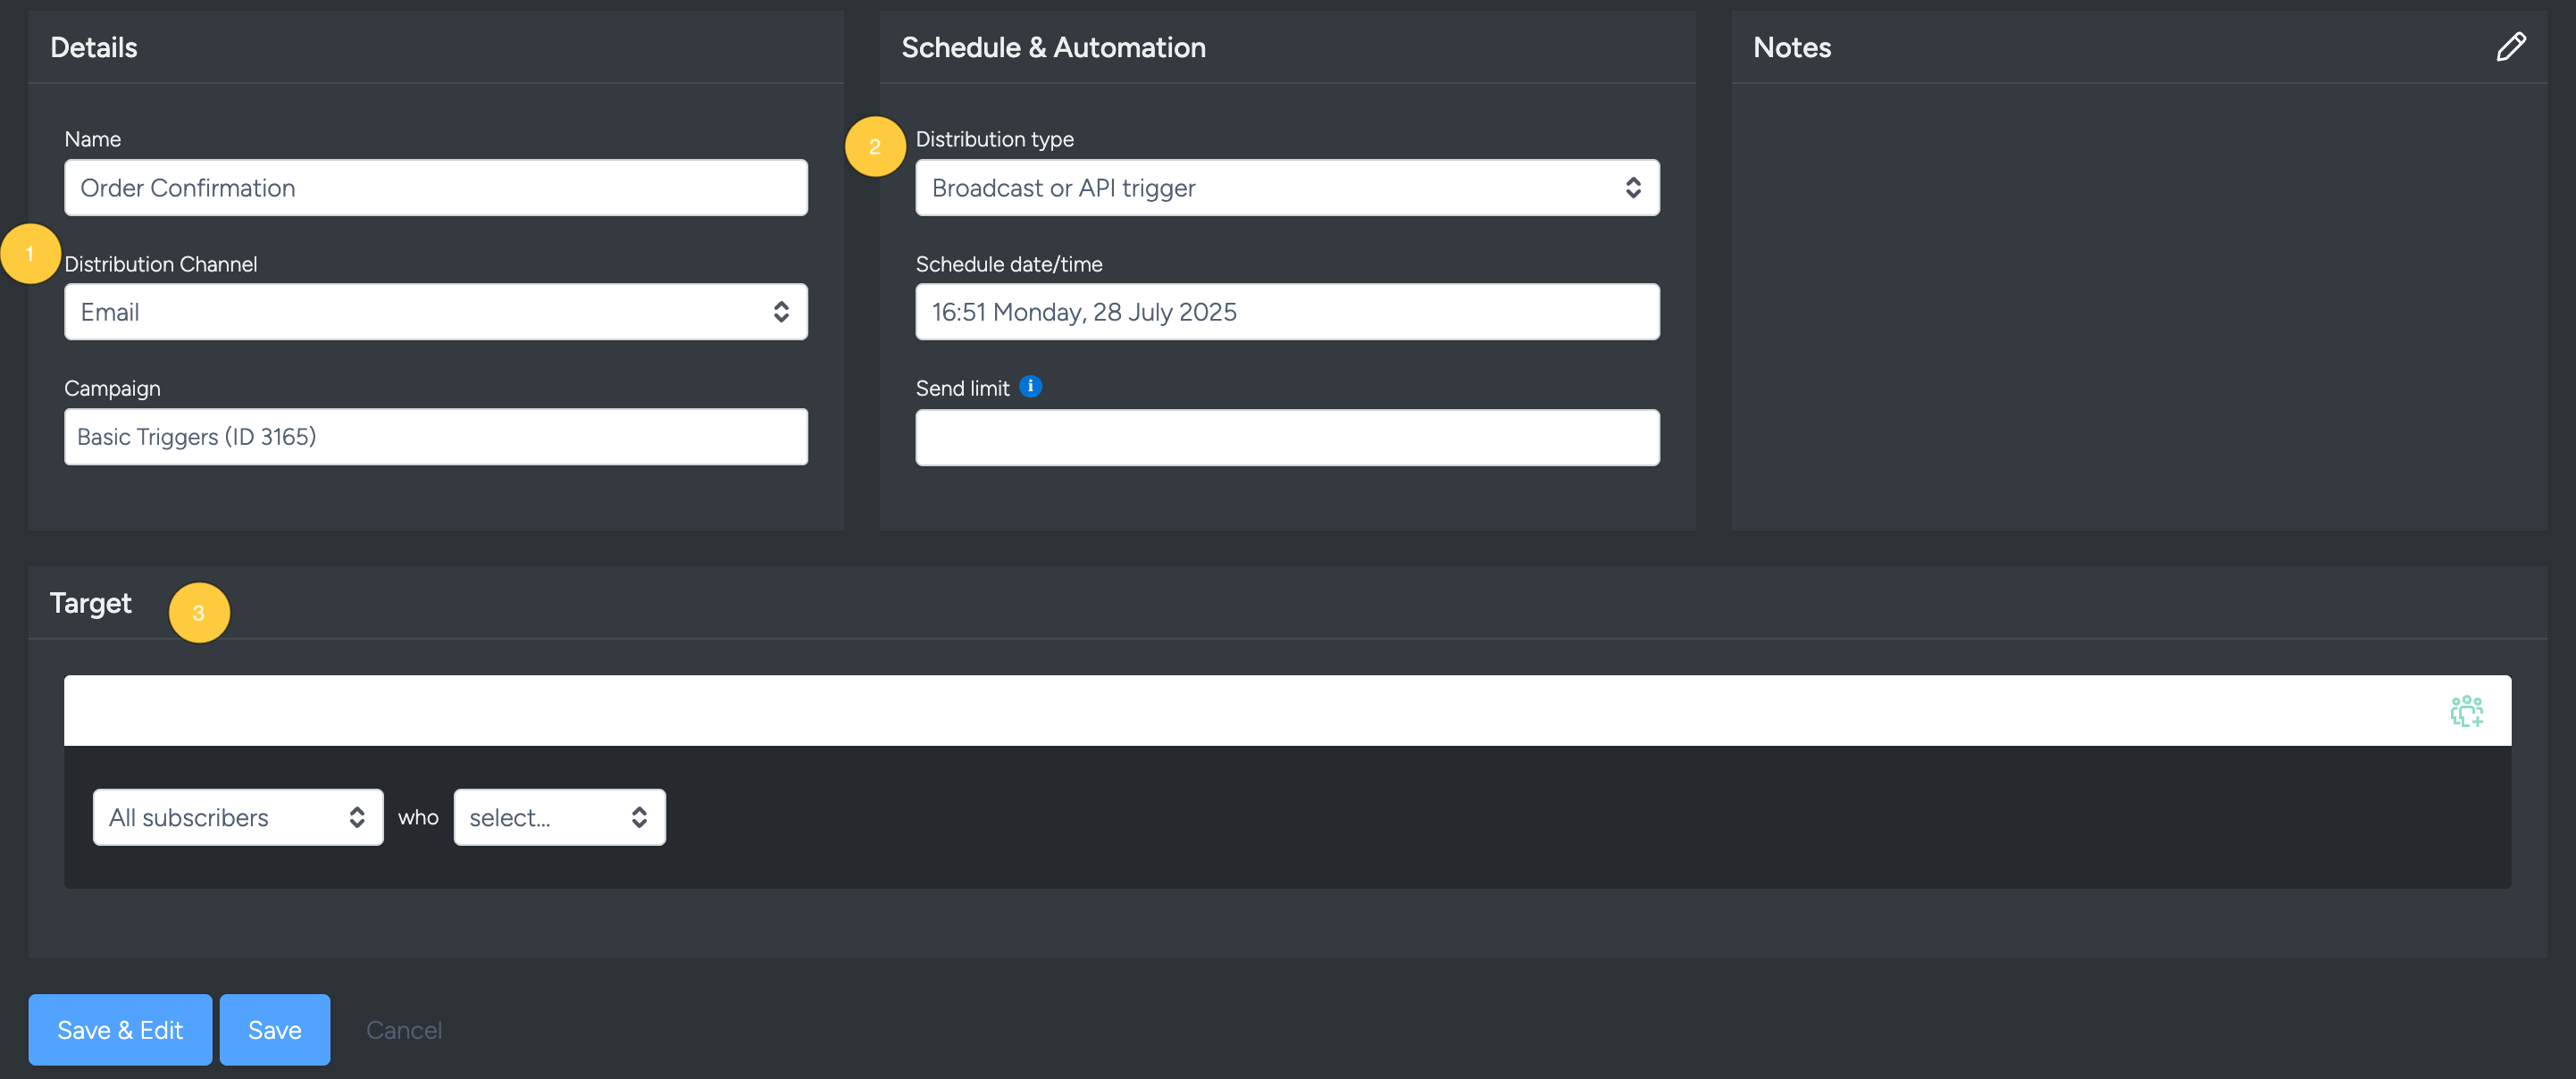
Step 3: Set-Up Trigger Activity in Taguchi UI
In order to trigger an email, we need to set up and deploy an email activity within the Taguchi UI. This activity will need to pull the custom field in order to display the order confirmation data.
To do this, simply create a new email activity.
Do be aware that since this is being triggered via the API, there is no target expression to be used for an Order Confirmation, as it will be automatic.
Next, we need to start populating some dynamic data (using our custom field containing JSON). There are two ways to do this.
The simplest way would be to use an existing block (e.g. article block) and display the cart items within that block using the following code:
{%
    var data = JSON.parse(recipient.custom.order_confirmation_data);
%}
This script just takes the custom field using recipient.custom.order_confirmation_data and parses it from a string to valid, workable JSON. You can then reference the JSON data included within the custom field using the data variable, like so:
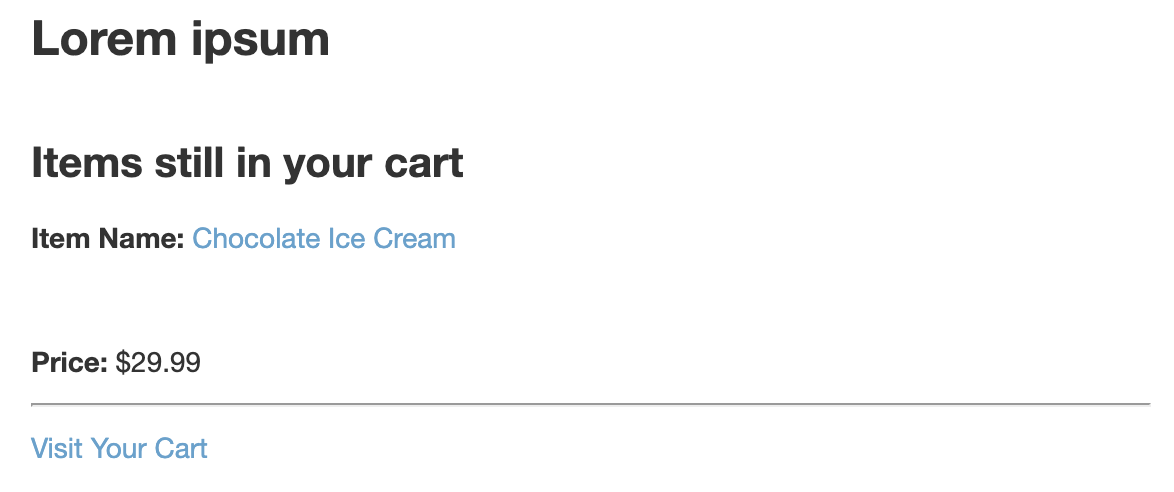
<h2>Order Placed!</h2>
{% Object.keys(data['products']).forEach(function (key) { var obj = data['products'][key]; %}
<p>
    <b>Item Name:</b> <a href="{%= obj['url'] %}">{%= obj['name'] %}</a>
</p>
<p>
    <img alt="{%= obj['name'] %}" src="{%= obj['image'] %}">
</p>
<p>
    <b>Price:</b> ${%= obj['price'] %}
</p>
{% }); %}
<hr />
Alternatively, the template you use can be modified to include an extra block which automatically pulls in the cart items from the subscribers custom field and displays them. The same code above can be used in the template.
If you do not manage your own templates within Taguchi, contact Taguchi Support to discuss further options in regards to template development work.
Once you are happy with the activity look and feel along with how the data will be displayed, you will need to approve and deploy. Ensure there is no target expression loaded into the activity before deploying, this activity will be triggered rather than broadcasted.
Step 4: Trigger The Activity
The activity will need to be sent to the customer/subscriber once the order confirmation data has been populated within their subscriber profile. To do this, we can utilise the activity resource with the method TRIGGER (using the _method querystring):
https://<client-name>.taguchimail.com/admin/api/<organization-id>/activity/<activity-id>?auth=<username>|<password>&_accept=application/json&_content_type=application/json&_method=TRIGGER
Replace the following variables within the URL above with appropriate data:
| Variable | Description |
|---|---|
<client-name> |
Your Taguchi client name (e.g. edm2). If you are unsure of your client name, contact Taguchi Support. |
<organization-id> |
A numerical organization ID. If you are unsure of your organization ID, contact Taguchi Support. |
<username><password> |
Replace these with a Taguchi user account details (with restricted permissions for API use), alternatively you can use a token to authenticate. |
<activity-id> |
The activity ID that will be triggered to the subscriber. |
The request data should contain the following fields to trigger the activity to the subscriber:
date: Date and time to trigger the email (YYYY-MM-DDTHH:MM:SS format)conditions: Array of subscriber ID(s) that will receive the triggered emailtest: Set to0for live send, or1if you wish to test the triggerrequest_content: Any additional content can be fed through to the request handler
[
    {
        "date": "2017-10-11T08:00:00",
        "conditions": [1234],
        "test": 0,
        "request_content": ""
    }
]
Alternatively you can set a target expression for more advanced handling:
date: Date and time to trigger the emailconditions: Object withexpressionproperty containing a target expression matching the send targettest: Set to1to enable testing mode, or0for live sendrequest_content: Any additional content can be fed through to the request handler
[
    {
        "date": "2017-10-11T08:00:00",
        "conditions": {"expression": "email = 'email@test.com' and not sent activity X last 7 days"},
        "test": 1,
        "request_content": ""
    }
]
The target expression included above will send to a subscriber matching the email 'email@test.com' who has not been sent activity X (replace with your activity ID) in the last 7 days. If the subscriber doesn't match the expression, they will not receive the triggered email. This would be useful for frequently returning customers, preventing an order confirmation email from being sent more than once within a week.
Upon successful completion of the request, you will see a 200 OK response. This is confirmation that the email has been successfully triggered. You can confirm this using the UI statistics for that activity.
Scheduled Trigger
Scheduled triggers allow you to automatically send order confirmation emails on a recurring schedule based on target expressions. This method is useful when you store order information in subscriber custom fields and want to process confirmations in batches.
How It Works
- Order data is stored in subscriber custom fields when a purchase is completed
- The trigger runs on a schedule (hourly, daily, weekly, or monthly)
- Target expressions identify subscribers who have completed orders and haven't received confirmation yet
- Emails are automatically sent to matching subscribers
Setup Instructions
Create an Email Activity: Follow the steps in How do I create a new email activity trigger
Design Your Email: Include the order confirmation content and use custom fields to display order data (similar to the API trigger method above)
Configure Distribution Type: In the activity Setup & Target page, select Scheduled trigger as the distribution type
Set Schedule: Choose when and how often the trigger should run (hourly, daily, weekly, or monthly)
Create Target Expression: Define which subscribers should receive the email. Example:
custom.order_confirmation_sent != 'true' and custom.order_confirmation_data is not nullThis targets subscribers who have order data but haven't been sent a confirmation yet.
Approve and Deploy: Once configured, approve and deploy the trigger
For more information about basic triggers, see Introduction to Basic Triggers.
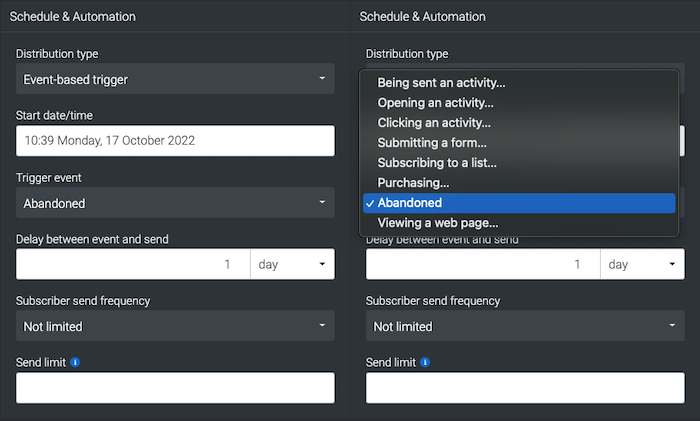
Event-Based Trigger
Event-based triggers send order confirmation emails automatically when a specific event occurs, such as when a subscriber is added to a specific list or when they are sent another activity.
How It Works
- Define a triggering event (e.g., subscriber added to "Recent Purchases" list)
- When the event occurs, the order confirmation email is automatically sent
- You can add delays between the event and the email send
- Set send frequency limits to prevent duplicate emails
Setup Instructions
Create an Email Activity: Follow the steps in How do I create a new email activity trigger
Design Your Email: Include the order confirmation content and use custom fields to display order data
Configure Distribution Type: In the activity Setup & Target page, select Event-based trigger as the distribution type
Select Trigger Event: Choose the event that will trigger the email:
- Subscriber added to list
- Subscriber sent an activity
- Subscriber subscribed
- Custom field updated
Set Timing: Configure any delay between the event and email send (e.g., immediate, or delay by hours/days)
Set Send Frequency: Define how often a subscriber can receive this email (e.g., once per day, once per week)
Add Target Expression (Optional): Further refine who receives the email based on subscriber data
Approve and Deploy: Once configured, approve and deploy the trigger
If you encounter any issues configuring this trigger for your organization, please contact Taguchi Support.