- Support Home
- Knowledge Base
- Getting Started
- How do I create a new email activity to trigger?
How do I create a new email activity to trigger?
To create and trigger a new email activity, these are the general steps you take. This is intended as a quick-start overview. Please see the relevant support categories for more information.
Step 1: Log In To Taguchi
Ensure you have logged in to Taguchi, if you do not know how to do this, please see the section 'How to Log In' in the v4 User Guide before attempting further steps.
Step 2: Create A New Campaign
If you have already created a campaign, skip to Step 3.
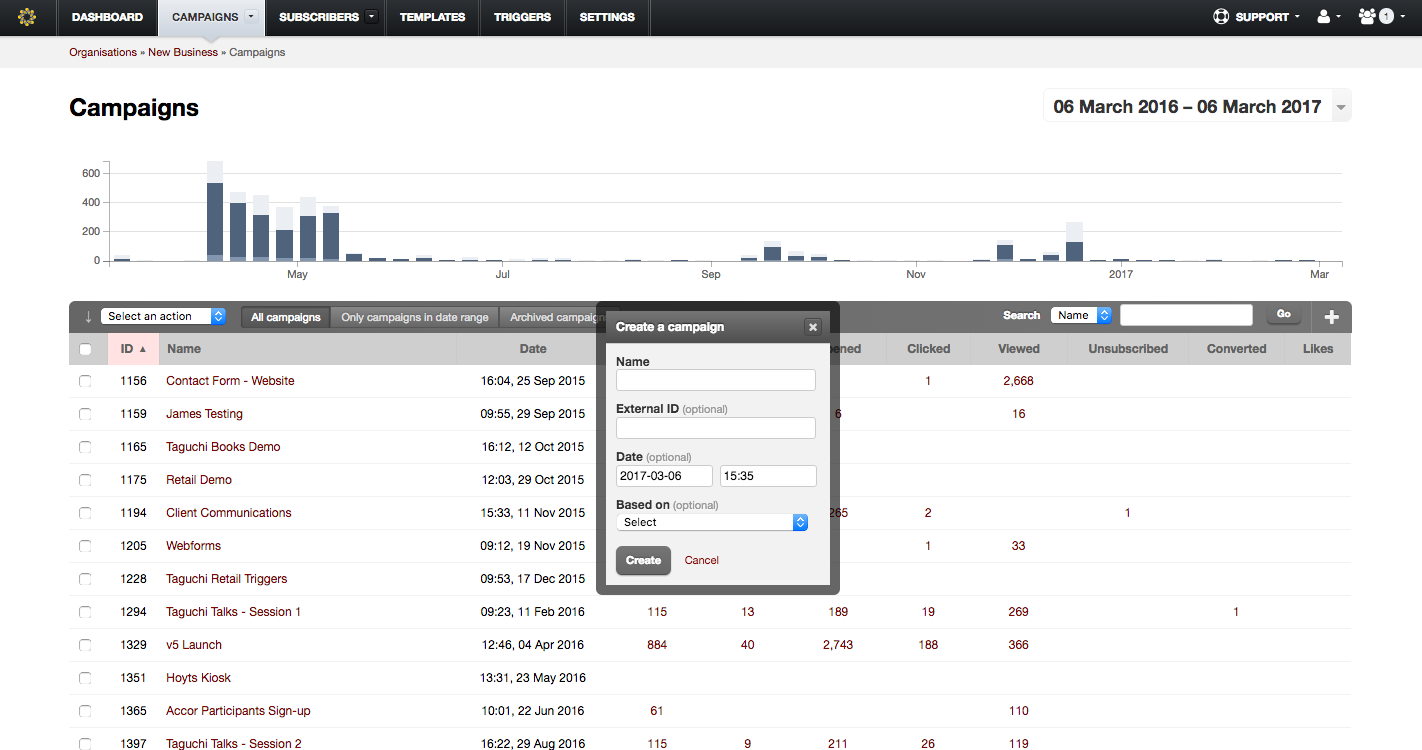
Navigate to your Campaigns tab and click the + button in the top right corner of the campaigns table. This will display a popup where you can enter in the campaign details:
- Name: Create a unique and useful campaign name (We recommend using a logical description, as well as any marketing reference codes, job number codes that will help identify the campaign in future e.g. J1257 Launch Campaign.)
- External ID: This is an optional field where you can add your own unique identifier for the campaign.
- Date: This is an optional field where you can change the date/time of the campaign.
- Based on: This is an optional field where you can base this new campaign off an existing campaign.
After you have entered the campaign details, click the Create button, you will be redirected to the newly created campaign folder.
Step 3: Create A New Activity
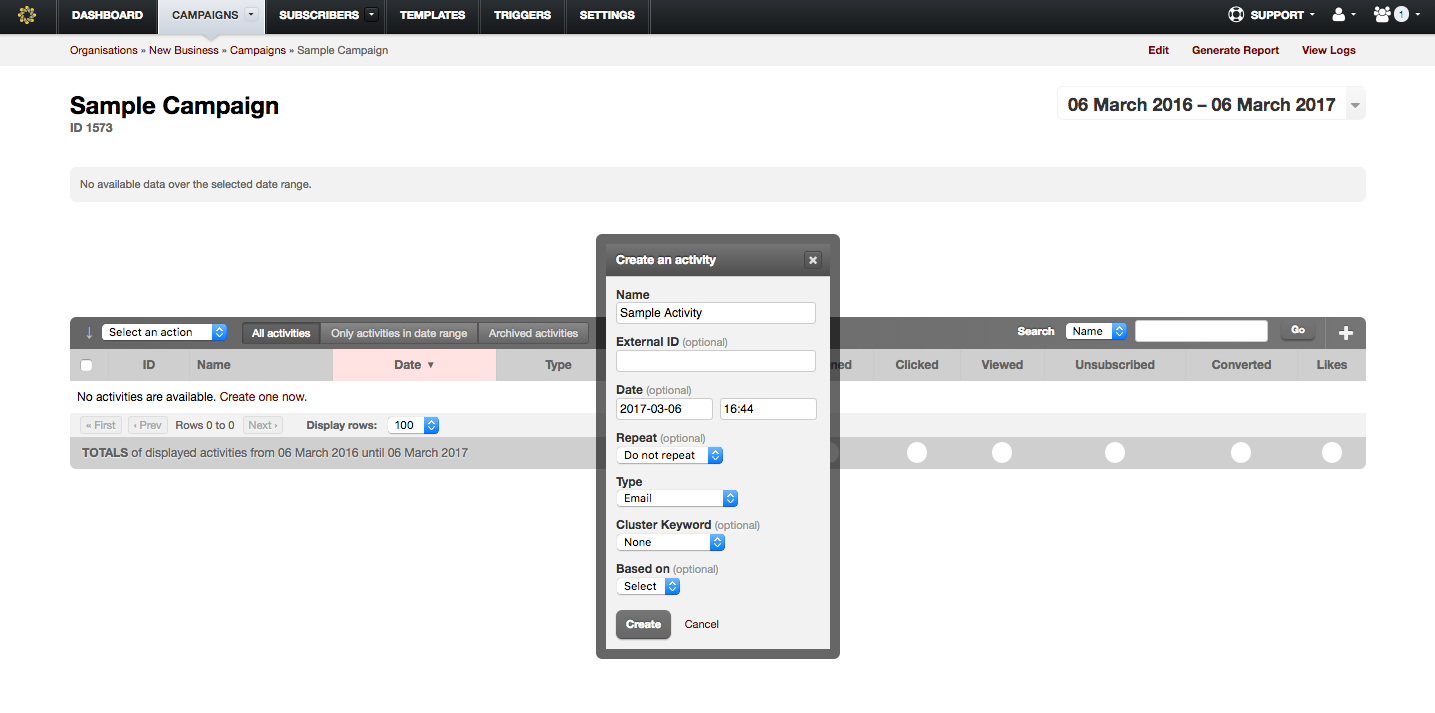
Once in your campaign folder, click the + button in the top right corner of the activities table. This will display a popup where you can enter your activity details:
- Name: Create a unique and useful activity name (We recommend using a logical description, as well as any marketing reference codes, job number codes that will help identify the activity in future e.g. REF-0981 Sale Activity.)
- External ID: This is an optional field where you can add your own unique identifier for the activity.
- Date: The date selector can be used to schedule the trigger day/time.
- Repeat: You can choose to repeat the activity trigger every hour, day or week.
- Type: The following types are: Email, Web Page and SMS. Select Email.
- Cluster Keyword: You can easily assign a cluster keyword to this activity using the dropdown. Cluster keywords are used to build a profile of an email recipient’s interests over time.
After you have entered the activity details, click the Create button, you will be redirected to the newly created blank activity.
Step 4: Select A Template
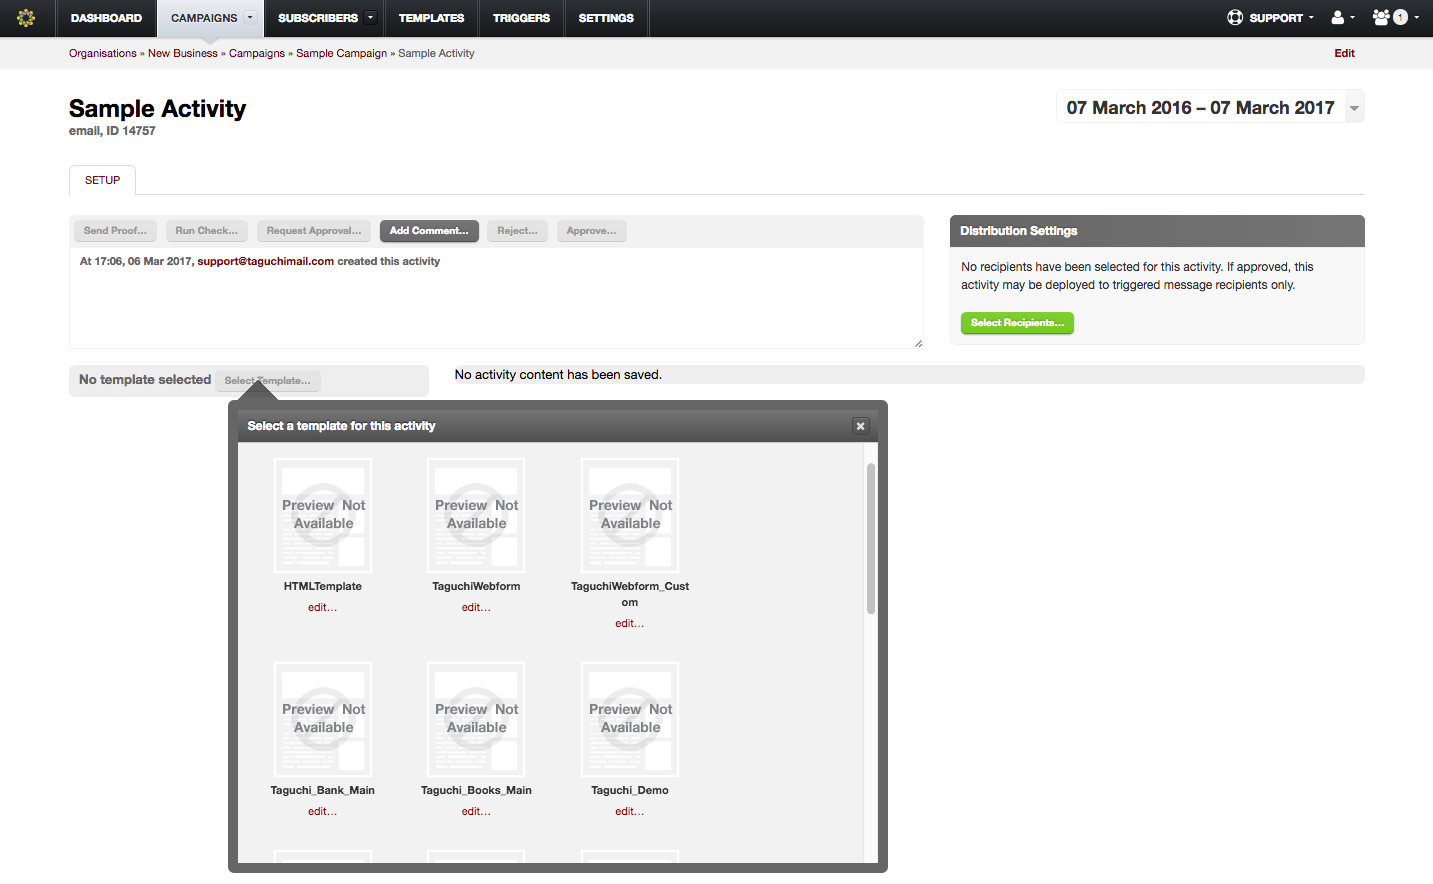
Click the green Select Template... button in the top right of the activity edit window and select a suitable template you wish to use for the activity. Once the template has loaded, you may begin populating the activity content.
Step 5: Edit The Activity Content
See the v4 User Guide on how to edit the subject lines, activity content and more.
Step 6: Set The Activity Target
If you wish to edit the activity details, schedule your triggers or broadcasts, add notes, or edit the activity subscriber targeting options, click the 'Setup & Target' link. A modal will appear where you can edit these settings. See 'Activity Targeting'.
Step 7: Proof The Activity
To preview the activity in your email client, you can send yourself a proof sample to your inbox. Simply click the Send Proof button at the top of the activity log section, select your user account in the popup modal, and click the Send Proof button. In a few minutes, you will receive a proof email in your inbox.
Step 8: Add Your Destination/Subscriber List
Next, you will need to define some subscribers you wish to send the email to. Click the green Select Recipients... button in the Distribution Settings window. In the popup, select one or more subscriber lists you wish to send the email to. If you wish to refine further, you may do so by clicking the Refine button in the lower right corner. You may also add a target expression under the Advanced tab at the top.
Step 9: Approve/Trigger Your Activity
When you are ready to trigger your activity, simply click the green Approve button at the top of the activity log section. Click the three checkboxes confirming the trigger, that the activity revision is correct and that the distribution settings are correct. After that, simply click Approve. Once your activity is approved, you will need to deploy it. Click the Trigger/Deploy button at the top of the screen and confirm the desired send rate.
Once your activity is deployed, you can see the activity send in real time. Results can be viewed under the Results tab within the activity.
Step 1: Log In To Taguchi
Ensure you have logged in to Taguchi, if you do not know how to do this, please see the section 'How to Log In' in the v5 User Guide before attempting further steps.
Step 2: Create A New Campaign
If you have already created a campaign, skip to Step 3.
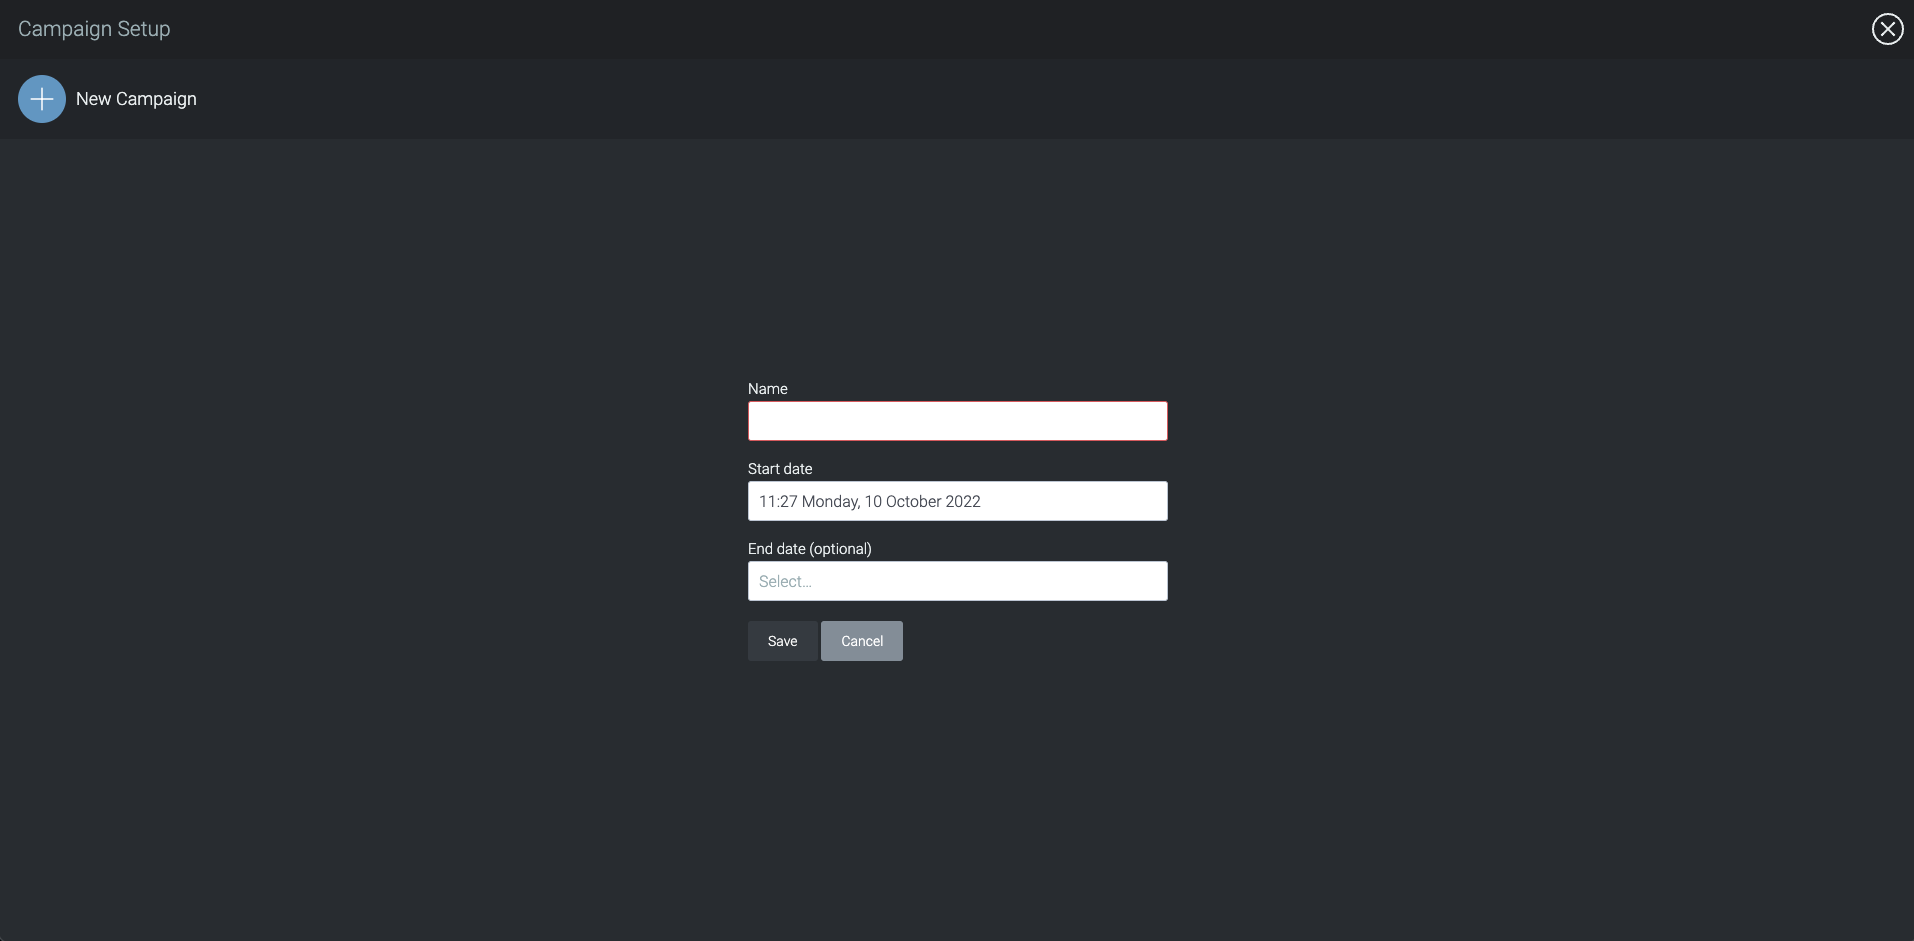
Navigate to your Campaigns tab and click the New Campaign button at the right hand side of the screen. This will open a new page where you can enter in the campaign details:
- Name: Create a unique and useful campaign name (We recommend using a logical description, as well as any marketing reference codes, job number codes that will help identify the campaign in future e.g. J1257 Launch Campaign.)
- Start Date: This is a field where you can configure the start date/time of the campaign.
- End Date: This is a field where you can configure the end date/time of the campaign.
After you have entered the campaign details, click the Save button, you will be redirected to the newly created campaign folder.
Step 3: Create A New Activity
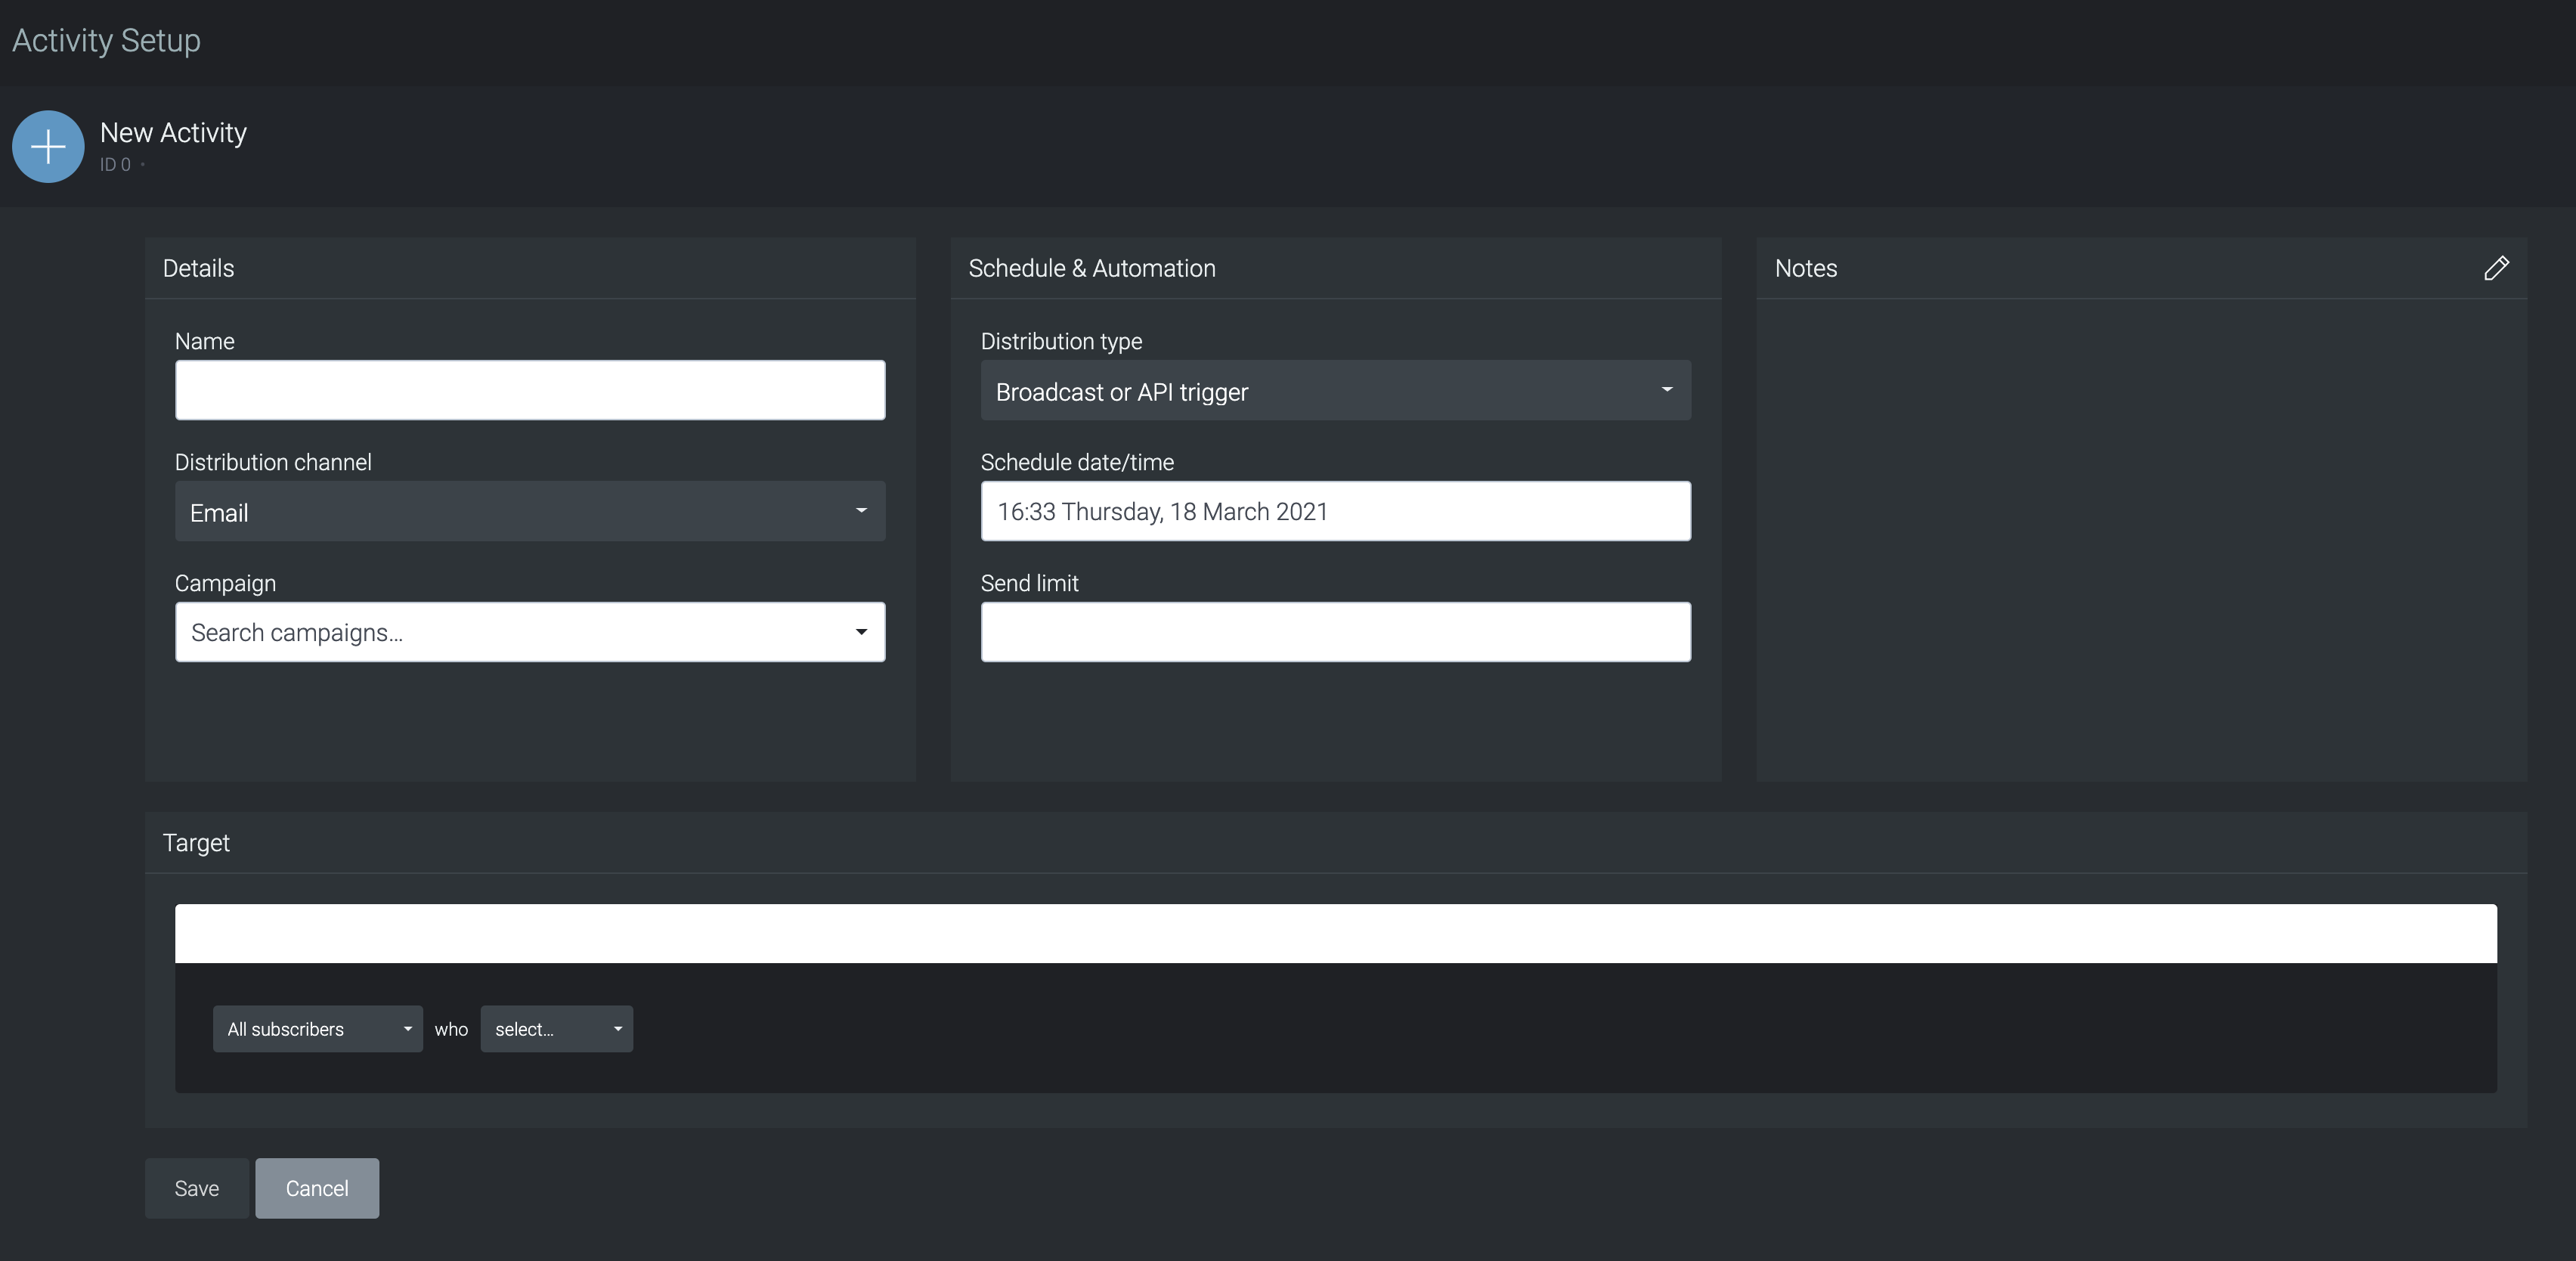
Once in your campaign folder, click the New Activity button at the right hand side of the screen. This will open a new page where you can enter in the activity details:
- Name: When selecting a name, we recommend using a logical eDM description. This can be followed by the broadcast date or reference job number.
- Distribution channel: The distribution channel can be: Email, SMS and Web, Display Ad.
- Campaign: The campaign name where the activity is located.
- Distribution type:
- Select the distribution type for your activity
- If Broadcast or API trigger is selected, add a schedule date and time for the activity to be deployed
- If Scheduled trigger is selected, add a start date and time for the activity to be deployed. Select a trigger interval; hourly, daily, weekly, or monthly and a subscriber send frequency.
- If Event-based trigger is selected, add a start date and time for the activity to be deployed. Select a trigger event e.g. being sent an activity, select the activity, and a time delay between event and send and a subscriber send frequency.
- Notes: Add relevant notes about your activity.
- Target: See 'Activity Targeting'
Step 4: Edit The Activity Content
See the V5 User Guide on how to edit the subject lines, activity content and more.
Step 5: Set The Activity Target
If you wish to edit the activity details, schedule your triggers or broadcasts, add notes, or edit the activity subscriber targeting options, click the 'Setup & Target' link. A modal will appear where you can edit these settings. See 'Activity Targeting'.
Step 6: Proof The Activity
To preview the activity in your email client, you can send yourself a proof sample to your inbox. Simply click the Send Proof... button at the top of the activity, select your user account in the popup modal, and click the Send Proof... button. In a few minutes, you will receive a proof email in your inbox. For more information, see Email Proofs.
Step 7: Schedule Trigger and Target Expression
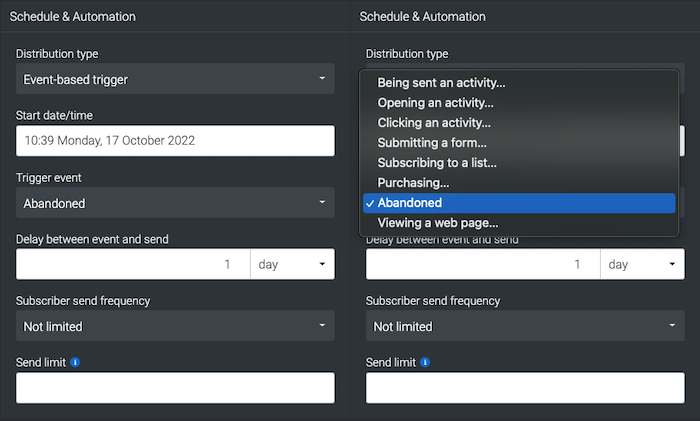
Now you can setup the activity trigger and add your targeting options. First, click the 'Setup & Target' link. This opens up the activity setup page. Under Schedule & Automation choose your trigger type in the Distribution type drop down menu. You can choose either:
Schedule trigger: This is a basic trigger that enables you to automate the sending of an activity in cycles using the powerful target expression engine. Refer to this article on how to setup basic triggers.
Event-based trigger: This trigger schedules sends after a specific event has occured. To setup choose Event-based trigger in the distribution type. Enter your desired start date/time. Select which event you want to trigger your activity in the Trigger event drop down. If the event chosen requires further information, you will be prompted to enter this directly below. You can also setup a delay between the event and send (this is set to 1 day by default), send frequency and send limit.
Now you can setup your target expression, see 'Activity Targeting'.
Step 8: Run an Activity Check
This is an important step. For more information about running activity checks, see the following documenation:
When you are satisfied that everything is set up and the activity is ready to send, you should run an activity check to verify the content of your activity. Click on the Run Activity Check... button in the top left area of the activity.
Step 9: Approve & Trigger Your Activity
When you are ready to trigger your activity, select the green Approve button at the top right hand area of the screen. Check the three checkboxes confirming the trigger, that the activity revision is correct and that the distribution settings are correct. After that, simply click Approve. Once your activity is approved, you will need to deploy it. Click the Schedule trigger... button at the top of the screen and confirm the desired send rate using the 'throttle' and click schedule email.

Once your activity is deployed, you can see the activity send in real time. Results can be viewed by clicking on the View Report link located at the top of the activity.

